Microsoft Teams Popular Tips and Tricks for the Experts

300,000 organizations and 115 million active daily users are on Microsoft Teams every day. If you're one of them, you need to learn the power user moves to get the most from the software!
You can think of Microsoft Teams as being like a social media platform but for business.
It's organized into teams of invited people who get to chat, share documents, and join real time voice and video conferencing. The platform organizes all of the materials that go with them. You can create any number of channels (the places where you chat and share files) for your team members.
Microsoft Teams has become so popular due in large part to its inclusion with Microsoft 365. At no extra cost, you get a messaging app that allow you to create and integrate with over 600 apps, including the entire Microsoft Office suite.
Even without M365, signing up for a free account gets you unlimited chat messages and search, audio and video calling for individuals and groups (capped at 60 minutes per session), 10 GB of team file storage, and 2 GB per person of individual storage.
Microsoft Teams Tips and Tricks

1. Use Keyboard Shortcuts
The first of our tips and tricks is keyboard shortcuts to speed up the most common tasks. It can take a while before you feel like you know your way around these essentials, but being able to call up a list of them quickly is half the battle.
Here are some essential keyboard shortcuts to get you started:
- Go to Search: Ctrl + E
- Turn your camera off: Ctrl+Shift+O
- Mute yourself: Ctrl+Shift+M
- Background blur: Ctrl+Shift+P
- Zoom: Ctrl+= to zoom in or Ctrl+- to zoom out
- Go to your files: Ctrl+6
2. Search Through Your Conversations
Search will become an indispensable feature as you produce more and more content and start to forget where you put those work projects!

To use this one, type in what you want to search for and hit Enter. The search results will appear in the pane on the left. Switch between People and Files by clicking on the tabs. This will cover group messages and individuals.
Sometimes you need more than just simple search, which is where integrated Keyword Query Language (KQL) for more advanced searches in messages comes in handy.
Here are the keywords that Teams supports to boost your searching power (remember not to add a space between the colon and the search terms):
“From:” then enter the person’s name
“In:” then enter the channel or group chat name
“Subject:” the keyword from a message or a subject line
“Sent:” the date the message was sent
3. Send and Filter Messages Using @mention
Microsoft Teams is all about helping you stay connected with your colleagues, which is why it includes an easy way to find them when you need to send a message.
Just type the @ symbol into the search bar to find the name you are looking for and no matter what corner of the platform you're currently in you will be able to message them directly.
You can also use @mentions to filter recent activity and prioritize messages meant for you. You can find @mentions by clicking the Filter button and selecting it from the drop-down menu while you’re in the Activity feed.
4. Avoid Being Disturbed
Sometimes you might just want to filter out the distractions so you can give your full attention to the chat at hand, with no worry of being disturbed by alerts.
To do this just select your profile picture (top right corner) then select the Notifications tab to change the type and frequency of your alerts.


5. Make Your Chats Searchable
Channels can carry thousands of threaded conversations. Luckily, Microsoft Teams makes it easy for you to tag your chats with memorable, more searchable titles so you can easily find your way back to them in the future should the need arise.
Select the pencil next to the member names at the top and type in a title that relates to the content of the chat and includes a word or phrase that will help you find it again.
6. Get a Better Background
One of the best Microsoft Teams tricks is to hide your background.
There are two ways you can do this, either with blurring or a stock image. When you join a meeting, click on the audio and video settings screen, then select the ellipsis (...) then Blur my background.
For a custom background, launch video chat and click the ellipsis to bring up a menu. Select Show background effects to see a sidebar with some nice-looking background images.
7. Use GIFs to Build Cultures
Company culture is an important building block of success. GIFs and custom reactions may seem superficial, but they can help staff to feel a greater sense of belonging, which is important at a time when remote working has kept them apart.
Just select the GIF button below your Type a new message box and enter a keyword to find loads of GIFs.
8. Translation of Teams Messages
Microsoft has included an easy way of translating messages. Just hover your cursor over the foreign-language message, click on the ellipsis (...) and then select Translate.
Microsoft Teams also includes translation for video calls. From the Translate to menu you can add captions to share content in up to 6 languages. Anyone attending can turn on live captions by clicking Subtitles On in the lower right hand corner of their screen.
You can now translate messages to your base language in Microsoft Teams on a message by message basis. In this example, the original message is in French.
Simply click the ‘…’ and choose ‘Translate’

Et Voila – (Sorry, couldn’t resist)

You can set it back to show the original language via the same menu. A great feature – I think you will agree.
NB: If you do not see this option, then talk to your IT admin, as they may need to turn it on for you to access it.
9. Use SharePoint
SharePoint, the Microsoft platform for securing and sharing files, is already integrated into Microsoft Teams.
Clicking on the Files tab lets you share files with other Team members using SharePoint. If a file has been shared to a Channel then people on your team can use Office Online or one of its desktop apps to collaborate on it.
10. Email Forwarding to a Channel
Email may have fallen out of fashion, but email still exists and lots of people use it every day. For that reason, Microsoft has made it easy for you to forward an email to any Microsoft Teams channel you like.
To do this, look for the ellipsis next to the channel name and click on Get email address. Doing this creates an email address for the channel that you can now use to mail anything directly. It’s a handy way of making it even more accessible.
11. Urgent Chat Notifications
This is the digital equivalent of banging loudly on an office door! To send an Urgent Message Notification, look below the text compose box and you’ll be able to check Urgent or Important to add either of these words to the message and grab the recipient’s attention.
Mark a message as urgent and once you’ve sent it they’ll get it every two minutes for the following 20 minutes, which should make it hard to ignore.
12. There Are Mobile Versions Too
Microsoft Teams isn’t just the web app. It also comes in Android, iOS and Windows Mobile flavors.
Not every feature would work on smaller screens of course, so these apps stick to the basics of team chats and channels, which is what you want most when you’re on the move.
13. Save a Message for Later
You can’t do everything at once, and sometimes you need to come back to a message later to give it your full attention.

Just hover over any message and click the ellipsis (…), then click Save this message. To view saved messages type /Saved in the search box followed by Enter. They will appear in the left pane. From here you can also unsave messages via the bookmark icon that appears in the top right of each message.
14. Invite Everyone to a Team
Microsoft Teams makes it easy to send messages to everyone in your organization. To add them to a team just:
1. Visit your Teams list.
2. Click on Join or create a team (bottom left corner)
3. Click on Create a team.
4. Click on Build a team from scratch.
5. Click on Org-wide.
6. Type your team name and click Create.
This team now includes everyone—apart from guest users—and when you add or remove users from Microsoft 365 their presence in Microsoft Teams will be updated accordingly too.
15. Conduct Polls
Asking a lot of people for their opinion on something is tedious, but polling them is a breeze.
Just click the Forms icon under the message box to create and send a poll in Microsoft Teams. You can then create your poll. Type your question and the answer choices.
To allow multiple answers click on the Multiple answers toggle. There are also check boxes for Share results automatically after voting and Keep responses anonymous. Check you're happy with it, click Send and watch the results roll in.
16. Ask T-bot for Help
T-Bot is Microsoft Teams’ dedicated help robot.
Click Chat and you’ll see T-Bot. Click on it and you can start typing questions (or just keywords) to get instant answers. If you just want to browse you’ll also find answers under the Help, FAQs, Videos, and What’s New tabs.

and 2 GB per person of individual storage.
17. Chats in Breakout rooms

Please note:
- Only a meeting organiser can move freely between multiple breakout rooms
- You must be using the desktop version of Teams – not the web app – to organise breakout rooms; however, attendees can use the web app / mobile app to take part in breakout rooms
- Attendees can present in breakout rooms by default
- You can rename your breakout room by selecting the ‘…’ by the room’s name
- In each breakout room you can record, chat, and share content just like a regular team meeting
- Breakout rooms become part of the original meeting and remain in place for further use, if required
- A room must have attendees assigned for it to open
- You can start breakout rooms individually, or all at once
- If a guest selects Rejoin while in a breakout room, they will leave that room and the original meeting; in order to rejoin the original meeting they must click on the link which they were initially sent
18. Announcement within a Channel
Another great way to catch your user’s attention is an Announcement. Which, if used in conjunction with posting to multiple channels, can be really powerful.
To start, go to the conversations tab of the channel you want to start from. In the Start new conversation box at the bottom, click the format button, the ‘A’ with a pencil next to it.
This time in the top left, select the down arrow next to ‘New conversation’ and choose ‘Announcement,’ as shown below:

As I mentioned above, you can then choose to post this to multiple channels as well, giving you a great way to communicate that important announcement across many channels and teams. Once posted, the message will appear in each of the channels selected and will have a little red icon on the right-hand side, from that point onwards though they are separate conversations. With an @General mention in the message, it is a great way of getting an announcement across a number of teams quickly.
19. Post a message to multiple Channels at once
A cool function if you have information or an announcement that needs to be shared across multiple teams and channels.
Go to the conversations tab of the channel you want to start from. In the Start new conversation box at the bottom, click the format button, the ‘A’ with a pencil next to it.
Then in the top of the window, you can select ‘Post in multiple channels’ as you can see below:

20. Get Planner Notifications in your Teams Team
In your Teams Channel, you can organize your tasks by adding one or more Planner tabs. You can then work on your plan from within Teams or in Planner for web, remove or delete your plan, and get notified in Teams when a task is assigned to you in Planner.
What does this mean?
Team members of a team with a Planner tab will receive a Teams notification when a Planner task is assigned to them by another person. This provides a fantastic way to manage and assign tasks with your team, all within the Teams workspace.
The Teams notification appears in the Teams Activity Feed and in Chat. It contains the task title, who assigned you the task, the plan the task belongs to, and a link to open the task details in Teams. You can see a record of past Teams notifications in the chat conversation with Planner.
The alerts and functionality can be enabled or disabled both at the individual and admin level.
21. How to change the display order of your Channels.
As the number of channels within your team grows, you may realise one day, maybe for efficiency of use or Logical layout, that you would like to change the order of your channels.
Well, you cannot as such change or fix the order of your channels, and the General Channel is always fixed at the top no matter what. However, it is worth noting that the channels display order is alphabetical or to be more accurate alphanumerical order.
If you have the following set of Channels you want to re-order, you could give them different names to get a better order:

Or, an easier option would be to give numbers to your Channel names:
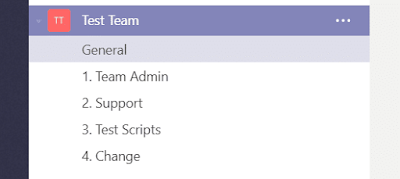
There you have it, your teams nicely ordered how you want them.
Note: There is, however, one thing to be aware of; renaming the Channel retrospectively in this way does not rename the SharePoint folder.
22. Send or Forward an Email into a Teams Channel
Now it might sound a little odd that the new way we all talk can get a message from the old way we all used to talk. However, emails are still widely used, and this flexibility with Teams provides some great uses, in particular when dealing with larger teams.
This is a great way to get an announcement, news, or information in front of your team quickly. You may send the message to their email addresses as well, however as people are moving increasingly towards managing their day-to-day work and communications within Teams, sending a message in this way is likely to get the highest (and probably fastest) read rate.
All you need to do is click the three dots ‘…’ against the channel and select ‘Get email address’. You can then copy the address and use it in your emails as you would any other.

When a message is sent to the channel, it will appear as a conversation on that channel.

23. Secret Teams Developer Menu from the System Tray

However, there is a menu that can be accessed from here that has all sorts of goodies on it for the Developers amongst you. Now don’t laugh when I tell you the secret handshake, I promise it works. All you have to do is double click the icon, then right-click all in quick succession.
If it doesn’t work the first time, keep trying as it often takes 2 or 3 goes.

This Menu gives you access to various tools to help with your work with Teams. However, the most useful is the ‘Open DevTools‘ options, which allows you to debug like you are in a browser.
24. Microsoft Immersive Reader for Teams
This functionality has been around in other Microsoft Tech for a little while and is predominantly a tool in the Microsoft Education space, that’s aimed at schools, colleges, and teachers billed as a learning and accessibility tool. However, it can, of course, be useful to a much wider audience than just schools, especially now that it is available in Microsoft Teams. So how do you use it, and what can it do?
Firstly, to access a given message, use the three dots ‘…’ and select it from the drop-down.

It can read the text aloud, at different speeds. It can show in larger font size with different colours and spacing. It can show syllables, verbs, nouns, adjectives, and sub-clauses all in different colours, and even with labels.

25. Zoom in and out
You no doubt are used to zooming in and out on your browser many times. Did you know you can do exactly the same in the Teams desktop client?
All you need to do is press ‘CTRL+’ to zoom in and ‘CTRL-‘ to zoom out.

At the time of writing this there’s no way to zoom on the mobile apps.
NB: If you’re using Teams in the browser you can also use the normal browser zoom functionality.
26. Work on Visio in a Microsoft Teams Tab
If there was ever a tool that got the best productivity and results when worked on collaboratively, it’s Microsoft Visio. Well, now you can do this with your team from within Teams. How cool is that?

Once you have uploaded the Visio file into a channel, you and your colleagues can alter the diagram from directly inside Teams! You can also discuss the diagram within the Teams conversation window while working on it as you go. I am sure you will agree, this is a great way to get input and agreement from all stakeholders as you go, saving everyone time and getting a better quality result.
27. Record your Teams meetings
You can record your Microsoft Teams meetings. The recording captures Audio, Video, and any screen sharing activities. The meeting is recorded in the cloud and saved to Stream, meaning you can manage, download, and share along with all your organisation’s other Video content.
At the most basic level, this allows you to have a record of what was discussed, so you can go back to it at a later stage, or share with team members that could not attend. This can also be used to easily create company or department announcements, management team updates, news items, demos, solutions to common problems, or any other communications you might use video for in your organisation.
So how do we do it? Well, it couldn’t be easier – once in the meeting just click the ‘…’ and click ‘Start Recording’ like this:

Once clicked, you will be told you are recording in a message at the top of the meeting. Once finished, click stop recording from the same menu. The video is saved to Stream. However, you will also see a link to it in the meeting chat window and be emailed a link to it from Stream. Obviously, as with all your Stream video content, it does take up space, so you need to ensure this use of Stream is included in your storage planning.
Here are a couple of links to help explain further and give other prerequisites and considerations:
- Teams Cloud meeting recording
- Get started with Microsoft Stream
- End User Documentation: Record meeting in Teams
28. All your Wikis in one place
If you are using the Wikis within teams, then this is a fantastic feature to help with your productivity. Simply click ‘…’ on the left-hand menu and choose ‘Wiki’.

This will take you to the Wiki home page on your ‘Personal ‘Wiki tab, and this is a great place for taking private notes.
Click on the ‘All‘ tab, and it gives you a summary view of all the Wikis you are involved in, making it easy to navigate, consume, and update them.
A nice extra on the Personal Wiki is being able to add notes from anywhere using the top command box. Just type ‘/wiki’ and press enter, and you can then type your note. Press enter again, and your note will be added. Press enter a third time, and it will take you to your Personal Wiki.
29. Bookmarking Messages

Then to recall all your saved messages, you simply click on your profile picture top right and select ‘Saved’ or possibly quicker would be to type in the command bar ‘/saved’. This gives you a list of all your saved points in the left-hand pane and clicking on them takes you back to the point in the conversation you saved them from.

30. Other Useful Shortcut Keys
- Navigation of the Left navigation panel – Ctrl + 1+ 2 + 3 – i.e. Ctrl + 1 = Activity feed; Ctrl +2 = Chat; Ctrl + 3 = Teams etc
- An Emoji for every occasion – Type a colon “:” immediately followed by a word – to discover additional emojis (e.g. :disapointed or :frog)
- Move your Teams around – Ctrl + Shift + up or down arrow – Moves the Team you have selected up in the Teams Panel on the left hand side, up or down in your list of Teams.
- What you really need! – CTRL + ‘.’ – Ctrl and the Full stop key together, probably should be first in this list, as it gives you all the shortcuts you can use

31. Apps and Actions from the Command Box
The search bar at the top is hiding more than just search functionality, it has some great ‘shortcut’ app and command options, some of which are really useful… A great shortcut key to get to the bar is CTRL+E.
All you have to do to see what’s on offer is type ‘/’ for the commands that work standalone or ‘@’ to see the Apps commands, give it a go.

Once installed, the apps can be accessed by clicking on the ‘…’ at the bottom of the conversation window. This allows you to share the search result, or item from the relevant app in the conversation, a great way to interact with Apps and your teams.
So back to the Command Bar, the shortcuts in here can be useful, here are just a few of my favourites:
- /whatsnew – This has to be the most useful one given the speed that MS release changes these days. This takes you to the Release notes tab in the T-Bot channel. Worth a regular check.
- @Wikipedia – Allows you to do a Wikipedia search. Returns a summary that you can click on to go to the full Wikipedia page.
- /goto – If you have a lot of teams or channels or spend a lot of time, as I do, in the Chat part of teams, then this is a good way to hop straight to your destination.
- /unread – Helps in those busy times, and pulls up a list of all your unread items
- /mentions – Gives a list of all your @Mentions. This will include direct tags or where a team you are in has been tagged.
- /files – Shows your recent files and allows you to search and go to the file you want rather than having to click around your teams to find what you need.
- /keys – This is a shortcut to show shortcuts. Nice quick reference for the MS Teams Keyboard Shortcuts.
- /call – This allows you to type the first few letters of the person you want to call and select them to call. In big organisations, this could be very timesaving.
- /help – Pretty self-explanatory and straightforward. A really good quick way to ask a question of the Teams help via the T-Bot.
- /saved – This takes you straight to your list of saved messages.
32. What can a guest do?
This post from the Microsoft support site best describes the different capabilities of Team Owner, Member, and Guest. Every member of Teams has a role, and each one has different permissions.
Owners
Team owners manage certain settings for the team. They add and remove members, add guests, change team settings, and handle administrative tasks. There can be multiple owners in a team.
Members
Members are the people in the team. They talk with other team members in conversations. They can view and usually upload and change files. They also do the usual sorts of collaboration that the team owners have permitted.
Guests
Guests are people from outside of your organisation that a team owner invites, such as partners or consultants, to join the team. Guests have fewer capabilities than team members or team owners, but there’s still a lot they can do.
This table gives a great summary of the capabilities of each role via the desktop:

And on Mobile:

You can also manage guest permissions via the ‘Manage Team’ option, again by clicking on the three dots ‘…’ next to the team.
In this menu, you can see your members, add and delete members, manage channels, manage settings, and manage Apps. With a mix of the Guest permission and the other settings, you can choose to set the team up to be fully interactive with all members and guests, or you can lock down to just the owner being able to post, which might be useful as an announcement or information channel.
All in all, the functionality and Collaboration that Guest access enables for users and organisations is fantastic!
33. Meeting Scheduling in Teams
This one is closely related to number 1; however, the simple features are always the best, in my opinion, so I figured it was worth a separate section.
You can schedule meetings from within Teams. From within a team or channel, you can click the small camera icon to meet now or using the same icon you can also choose to schedule a meeting as you would in Outlook.

You can also see your Calendar and meetings within teams by clicking the meetings icon on the left-hand panel. When scheduling from within Teams, you get this window:

34. Some Useful Links
hat’s it for the Teams tips: However, I just wanted to add some other useful resources that might help you with your quest to learn more about Teams:
- Collab365 Community site has some great posts – https://collab365.com/category/microsoft-teams/
- Microsoft interactive teams demo – https://teamsdemo.office.com/
- Collab365 Microsoft Teams Facebook group is one of our most popular Facebook groups and a fantastic place to get help and questions answered – https://www.facebook.com/groups/MicrosoftTeams
- Microsoft’s Support site has some great resources including the really useful Microsoft Teams FAQs
- Resources you can purchase from our Recent Teams Virtual Summit:
- Teams Virtual Summit – Session Recordings.
- Teams Nuggets Training Videos
Microsoft Teams is More Than Just a Collaboration Tool
Microsoft Teams not only offers easy collaboration but also provides convenient access to all files within an organization and integration with a long list of useful and popular apps. The tips and tricks covered here provides a taste of what’s possible.
Concerned about your remote workers and the data they’re using every day? Download our brand new “Guide to Remote Work Security” to see how you can help strengthen your organization today!
Thanks for Reading...
Masud Rana
No comments:
Post a Comment