How to Fix: 100% Disk Usage in Windows 10
Here I have listed some methods to overcome this issue.
One of these methods can definitely help you to fix this Windows issue.
Method-1: Restart your systems
You know from experience that restarting your machine can often resolve all kinds of issues. Your Windows 10 100% disk usage problem is no exception. While taking this route may not help you find out the underlying reason for the problem, if it goes away, that may be sufficient for you.
Before restart, the PC Delete all temporary files, Run Disk cleanup.
Be sure to use the “Restart” option which starts your system in a fresh state as opposed to the “Shut Down” option which preserves your system state and may not resolve your disk issue.
Method-2: Update Windows
Installing the latest updates can often resolve mysterious problems with your Windows 10 system. Check if you are up to date by going into the “Update and security” section of the Windows Settings app.
You can check for new updates and install them if they are available.
Settings > Update & Security settings > Windows Update
This may improve the overall performance of your system including that of your hard drive.
Method-3: Disable windows update search
There are a few ways that you can disable the Windows updates. Let’s review them:
Option-A: Disable a Windows 10 Update Permanently
You can disable Windows 10 updates by following these steps:
Using the Win+R keyboard shortcut type “services.msc” to access your PC’s service settings.
Double click on Windows update service to access the General settings.
Select Disabled from the Startup dropdown menu.
Once done, click ‘Ok’ and restart your PC.
Performing this action will permanently disable Windows automatic updates. If you’d like to enable it again, follow the same steps as above and toggle the option to Automatic.
Option-B: Disable Windows Updates Via the Settings Menu
Another, more familiar option would be to change the Windows Update settings through your PC’s actual Windows Settings. This option may be simpler for some depending on how tech-savvy you are, but it is not a permanent solution.
To disable your updates through the settings, do this:
Go to your Windows Start menu and click on the Settings.
Scroll down to the bottom of the page and click on
Updates & Security.Now, click on the
Advanced Options tab.
Now, you can choose a date from the dropdown that you’d like to pause automatic updates to.
As stated above, this is not a permanent solution but it’s great to know if you only need to pause your updates for a while. Pausing your updates means there is no worry that your PC will go severely out of date as the automatic updates will eventually turn back on by themselves.
Option-C: How to Stop Windows 10 Downloading: Via the Registry
The initial instructions largely depend on which version of Windows you’re using, but the method is essentially the same. To stop automatic updates using the Registry, follow these steps:
Open the Start menu and type “regedit.” Click on Registry Editor. (TOP TIP: Alternatively you can simply hold Windows key + R to bring up the Run window)
Now that the Registry Editor is open, you can check the key that records whether your system is ready to download Windows 10. Using the options on the left side, double click as follows: HKEY_LOCAL_MACHINE > SOFTWARE > Microsoft > Windows > CurrentVersion > WindowsUpdate > OSUpgrade
Your path should look like this: HKEY_LOCAL_MACHINE/SOFTWARE/Microsoft /Windows/CurrentVersion/WindowsUpdate/OSUpgrade
Once you’ve navigated to the right key, you’ll need to add a value that tells the system you don’t want to download Windows 10. To do this, right-click on the key name, select the New submenu and then select DWORD (32-bit) Value. You’ll see that a new value is created called “New Value #1”. Rename it “AllowOSUpgrade”.
The last step in Registry Editor is to make sure that the OS Upgrade feature is turned off. To do this, double-click the file and check that the value is “0”, making sure that the hexadecimal box is checked. To complete the process, refresh the page and then close regedit.
Many users have stated that this method does not take affect or work immediately. One (albeit strange) workaround for this is to open the Settings again and click on ‘Check for Updates.’ Doing this should force the changes to take affect.
Now you should be able to use Windows Update without having to check whether the Windows 10 Upgrade has sneaked into the Optional upgrade list and ticked itself for download. Result!
Option-D: Set a Metered Connection
Fortunately, your Windows 10 PC will not update without meeting certain internet connection requirements. If you set a metered internet connection, automatic updates will not take place. To set a metered connection, follow these steps:
Type “Network & Internet” into your computers’ search bar. Then, click on Wifi on the left-hand side.
Next, click on
Manage known networks. On this new page that opens, click on the wifi network you use and click on
Properties.
Now you can toggle
Metered Connection on.

This may not be a perfect solution for you because other systems like OneDrive will also fail to update or backup information. But, it should stop automatic updates on your PC.
Option-E: Using Group Policy to Stop Windows 10 Updates
For those that have a version of Windows 10 that isn’t the Home Edition, this section will work for you.
- Either open the Start menu or hit the Windows key + R and type “gpedit.msc” and hit Enter.
- Next, click on Computer Configuration > Administrative Templates > Windows Components > Windows Updates.
- Now, locate Configure Automatic Updates and double-click it.
- Then, check Disabled and click Apply and then OK.
Method-4: Disable Windows Search
The next thing to check is whether the 100% disk usage error has anything to do with Windows Search.
A bug in Windows 10 results in a "search loop" that causes an increased load on the system drive.
To stop this and prevent it from happening during your current session (until Windows is rebooted) open Windows PowerShell (Admin). You'll find this by right clicking the Windows 10 Start menu.
Enter:
net.exe stop "Windows search"
To permanently disable Windows Search or Indexing, press WIN+R, enter services.msc, and hit Enter. In the Services window that opens find the Windows Search entry and double-click it to open the Windows Search Properties window.
Under Startup type, select Disabled. Here you can click Stop to abort the service. Click OK to save your changes.
A few moments after disabling Windows Search, your Windows 10 performance should improve considerably. If not, move on...
Method-5: Disable Sysmain and superfetch
Another Windows 10 feature identified as a potential cause of the 100% disk usage issue is the superfetch service. Since Windows 10 1809 (the 2018 Windows 10 October Update) this has been renamed to "SysMain."
To prevent this service from causing the disk usage issue, open another Windows PowerShell (Admin) and enter:
net.exe stop sysmain
Again, wait a few moments to check whether this has had any effect on your computer's performance. You should also run Check Disk:
chkdsk.exe /f /r
You'll be informed that your PC must be rebooted for Check Disk to complete, so make sure you have closed all your applications first.
If this doesn't work, it is likely that you're experiencing a frustrating iteration of this issue that is simple to resolve.
Try the below command to stop superfetch
Observe disk utilization now....
Method-6: Is Flash Causing the 100% Disk Usage Bug?
Flash remains one of the most vulnerable aspects of modern computing and should be disabled. Adobe plans to kill off its multimedia plugin in 2020, so there's little reason to keep using it.
Flash also seems to be one of the most common culprits for the 100% hard disk usage in Windows 10 if you're using the Google Chrome browser.
Open Menu > Settings > Privacy and security and click the section marked Site Settings. Here, find Flash and set the toggle to Block sites from running Flash, then click Back.
Restart the browser and check your HDD performance.
Method-7: Switch Web Browsers
It may not be Flash that is impacting on your browser performance.
Another cause could be the browser itself, particularly if you're using Google Chrome.
The obvious option is to choose a different browser. Windows 10 already has two browsers built in. You probably don't want to use Internet Explorer, but Microsoft Edge is an adequate replacement for Chrome.
Several browsers are available, some better than others. See our guide to the best web browsers for Windows to find an alternative.
Method-8: Disable Diagnostic Tracking in Windows 10
Finally, it's worth considering the impact of diagnostic tracking in Windows 10. A feature that you might have otherwise disabled for privacy reasons, it has been blamed for 100% HDD use on many PCs.
When it comes to reducing your hard disk drive usage, it's quicker to simply disable the DiagTrack service. If this is the source of the 100% disk usage error in Windows 10, you can stop the service launching.
However, to do this you'll need to access Command Prompt in administrator mode.
Do this by clicking Start and typing cmd in the search box. Wait for the results and right-click Command Prompt, selecting Run as administrator.
Input these commands to disable and stop DiagTrack:
sc config "DiagTrack" start= disabledsc stop "DiagTrack"
In addition, you might also head to Settings > System > Notification & actions and disable Get tips, tricks and suggestions as you use Windows. Doing so has been shown to improve things.
Method-9: Change Energy Options from Balanced to High Performance
This change of energy settings seems to have worked for a number of users who have experienced 100% disk usage on Windows 10.
Use this procedure:
- Go to Power Options > Change plan settings > Change advanced power settings.
- Select the High-performance option from the drop-down box and make sure all plan settings are set to their defaults.
Method-10: Temporarily Turn Off Your Antivirus Software
Another step to take when investigating the cause behind your Windows 10 100% disk usage problem is to turn off your antivirus software temporarily. See if this improves your disk usage. If so, you may want to consider changing antivirus packages. Even Windows Defender can cause problems by increasing I/O and network usage which might lead to high disk usage.
Method-11: Reset Virtual Memory in Windows 10
Virtual memory treats your disk as if it is RAM and uses it to swap out temporary files when it runs out of actual RAM. Errors in the pagefile.sys can cause 100% disk usage on your Windows 10 machine. The remedy to this problem is to reset your virtual memory settings.
In your computer’s “System Properties” you need to click on “Advanced system settings”.
Click “Settings” in the Performance section.Select the “Advanced” tab and click the “Change” button.Make sure the box titled “Automatically manage paging file size” is checked.
You can also choose “No paging file”, Press OK and then reboot. This will inhibit the use of virtual memory and may improve your system’s disk performance.
Method-12: Change Settings in Google Chrome
Some users have reported that making these changes to your Google Chrome settings can have a beneficial effect on your disk usage.
For Chrome, make this change:
- Settings -> Show advanced settings.
- Under Privacy section, uncheck the “Use a prediction service to load pages more quickly” option.
- You should also try disabling Flash in Google Chrome.
Method-13: Perform a disk check
1) On your keyboard, press Windows key and X at the same time, then choose Command Prompt (Admin).
Click Yes at the User Account Control prompt.
3) The command prompt will once again display. Type in the following command:
chkdsk.exe /f /r
4) Hit Enter on your keyboard, then type Y to confirm that you’d like to perform the disk check the next time you restart your computer. Please make sure you have closed all of your applications first.
IMPORTANT: Disk check will start the next time you boot your PC and it might take some time to complete (could be a day for some). If, when you restart, you don’t have time to wait for the disk check to complete, you can skip it. You’ll need to reschedule it again, as described above, though.
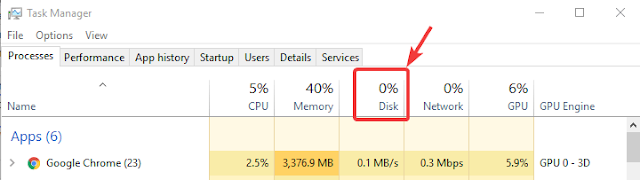
5) Once you’ve completed the disk check, check your computer’s disk usage again: Type “task manager” in the Windows search bar and select Task Manager, then in the Processes tab, look at the % at the top of the Disk column. If it’s no longer 100%, you’ve fixed the problem!

Method-14: Fix your StorAHCI.sys driver
The Windows 10 100% disk usage problem might also be caused by some Advanced Host Controller Interface PCI-Express (AHCI PCIe) models running with the inbox StorAHCI.sys driver due to a firmware bug.
Here’s how to determine if this is your problem and fix it:
1) Open Device Manager by pressing Windows logo key and X at the same time to choose Device Manager.
2) Expand the IDE ATA/ATAPI Controllers category, and double-click the AHCI controller.
3) Go to the Driver tab and click Driver Details. If you can see storahci.sys stored in a path of system32 folder, then you are running the inbox AHCI driver.
4) Close the Driver Details window and go to Details tab. From the drop-down menu, select Device Instance Path. Make note of the path, starting from VEN_.
5) Type regedit in the search box of Start panel, then hit Enter on your keyboard to run Registry Editor. Then go to:
HKEY_LOCAL_MACHINE\System\CurrentControlSet\Enum\PCI\ <AHCI Controller>\<Random Number>\Device Parameters\Interrupt Management\MessageSignaledInterruptProperties
The <AHCI Controller> here refers to the name you see from step 2).
The <Random Number> differs on different machines.
6) Double click the MSISupported key and change the value to 0.
7) Restart your computer after the change, then check your computer’s disk usage: Type “task manager” in the Windows search bar and select Task Manager, then in the Processes tab, look at the % at the top of the Disk column. If it’s no longer 100%, you’ve fixed the problem!
Method-15: Change File Explorer Options
Step 1. Open Windows 10 File Explorer, and then navigate to "View" and click "Options".
Step 2. Switch to the "Search" tab and UNCHECK these two options:
- "Include compressed files (ZIP, CAB…)"
- "Always search file names and contents (this might take several minutes)"
- Remove Adobe Creative Cloud and Photoshop CC. You may have to allow their update before you can uninstall.
- Uninstall disk driver and reboot.
- Disable "Intel Rapid Start Technology" in BIOS.
Step 3. Click “Apply” and then “OK”.
Some Other Fixes You May Have a Try:
Since you are here, take a look at the suggestions put forward by users who have successfully overcome the 100% disk utilization problem.
But if all of these fixes do not help. Continue reading Fix 11 and Fix 12.
Option-16: Resolve low disk space primary partition issue
.............Will update/post later
Option-17: Manage damaged page file
Whenever your PC runs out of free memory (RAM), it uses a “page file” on your hard disk to expand its memory. Let’s say you’re editing a 10 GB video file, but you have only 8 GB of memory (at least 2 to 3 GB of which are taken up by Windows and your apps). Your PC will use the page file on your disk as expanded memory.
Over time, this page file can become defective, which can, in turn, cause unexpected slowdowns and high disk usage. To fix it, you need to delete that page file and create a new one. To do that, press the Windows and R keys at the same time and type in sysdm.cpl.
Click OK and go to Advanced > Performance > Settings > Advanced > Change. Uncheck Automatically manage paging file size for all drives and then select No paging file. Hit Set and then reboot your system.
Repeat all those steps again, select System managed size, and hit Set. Then, check Automatically manage paging file size for all drives.
Method-16: Wipe SSD and Reinstall Windows 10
The last method is to totally wipe your hard drive and reinstall Windows 10. You may completely back up the SSD, and prepare a Windows 10 installation media, then do a clean install.
Step 1: Back up SSD
Here you can also use the MiniTool Partition Wizard Free to do this.
Launching the MiniTool Partition Wizard, select the system disk and choose “Copy Disk Wizard” from the menu.
Step 2: Reinstall Windows 10
Step 3: RUN Update Windows 10
Step 4: Update security patches
Step 5: Update all of the device driver software
Step 6: Install the best Anti-Virus software.
Thanks for Reading...
Masud Rana
assd
,,


No comments:
Post a Comment