Saturday, January 21, 2023

How to identify different types of battery chemistries

How to identify different types of battery chemistries

 Batteries contain a range of toxic materials including mercury, silver, nickel, cadmium, and lithium, and are generally regulated as Universal Waste, a category of hazardous waste, by the federal government. Batteries should be collected, recycled, and processed so they don’t leach toxic material into waste sites and landfills, which could eventually reach our drinking water. Also, if spent batteries are not stored correctly they may spark and potentially cause a fire.

It is always best to recycle all types of batteries including:

  • Lithium
  • Alkaline
  • Nickel metal hydride
  • Nickel cadmium
  • Zinc carbon
  • Lead acid

In order to meet regulatory requirements and avoid sparks and potential fires, fully insulate the terminals of all lithium batteries using non-conductive tape or caps.  For all other battery types fully insulate the terminals of all batteries over nine volts. Clear packing tape is a good choice to insulate battery terminals because it allows recyclers to identify batteries before recycling.  If you are in doubt about a battery type, fully tape terminals to be safe.

It is also a good idea to store spent batteries by type prior to recycling.  Recyclers may charge substantial fees to sort batteries.

There are two different types of batteries that you will encounter at work and at home: rechargeable and non-rechargeable.


Non-rechargeable batteries

The following types of non-rechargeable batteries require terminals to be fully insulated for spent batteries over 9 volts:

Alkaline batteries
Alkaline batteries are the batteries we use everyday in our households to power flashlights, toys, and other items. These batteries include various sizes including AA, AAA, C, D, square 9 volt, button cell and others.

Zinc-Carbon (Zn)
Zinc-carbon batteries are the older version of the AA, AAA, C, D, square 9 volt batteries. These batteries do not last very long and are rarely used.

Silver-Oxide
Silver-oxide batteries are primarily button cell batteries; however, a few types of square 9 volts are also silver-oxide chemistry. These batteries are regulated by the USEPA as a Universal Waste requiring most businesses to ship to permitted recycling facilities.

Non-rechargeable primary lithium batteries – Fully insulate the terminals for all spent lithium batteries.

Many people are unaware there is a large volume of non-rechargeable lithium batteries (sometimes called lithium metal batteries).  Many of these look exactly like alkaline AA, D and other batteries. All lithium batteries, including non-rechargeable batteries, must have all terminals fully insulated with tape or caps before disposal.  Also, a maximum of 66 lbs. of lithium batteries may be included in a single container. Carefully read instructions for mail-back recycler kits or contact your recycler for additional specific requirements to comply with specifics to manage lithium batteries.  

There are three primary chemistries for non-rechargeable lithium batteries.

1. Lithium-Sulfur Dioxide (LiSO2)
Lithium-sulfur dioxide batteries are used most often for small industrial battery applications.

2. Lithium Manganese Dioxide (LiMnO2)
Lithium manganese dioxide are non-rechargeable batteries used in AA, C, and D batteries as well as many industrial applications. These are very light with high energy and can ignite when shorted across the terminals.

3. Lithium Thionyl Chloride (LiSOCI2)
Lithium thionyl chloride is used for AA batteries at a higher voltage rate, as well as other industrial applications.

Rechargeable batteries

The types of rechargeable batteries below require terminals are fully insulated for batteries over 9 volts. All of these battery types are regulated as a Universal Waste by the USEPA and require most businesses to ship to permitted recycling facilities.

Nickel Cadmium (NiCad)
Nickel cadmium batteries are an older technology rechargeable battery that are still used and are generally heavier rechargeable batteries found in tools and computers.

Nickel-Metal Hydride (NiMH)
Nickel-metal hydride batteries are rechargeable batteries often used in rechargeable AA batteries.

Sealed Gelled Lead Acid
These heavy-sealed batteries are used in children’s riding toys and heavy-duty industrial applications.

Lead Acid
Lead acid batteries are used for car and motorcycle batteries and cannot be shipped in the recycle kits. These can usually be recycled at automotive parts stores.

Rechargeable Lithium-ion Batteries

All lithium batteries, including lithium ion batteries must have all terminals fully insulated with tapes or caps. Also, a maximum of 66 lbs. of lithium batteries may be included in a single container.  Carefully read instructions for mail-back recycler kits or contact your recycler for additional specific requirements to comply with specifics to manage lithium batteries.

There are two primary chemistries for rechargeable lithium batteries.

1. Lithium-ion (Li-Ion)
These are the most common rechargeable battery and are a lighter and higher energy than the older NiCad batteries. Lithium-ion rechargeable batteries are used in laptops, phones, tools.

2. Lithium Polymer
Sometimes referred to as a Lithium-ion polymer, these batteries are used in phones and other rechargeable applications.


Thanks for Reading...

Masud Rana
Monday, January 16, 2023

How to Create a Batch (BAT) File in Windows: 3 Simple Steps

  How to Create a Batch (BAT) File in Windows: 3 Simple Steps

This article covers how to create a batch file using five simple steps for the Windows operating system.

Creating a batch file to automate repetitive tasks is easy, once you know how.

Batch files are the computer handyman's way of getting things done. They can automate everyday tasks, shorten the required time to do something, and translate a complex process into something anyone could operate.

In this article, you'll see how to write a simple batch file. You'll learn the basics of what batch files can do, and how to write them yourself. I'll also provide you with further resources for learning to write batch (BAT) files.

How to Create a Batch File on Windows

To create a Windows batch file, follow these steps:

  1. Open a text file, such as a Notepad or WordPad document.
  2. Add your commands, starting with @echo [off], followed by, each in a new line, title [title of your batch script]echo [first line], and pause.
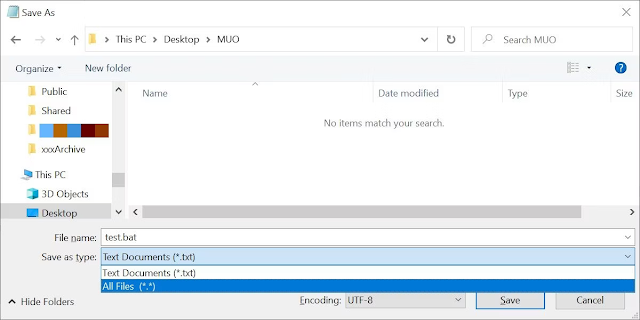
  3. Save your file with the file extension BAT, for example, test.bat.
  4. To run your batch file, double-click the BAT file you just created.
  5. To edit your batch file, right-click the BAT file and select Edit.

Your raw file will look something like this:


And here's the corresponding command window for the example above:


If this was too quick, or if you want to learn more about BAT file commands and how to use them, read on!

Step 1: Create a BAT File

Let's say that you frequently have network issues; you constantly find yourself on the command prompt, typing in ipconfig, and pinging Google to troubleshoot network problems. After a while, you realize that it would be a bit more efficient if you just wrote a simple BAT file, stuck it on your USB stick, and used it on the machines you troubleshoot.

Create a New Text Document

A batch file simplifies repeatable computer tasks using the Windows command prompt. Below is an example of a batch file responsible for displaying some text in your command prompt. Create a new BAT file by right-clicking an empty space within a directory and selecting New, then Text Document.


Add Code

Double-click this New Text Document to open your default text editor. Copy and paste the following code into your text entry.

@echo off

title This is your first batch script!
echo Welcome to batch scripting!
pause

Save as BAT File

The above script echoes back the text "Welcome to batch scripting!" Save your file by heading to File > Save As, and then name your file what you'd like. End your file name with the added BAT extension, for example welcome.bat, and click OK. This will finalize the batch process. Now, double-click on your newly created batch file to activate it.


Don't assume that's all batch scripting can do. Batch scripts parameters are tweaked versions of command prompt codes, so you are only limited to what your command prompt can do. For those unfamiliar with the program, the command prompt is capable of quite a lot.

Step 2: Learn the Basics of Batch Scripting

Batch files use the same language as the command prompt. All you're doing is telling the command prompt what you want to input using a file, rather than typing it out in the command prompt. This saves you time and effort. It also allows you to put in some logic, like simple loops, conditional statements, etc. that procedural programming is capable of conceptually.

@echo: This parameter will allow you to view your working script in the command prompt. This parameter is useful for viewing your working code. If any issues arise from the batch file, you will be able to view the issues associated with your script using the echo function. Adding a following off to this parameter will allow you to quickly close your script after it has finished.

  • title: Providing much of the same function as a <title> tag in HTML, this will provide a title for your batch script in your Command Prompt window.
  • cls: Clears your command prompt, best used when extraneous code can make what you're accessing had to find.
  • rem: Shorthand for remark provides the same functionality as <!-- tag in HTML. Rem statements are not entered into your code. Instead, they are used to explain and give information regarding the code.
  • %%a: Each file in the folder.
  • (".\"): The root folder. When using the command prompt, one must direct the prompt to a particular directory before changing a files name, deleting a file, and so on. With batch files, you only need to paste your BAT file into the directory of your choosing.
  • pause: Allows a break in the logical chain of your BAT file. This allows for users to read over command lines before proceeding with the code. The phrase "Press any key to continue..." will denote a pause.
  • start "" [website]: Will head to a website of your choice using your default web browser.
  • ipconfig: This is a classic command prompt parameter that releases information concerning network information. This information includes MAC addresses, IP addresses, and sub-net masks.
  • ping: Pings an IP address, sending data packets through server routes to gauge their location and latency (response time).

The library for batch variables is huge, to say the least. Luckily there is a Wikibook entry that holds the extensive library of batch script parameters and variables at your disposal.

Step 3: Write and Run Your BAT File

We'll create three examples of batch scripts which can simplify your daily online and offline activities.

News Script

Let's create an immediately useful batch script. What if you wanted to open all your favorite news websites the moment you wake up? Since batch scripts use command prompt parameters, we can create a script that opens every news media outlet in a single browser window.

To re-iterate the batch-making process: first, create an empty text file. Right-click an empty space in a folder of your choosing, and select New, then Text Document. With the text file open, enter the following script. Our example will provide the main American news media outlets available online.

@echo off

cd "" http://www.cnn.com
start "" http://www.abc.com
start "" http://www.msnbc.com
start "" http://www.bbc.com
start "" http://www.huffingtonpost.com
start "" http://www.aljazeera.com
start "" https://news.google.com/

The above script stacks one start "" parameter on top of the other to open multiple tabs. You can replace the links provided with ones of your choosing. After you've entered the script, head to File, then Save As. In the Save As window, save your file with the BAT extension and change the Save as type parameter to All Files (*.*).


Once you'd saved your file, all you need to do is double-click your BAT file. Instantly, your web pages will open. If you'd like, you can place this file on your desktop. This will allow you to access all of your favorite websites at once.

File Organizer

Have you been downloading multiple files a day, only to have hundreds of files clogging up your Download folder? Create a batch file with the following script, which orders your files by file type. Place the BAT file into your disorganized folder, and double-click to run.

@echo off

rem For each file in your folder
for %%a in (".\*") do (
rem check if the file has an extension and if it is not our script
if "%%~xa" NEQ "" if "%%~dpxa" NEQ "%~dpx0" (
rem check if extension folder exists, if not it is created
if not exist "%%~xa" mkdir "%%~xa"
rem Move the file to directory
move "%%a" "%%~dpa%%~xa\"
))

Here is an example of my desktop before, a loose assortment of files types.


Here are those same files afterward.


It's that simple. This batch script will also work with any type of file, whether it's a document, video, or audio file. Even if your PC does not support the file format, the script will create a folder with the appropriate label for you. If you already have a JPG or PNG folder in your directory, the script will simply move your file types to their appropriate location.

Program Launcher

If you find yourself opening the same set of apps over and over again, you can now create a custom launcher batch file that opens multiple programs with a single click. All you need to find out is the Windows file location. Let's say you need to do some work, and you want to open Excel, the Calculator, and Spotify. Here's the code for that:

@echo off

cd "C:\Program Files\Microsoft Office\root\Office16\"
start EXCEL.EXE

You could even have your batch file open specific documents or websites, along with a set of apps. The trick is to mix-and-match all the different elements a batch file can do for you. Eventually, you'll be incorporating IF statements into your batch scripts.

Automate the Simple Stuff With Batch Scripts

This is just a taste of what batch scripts have to offer. If you need something simple done over and over, whether it be ordering files, opening multiple web pages, renaming files en masse, or creating copies of important documents, you can make tedious tasks simple with batch scripts.

Thanks for Reading...

Masud Rana

Sunday, January 15, 2023

8 Easy Ways to Boosting Security in Microsoft Defender and Windows 10

 8 Easy Ways to Boosting Security in Microsoft Defender and Windows 10


1. Detect and Remove Hidden Malware
2. Protect Your Files From Ransomware
3. Automatically Block the Latest Malware
4. Block Unrecognized and Unwanted Apps
5. Configure Defender’s Firewall Settings
6. Access Defender’s Advanced Settings with ConfigureDefender
7. How to Restore a Quarantined File in Defender
8. How to Restore a Quarantined File Using Command Prompt


Windows 10’s built-in security software frequently beats paid antivirus programs in independent tests. It recently scored 100 percent from security-research laboratory AV-Test and is arguably all you now need to protect your PC from malware.

Now called Microsoft Defender (rather than Windows Defender), it’s a deceptively simple set of tools that mostly works in the background. Dig into Defender’s settings, however, and you’ll find powerful features that can increase your PC’s protection against the latest threats. We’ll explain how to unlock them.

1. Detect and Remove Hidden Malware

By default, Microsoft Defender's Antivirus component performs a Quick scan of your system every day. This checks only the folders in which threats are most commonly found.

To run a scan manually, either go to Settings > Update & Security > Windows Security or type security in the Start Menu search bar and select the Best Match. Select Virus & threat protection and click Quick scan.


To scan more thoroughly, click Scan options and choose Full scan, which checks every file and program on your PC. Alternatively, select Custom scan, which lets you check specific files and folders for malware.

If you suspect your system is infected, but the other scans don’t find anything, select Microsoft Defender Offline Scan. This targets malware that’s difficult to detect, such as rootkits.


Offline Scan works by rebooting into a safe environment to perform a scan outside of Windows, where hidden malware is unable to run. Save your work before choosing this option, then click Scan now > Scan, and your PC will restart.

The scan takes up to 15 minutes. Don’t panic if your screen goes black for a few seconds, as this is normal. If any malware is found, you’ll be prompted to remove it, but otherwise, your PC will boot back into Windows once the scan is complete.

2. Protect Your Files From Ransomware

Ransomware can cause serious problems on your PC, encrypting your files and folders and demanding payment to unlock them with no guarantee that the decryptor will work.

It’s strange then that Defender’s ransomware protection is switched off by default, presumably to stop legitimate programs from being blocked. Fortunately, the feature is easy to enable.

On the Virus & threat protection screen, scroll down to Ransomware protection and click Manage ransomware protection.

Click the switch under Controlled folder access to turn the option on. This will protect your Pictures, Documents, Videos, Music, and Desktop folders, but you can supplement these by clicking Protected folders, then Add a protected folder.


You can’t remove protection from pre-selected folders, but you can let specific programs access them by clicking Allow an app through controlled folder access.

3. Automatically Block the Latest Malware

Microsoft Defender offers real-time protection against malware, detecting and blocking known threats using constantly updated virus definitions.

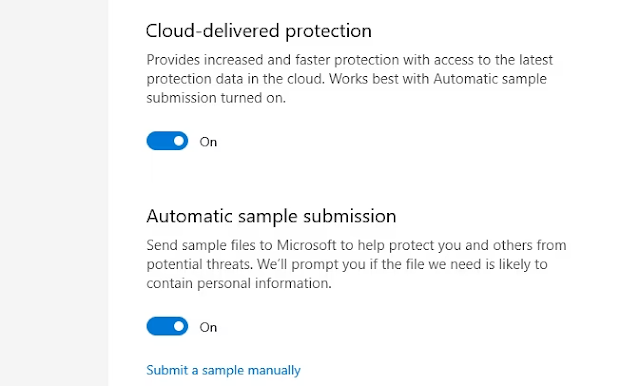
It also safeguards your system against threats that have yet to be identified through a feature called Cloud-delivered protection, formerly known as Microsoft Active Protection Service (MAPS). This uploads details of suspicious files to Microsoft, to determine whether they’re safe.

The feature is enabled by default, but it’s worth checking in case it’s been turned off by another security program or hidden malware. You should see a warning if this is the case.

On the Virus & threat protection screen, click Manage settings under Virus & threat protection settings and switch on Cloud-delivered protection if it’s not already active.

You should also turn on Automatic sample submission to submit suspicious files to Microsoft for further analysis. This may sound like a privacy risk, but it will only upload program files automatically. If a file could contain personal information, you’ll be asked for permission before it’s sent.


4. Block Unrecognized and Unwanted Apps

The May 2020 Update added protection against potentially unwanted programs (PUPs) to Windows Security (in the past, blocking this junk required using a PowerShell command) to complement its existing SmartScreen feature.

To ensure these tools are offering maximum protection, select App & browser control in Windows Security. Click Turn on under Reputation-based protection if prompted, then click Reputation-based protection settings.

The Check apps and files option uses Microsoft Defender SmartScreen to stop unrecognized and untrustworthy programs running on your PC. Although it sometimes blocks legitimate software (which you can choose to run anyway), this should be enabled. However, unless you use Edge, the second SmartScreen option can be switched off.


5. Configure Defender’s Firewall Settings

Windows Defender Firewall automatically blocks incoming and outgoing security threats, so long as it’s properly configured. Click Firewall & network protection in Windows Security and ensure that the DomainPrivate, and Public options are all switched on.

The firewall uses "rules" against which all internet traffic is checked. To define your own rules, click Advanced settings and select either Inbound Rules to control data coming into your PC or Outbound Rules to manage data heading out to the network and internet.

You can block specific ports to protect against risky types of web traffic, for example, port 21, which manages file transfers (FTP):

  • Select Inbound Rules and, in the right-hand sidebar, click New Rule.
  • In the New Inbound Rule Wizard, select Port and click Next.
  • Enter 21 in the Specific local ports box and click Next.
  • On the following screen, select Block the connection, and click Next twice.
  • Give the rule a name such as Block incoming file transfers, and click Finish to apply it.

If you experience any problems with a rule you’ve created, select it, and choose either Disable Rule or Delete.


6. Access Defender’s Advanced Settings with ConfigureDefender

Microsoft Defender has many advanced settings that you can’t access via Windows Security but need to unlock via complicated PowerShell commands. This is where ConfigureDefender comes in useful.

This free tool provides a graphical user interface for all Defender's settings, which gives you complete control over your system security. You can easily enable and disable any options you want, from basic settings such as scanning all downloads and attachments to advanced tweaks such as blocking potentially dangerous Office macros and programs on USB sticks.

ConfigureDefender is very easy to use, with one-click options that apply DefaultHigh, or Max protection to Microsoft Defender. You’ll need to restart your PC for its changes to take effect.


7. How to Restore a Quarantined File in Defender

Suspicious files will usually be quarantined rather than automatically deleted. This means they're put in a secure holding state so you can decide whether or not they should be deleted. However, in some situations, files confirmed to be infected will be deleted to protect your system.

You can find recently quarantined files in the Protection History.

  1. Open Settings > Privacy & Security > Windows Security, and click the Open Windows Security button.
  2. Select Virus & Threat Protection and click the Protection History option below the Scan button.


3.  You can filter the protection history to display quarantined files using the button at the top.

4. Locate the file you want to restore and select it. You can then choose the option to restore it.


8. How to Restore a Quarantined File Using Command Prompt

If you can't access the Windows Security app, for some reason, you can restore quarantined files in Command Prompt (elevated).

  1. In Windows Search, type Command Prompt and click the Run as Administrator option.
  2. In Command Prompt, enter the following command: cd “%ProgramFiles%\Windows Defender”.
  3. Then type: MpCmdRun.exe -restore -listall to see a list of all currently quarantined files.

4. You can restore a single file by typing: MpCmdRun.exe -restore -name “Filename”. Replace Filename with the name of the file you want to restore

 Strengthen Microsoft Defender’s Defenses

Although you can leave Microsoft Defender to do its job without changing any settings, there are clear benefits to enabling options that are switched off by default. Not only will this increase your protection against the latest threats, but it means you can customize your security to suit your needs.

Of course, you don’t have to stick with Window 10’s built-in software if you’d prefer to trust a different company to defend your PC. There are plenty of other reliable and free security suites for Windows that are worth considering.

Thanks for Reading...

Masud Rana
Restoring a Quarantined File in Microsoft Defender

Restoring a Quarantined File in Microsoft Defender 


Microsoft Defender antivirus is a reliable choice to protect your Windows PC. It consistently scores high in AV tests, includes multiple scan options, and provides several extra tools. But that doesn't mean it's infallible and immune from alerting to false positives.

Here's what to do if Defender quarantines a file you know to be safe.

Why Would Defender Quarantine a Safe File?

Microsoft Defender is generally good at not alerting to safe files. As long as the virus definitions are kept up to date (especially if you learn how to manually update Windows Defender), false positives are rare. But they do happen.

Defender provides strong protection by being proactive and will quarantine potential threats, as well as active ones. Files are usually flagged as suspicious due to a mismatched or expired digital signature. It can also occur if the file has been incorrectly reported as dangerous.

How to Restore a Quarantined File in Defender

Suspicious files will usually be quarantined rather than automatically deleted. This means they're put in a secure holding state so you can decide whether or not they should be deleted. However, in some situations, files confirmed to be infected will be deleted to protect your system.

You can find recently quarantined files in the Protection History.

1.   Open Settings > Privacy & Security > Windows Security, and click the Open Windows Security button.

2. Select Virus & Threat Protection and click the Protection History option below the Scan button.


3.   You can filter the protection history to display quarantined files using the button at the top.

4.   Locate the file you want to restore and select it. You can then choose the option to restore it.


To prevent the file from being flagged again, you can add it to the list of exclusions. You can find this option in the Virus & Threat Protection Settings. If you need more help, check out our guide about adding exclusions to Microsoft Defender antivirus.

How to Restore a Quarantined File Using Command Prompt

If you can't access the Windows Security app, for some reason, you can restore quarantined files in Command Prompt (elevated).

1.   In Windows Search, type Command Prompt and click the Run as Administrator option.

2.   In Command Prompt, enter the following command: cd “%ProgramFiles%\Windows Defender”.

3.   Then type: MpCmdRun.exe -restore -listall to see a list of all currently quarantined files.


4.   You can restore a single file by typing: MpCmdRun.exe -restore -name “Filename”. Replace Filename with the name of the file you want to restore.

If a file was quarantined because it was a potential network threat, you might be unable to restore it. This is usually because the system might no longer have the required network credentials to access the file.


Thanks for Reading...

Masud Rana

Describe BIOS and UEFI

  BIOS (Basic Input/Output System) and UEFI (Unified Extensible Firmware Interface) are firmware interfaces responsible for initializing har...