Friday, June 4, 2021

How to use shutdown command tool on Windows 10

How to use shutdown command tool on Windows 10

 Did your computer shut down unexpectedly, or you found that it restarted? If so, you can use these instructions to find out why this happened on Windows 10.


On Windows 10, the Event Log system tracks everything that happens, including when and why the computer restarts or shuts down correctly or due to a problem.

Although you would not typically think about reviewing this information as long as Windows 10 starts up again correctly, sometimes, you may need to know these details to determine if there is an issue that needs attention. Or to understand if Windows Update suddenly rebooted the system to apply a new update, or the device lost power unexpectedly.

Regardless of the reason, Windows 10 includes different ways to check the date, time, and reason why the system shut down or restarted unexpectedly using the Event Viewer or querying the event logs with PowerShell and Command Prompt.

In this Windows 10 guide, we will show you the steps to check why the device shut down.

    • How to determine shutdown reason on Windows 10 with Event Viewer
    • How to determine shutdown reason on Windows 10 with PowerShell
    • How to determine shutdown reason on Windows 10 with Command Prompt

        How to determine shutdown reason on Windows 10 with Event Viewer

        To check the Event Viewer logs and determine why the device was shut down or restarted, use these steps:

        1. Open Start.
        2. Search for Event Viewer and click the top result to open the console.
        3. Browse the following path:
        4. Event Viewer > Windows Logs > System
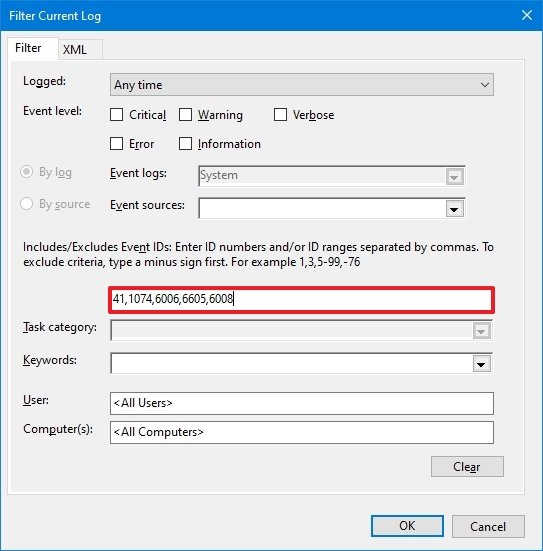
        5. Right-click the System category and select the Filter Current Log option.


        5. In the "All Event ID" textbox, include the following ID numbers separated using a      comma:

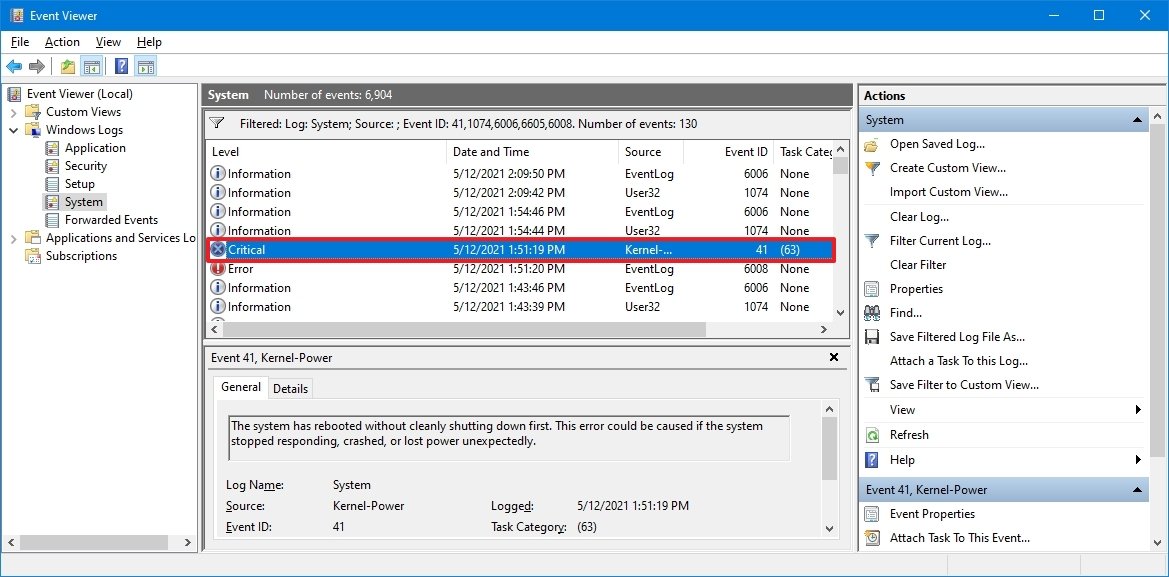
        • 41 — The device did not restart correctly using a clean shutdown first. This event could be caused if the computer stopped responding, crashed, or lost power unexpectedly.
        • 1074 — This event is triggered when the user initiates a manual shutdown or restart. Or when the system restarts automatically to apply updates, for example. If you were using the shutdown command with a custom message, the information would be recorded in the "Comment" section.
        • 6006 — This event is logged when the Event Log system has been stopped by during a good shutdown. This error usually happens after error 1074.
        • 6005 — This event is logged when the Event Log system started, which can indicate when the computer was booted.
        • 6008 — Indicates that the previous system shutdown was unexpected. This error will usually happen after error 41.


        1. Quick note: The input should look like this: 41,1074,6006,6605,6008. Windows 10 logs many types of logs, these are just a few events you can use to diagnose the problem.

        2. 6. Click the OK button.
        3. 7. Double-click a log to confirm the information.


        1. Quick tip: You can use the down and up keyboard arrows to browse between events. As you move between the logs, the details will appear at the bottom of the screen, in the "General" tab.

        Once you complete the steps, you will know when and the possible reason (such as Blue Screen of Death, crashed, unexpected power lost, etc.), which may have caused the reboot or shutdown of the computer.

        Unless you can link these logs to another system component error log, it would be difficult to identify what exactly forced the device to unexpected. However, these events will help to under what happens and where to continue looking.

        How to determine shutdown reason on Windows 10 with PowerShell

        To find out the reason Windows 10 shutdown with PowerShell, use these steps:

        1. 1. Open Start.
        2. 2. Search for PowerShell and click the top result to open the console.
        3. 3. Type the following command to view event logs and press Enter:

          Get-WinEvent -FilterHashtable @{ LogName = 'System'; Id = 41, 1074, 6006, 6605, 6008; } | Format-List Id, LevelDisplayName, TimeCreated, Message


        1. 4. Check the log information to determine the time and reason for the shutdown.

        After you complete the steps, the events will indicate the date, time, and reason why Windows 10 was shut down or rebooted.

        How to determine shutdown reason on Windows 10 with Command Prompt

        To check why the computer shutdown with Command Prompt, use these steps:

        1. 1. Open Start.
        2. 2. Search for Command Prompt and click the top result to open the console.
        3. 4. Type the following command to view event logs and press Enter:

          wevtutil qe System /q:"*[System[(EventID=41) or (EventID=1074) or (EventID=6006) or (EventID=6005) or (EventID=6008)]]" /c:100 /f:text /rd:true


        1. Quick note: The above command will check the 100 more recent logs for the shutdown information. You can modify the /c:100 option with a different number to check more or fewer events.

        2. 4. Check each log description to determine the time and reason for the shutdown.

        Once you complete the steps, you will understand why the computer was shut down or restarted unexpectedly.

        If you use the PowerShell or Command Prompt option, you can also export the output to a text file with these instructions.

        Thanks for Reading...

        Masud Rana


        Thursday, June 3, 2021

        Excel tries “Accessing Printer” while opening the specific workbook

         Excel tries “Accessing Printer” while opening the specific workbook


        Changed the default printer to the XPS document writer and the problem was resolved. I therefore uninstalled his previous default printer and removed the driver through Print Management, then reinstalled it. The problem was resolved.

        How to Check Disk Health and Identify Unhealthy Disks in Windows Server


        How to Check Disk Health and Identify Unhealthy Disks in Windows Server

        Leverage PowerShell to check disk health and identify disks that need to be replaced.

        It’s been said that there are two types of hard disks--those that have failed and those that are going to. When a hard disk falls into an unhealthy state, it is important to replace the disk before a full-blown failure can occur. Sometimes,  however, this is easier said than done. While Windows might inform you that one of the disks attached to your server is unhealthy, it can be difficult to know for sure which physical disk to replace. Fortunately, there is an easy way to use PowerShell to check disk health and track down unhealthy disks


        If you believe that a physical disk within your system is failing, the first step in the process is to see whether Windows has identified a problem. The easiest way to do this is to open PowerShell and enter the Get-PhysicalDisk cmdlet. You can see what this looks like in Figure 1.


        Figure 1

        This is what it looks like when you use the Get-PhysicalDisk cmdlet.

        I created the screen capture shown above on a PC running Windows 10, but the command works in exactly the same way when used on Windows Server. The only real difference is that Windows servers often have far more disks than desktop PCs.

        When using the Get-PhysicalDisk cmdlet, I recommend paying attention first to the Health Status column. As the name implies, this column indicates whether each disk is healthy. In my experience, if Windows identifies a physical disk as being unhealthy, it probably really is unhealthy. However, even if Windows indicates that a disk is healthy, that is not a guarantee of the disk’s health. (Not all that long ago, for instance, I had a disk that was clicking--a sure sign of an impending failure--but Windows continued to show the disk as being healthy.)

        Incidentally, if you have a large number of disks installed in a server, you can easily filter the Get-PhysicalDisk cmdlet’s output so that only the unhealthy disks are shown. The command for doing so is:

        Get-PhysicalDisk | Where-Object {$_.HealthStatus  -ne ‘Healthy’}


        For the purposes of this article, let’s assume that PowerShell does identify one of the disks as being unhealthy. Since it is a physical disk that is being reported as unhealthy (as opposed to a volume health issue, which can be checked by using the Get-Volume cmdlet), it is safe to assume that the disk needs to be replaced. So, how do you figure out which physical disk to replace based on the information that Windows has given you?

        One of the easiest ways to check disk health is to tell PowerShell to illuminate the disk’s LED light. Before you can do this, however, you will need to know the disk’s friendly name. If you look back at the previous screen capture, you can see that Windows provides a friendly name for each disk. This friendly name must be used in conjunction with the Enable-PhysicalDiskIdentification cmdlet.

        You can easily type the Enable-PhysicalDiskIdentification cmdlet, followed by the disk’s friendly name. That technique works flawlessly. However, friendly names are often anything but friendly and can be cumbersome to type. There is also the human error factor that must be considered. If you accidentally type the wrong disk’s friendly name, you could end up replacing the wrong disk. As such, I recommend using PowerShell to extract the disk’s friendly name. You can then supply the friendly name directly to the Enable-PhysicalDiskIdentification cmdlet in the form of a variable.

        The first step in the process is to create a variable named $Disk and set it equal to the unhealthy physical disk. Here is what the command looks like:

        $Disk = Get-PhysicalDisk | Where-Object {$_.HealthStatus  -ne ‘Healthy’}

        Next, I recommend creating a second variable. We’ll call this one $Name. We will set it equal to the disk’s friendly name. Here is the command for doing so:

        $Name = $Disk.FriendlyName

        You can see how these commands work in Figure 2. I don’t have an unhealthy disk on my system, so I made a slight modification to the first command so that it would retrieve a disk based on its number rather than on its health status.


        Figure 2

        I have written the disk’s friendly name to a variable named $Name.

        The last step in the process is to enter the Enable-PhysicalDiskIdentification cmdlet, followed by the $Name variable. Here is what the command looks like:

        Enable-PhysicalDiskIdentification $Name

        If you receive an error while performing this operation, check to make sure that you are working within an elevated PowerShell session. It is also important to note that this command works only if each disk has a dedicated LED and the hardware supports disk identification. Otherwise, you will receive a Not Supported error.

        When you have finished identifying the disk, you can use the following command to turn the disk’s LED back off:

        Disable-PhysicalDiskIdentification $Name


        Excel File Slow-to-Open Bug in Windows 10

        Excel File Slow-to-Open Bug in Windows 10

        This is one of the issues that has plagued me since upgrading my systems to Windows 10, but due to a busy travel schedule and other miscellaneous work items, I just delayed digging in to figure out a solution. Last night I had had enough and spent a good hour developing a solution.

        The solution is a simple one, but makes absolutely no sense. I chalk it up to an errant bug Microsoft missed.

        The Problem

        Running either Office 2013 or the latest Office 2016, when opening an Excel file from the file system, it takes close to 20 seconds for the file to open completely. It doesn’t matter if the file is sitting in the Cloud, on a network share, or even locally – it just takes forever to load, even if the file contains no data. To make matters more confusing, if you open Excel first (which opens quickly on its own) and then open the file, the file opens blazingly fast. So, it would seem that it’s an Excel issue, right?

        To further confound the wise, the issue doesn’t exist for everyone. And, that seems to eliminate an Excel issue and put the blame squarely on Windows 10, or at least a component of Windows 10. Why would the experience differ between Windows 10 users?

        I finally figured out why…

        This is one of the issues that has plagued me since upgrading my systems to Windows 10, but due to a busy travel schedule and other miscellaneous work items, I just delayed digging in to figure out a solution. Last night I had had enough and spent a good hour developing a solution.

        The solution is a simple one, but makes absolutely no sense. I chalk it up to an errant bug Microsoft missed.

        The Problem

        Running either Office 2013 or the latest Office 2016, when opening an Excel file from the file system, it takes close to 20 seconds for the file to open completely. It doesn’t matter if the file is sitting in the Cloud, on a network share, or even locally – it just takes forever to load, even if the file contains no data. To make matters more confusing, if you open Excel first (which opens quickly on its own) and then open the file, the file opens blazingly fast. So, it would seem that it’s an Excel issue, right?

        To further confound the wise, the issue doesn’t exist for everyone. And, that seems to eliminate an Excel issue and put the blame squarely on Windows 10, or at least a component of Windows 10. Why would the experience differ between Windows 10 users?

        I finally figured out why…

        The Reason

        I’ve yet to figure out why this is, but if you turn on the “Hey, Cortana” voice command feature after installing or upgrading to Windows 10, it bogs down Excel file execution. This issue only exists for Excel and none of the other Office applications. Word, PowerPoint, etc., work just fine.

        Those that never turned on “Hey, Cortana” (which is an awesome feature, btw) have never experienced this problem, hence why the issue exists for some and not others.

        The Fix

        To fix the issue and speed up the opening of Excel files, you have to turn off the “Hey, Cortana” feature.

        This is one of the issues that has plagued me since upgrading my systems to Windows 10, but due to a busy travel schedule and other miscellaneous work items, I just delayed digging in to figure out a solution. Last night I had had enough and spent a good hour developing a solution.

        The solution is a simple one but makes absolutely no sense. I chalk it up to an errant bug Microsoft missed.

        The Problem

        Running either Office 2013 or the latest Office 2016, when opening an Excel file from the file system, it takes close to 20 seconds for the file to open completely. It doesn’t matter if the file is sitting in the Cloud, on a network share, or even locally – it just takes forever to load, even if the file contains no data. To make matters more confusing, if you open Excel first (which opens quickly on its own) and then open the file, the file opens blazingly fast. So, it would seem that it’s an Excel issue, right?

        To further confound the wise, the issue doesn’t exist for everyone. And, that seems to eliminate an Excel issue and put the blame squarely on Windows 10, or at least a component of Windows 10. Why would the experience differ between Windows 10 users?

        I finally figured out why…

        The Reason

        I’ve yet to figure out why this is, but if you turn on the “Hey, Cortana” voice command feature after installing or upgrading to Windows 10, it bogs down Excel file execution. This issue only exists for Excel and none of the other Office applications. Word, PowerPoint, etc., work just fine.

        Those that never turned on “Hey, Cortana” (which is an awesome feature, btw) have never experienced this problem, hence why the issue exists for some and not others.

        The Fix

        To fix the issue and speed up the opening of Excel files, you have to turn off the “Hey, Cortana” feature.

        To do this:

        1. Open Cortana and go to Settings.


        2. 

        Locate the Hey Cortana setting and turn it OFF.


        3.  Reboot the computer.


        I’m sure Microsoft will fix this bug eventually, but at least there’s a remedy – even if you have to turn off a valuable and highly touted feature of Windows 10.


        Thanks for Reading...

        Masud Rana

        How to Automatically Monitor Storage Health in Windows Server

        How to Automatically Monitor Storage Health in Windows Serve

        Here’s how to automatically monitor storage health using a PowerShell cmdlet.

        Windows Server includes a PowerShell cmdlet called Get-ClusterPerformanceHistory that gives organizations a way to monitor storage health. The cmdlet returns a wealth of information about a cluster’s storage health, but you can take advantage of this information only if you remember to use cmdlet. However, there is a way to set up PowerShell to automatically run the cmdlet on a scheduled basis. Here’s how to set up automatic storage health monitoring in Windows Server using the Get-ClusterPerformanceHistory cmdlet.

        There are three basic tasks you will need to perform to monitor storage health using the Get-ClusterPerformanceHistory cmdlet:

        • Make the script run according to a schedule.
        • Configure the script to check to make sure that reported values fall within the expected range.
        • Send an alert to an administrator if values exceed a predetermined threshold.

        So let’s take a look at how you might accomplish these three tasks.

        1. Run the script on a schedule.

        It’s relatively easy to make a PowerShell script run automatically according to a schedule by using the Windows Task Scheduler.

        To do so, open the Task Scheduler, then choose the Create Task option. The Create Task window is divided into several tabs. The General tab lets you assign a name to the task, and you can use the Triggers tab to set up the task schedule. The Actions tab is where you will need to go to tell Windows to run your PowerShell script. Make sure that the Action option is set to Start a Program, and then set powershell.exe as the program name.  You can then use the Add Arguments section to specify the name of the script you want to run. You will need to specify the -File switch followed by the path and filename of the script. You can see an example of this in Figure 1.


        Tuesday, June 1, 2021

        Outlook Is Working Offline – How to Switch to Online

         Outlook Is Working Offline – How to Switch to Online


        Sometimes, you may face problem to send or receive email through Microsoft Outlook if it is disconnected or non-functional. If Outlook does not send or receive email, Outlook is called “Offline”.

        Below steps will ensure, how to switch Outlook from Offline (Disconnected) to Online (Connected Stage)

        1.     In Outlook, on the Send/Receive tab, If the background of the Work Offline button is shaded (as shown in the image below), means the outlook is not connected. But if the background of Work Offline is clear, means the outlook is connected.


        2.      If Outlook is working Offline, there can be different reasons. Firstly, you have to check whether your Internet connection is working perfectly or not. 

        3.      If the Internet connection is okay, you have to reconnect Outlook by resetting Work Offline Status.

        On the Send/Receive tab, choose (click) Work Offline, and check your status bar. If the status shows Working Offline, repeat the action. If the background of Work Offline is clear alike below image, your outlook is connected and Online.  In this stage, you should send / receive email through outlook.


          In the bottom status bar of Outlook, it will be shown “Connected to Microsoft Exchange” as like above image.

        4.     If Outlook remains Offline stage (Not connected), you can send/receive email through icddrb webmail (webmail.icddrb.org) like the below image.


        Thanks for Reading....
        Md. Masud Rana

        How to Find/Read Message Headers in Outlook

        How to Find/Read Message Headers in Outlook


        Step-1: Open email from where you want to find/read full header information. From the top left corner Click on File


        Step-2: Click on Properties


        Step-3: Below properties window will open, from where you can find email internet headers.


         Thanks for reading....

        Md. Masud Rana


        Microsoft office broken copy-and-paste functionality in multiple versions of Excel

         Microsoft office broken copy-and-paste functionality in multiple versions of Excel A recent Microsoft security update (KB5002914) released ...