Skype is the most popular messaging application in the world, but besides instant messaging support, this application also supports video and audio calls.
Users reported that Skype audio isn’t working on Windows 10, so let’s see how to fix this problem.
Frequent Skype audio issues
Skype is a great application, but many users reported audio issues while using Skype. Speaking of issues, these are some of the common problems that users reported:
- Skype no sound in call – According to users, sometimes they aren’t getting any sound during their Skype call. This can appear if your microphone or speakers aren’t properly configured in Skype.
- Skype audio very quiet – This is another common problem with Skype. By default, Skype automatically adjusts the audio levels, and if your audio is quiet, be sure to disable this feature and check if that solves the problem.
- Skype audio won’t go through headphones – This is another problem that can appear on Skype. If this happens, make sure that your headphones are selected as a default audio device in Skype.
- Skype audio breaking up – Sometimes your Skype audio can break up during the call. To fix this problem, be sure that you don’t have any downloads running in the background. In addition, you might want to try switching to a wired network and check if that helps.
- Skype audio output not working – If this problem occurs, you need to check your playback settings and make sure that your speakers or headphones are set as the default audio device.
- Skype audio distorted – This problem can appear due to your network connection, and in order to fix it, be sure to check if your connection is fast and stable.
Steps to fix audio issues on Skype
Solution 1 – Make sure that your speakers and microphone are properly configured
Usually problems with audio in Skype are due to your configuration, so you’ll have to set the proper audio device and microphone in Skype. To do that, follow these steps:
- Open Skype.
- Go to Tools > Options.
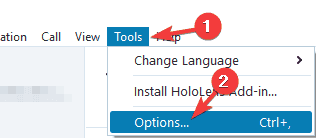
- Navigate to the Audio settings tab.
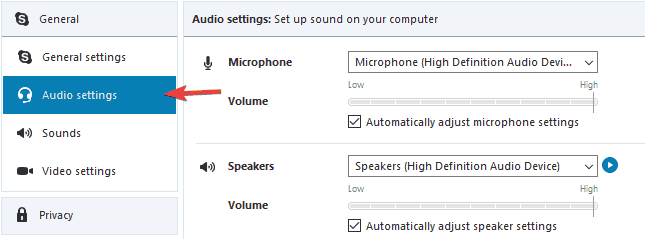
- Be sure that Microphone and Speakers are properly set. If you want, you can test both microphone and speakers from Skype. If your speakers and microphone passed the test, it means that they are properly configured and working in Skype.
- Click Save to save changes.
According to users, sometimes an update can change your default speakers or microphone, so be sure to check if your audio device is properly configured in Skype.
Solution 2 – Use Microsoft’s default audio driver
If you have audio issues in Skype, it might because your audio driver isn’t fully compatible with Skype. To fix this problem users are suggesting to use the default Microsoft driver instead.
If you want to switch back to the default driver, you’ll have to uninstall your current driver. To do that, follow these steps:
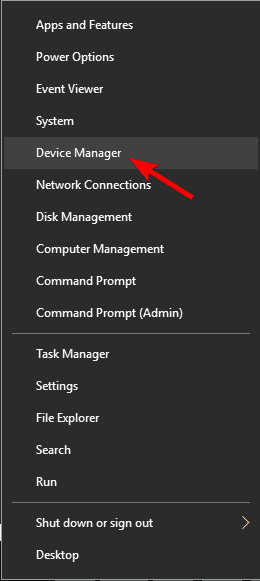
- Press Windows Key + X to open Power User Menu and choose Device Manager from the list.
- Once Device Manager opens, locate your audio device, right-click it and choose Uninstall device.
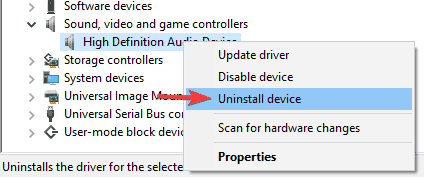
- If available, check Delete the driver software for this device and click Uninstall.
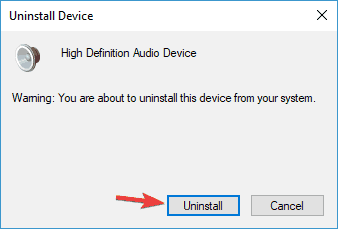
- After you delete the driver, restart your PC.
When your PC restarts, the default driver will be installed and problems with Skype audio should be fixed.
Solution 3 – Update your audio drivers
Users reported that you can fix Skype audio issues simply by downloading and installing the latest drivers for your audio device. You can download the latest drivers from your motherboard or sound card manufacturer’s website.
Users reported issues with Realtek drivers, but even if you don’t use Realtek sound card you might want to try updating your audio drivers.
There are many versions of drivers for audio cards, so select the exact version and then download and install it. This can be a long process, especially if you do it manually.
Download TweakBit’s Driver Updater Tool (approved by Microsoft and Norton) to do it automatically.
This tool will help you to avoid permanent damage to your PC by downloading and installing the wrong driver versions.
Disclaimer: some features of this tool are not free.
Solution 4 – Change your microphone settings
If you’re having Skype audio issues, you might be able to fix them by changing your microphone settings. You can do that by following these steps:
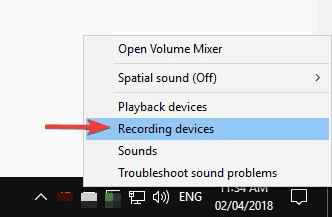
- Right-click the audio icon on your Taskbar and choose Recording Devices from the menu.
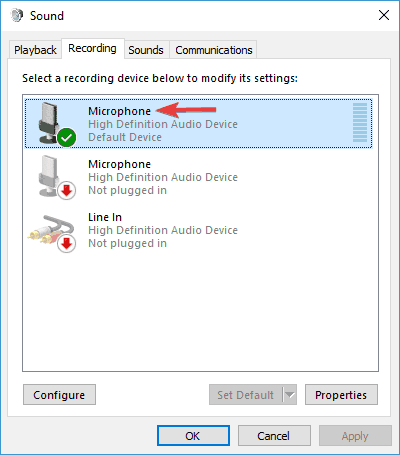
- Locate your microphone and double-click it to open its properties.
- Go to Advanced tab and make sure that Allow applications to take exclusive control of this device is not enabled.
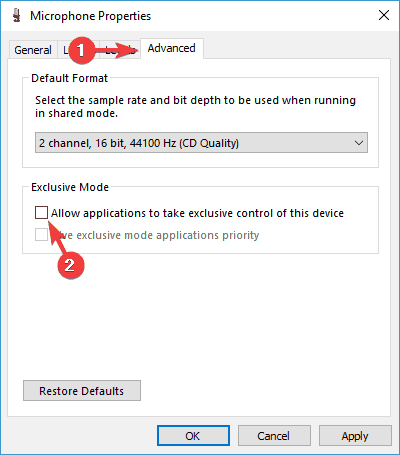
- Click Apply and OK.
Solution 5 – Restart Windows Audio service
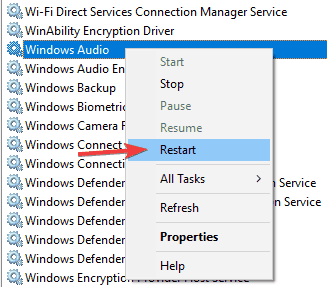
Sometimes Skype audio issues can be caused by Windows Audio service, and in order to fix this issue, you need to restart it. This is a simple procedure and you can do it by following these steps:
- Press Windows Key + R and enter services.msc. Press Enter or click OK.

- When Services window opens, locate Windows Audio service, right-click it and choose Restart from the menu. If the Restart option isn’t available, just try stopping and starting the service manually.
Solution 6 – Update / reinstall Skype
According to users, you can fix this problem simply by installing the latest version of Skype.
You can update Skype simply by downloading the latest version directly from Skype’s website, or you can update it from the Skype application itself.
To do that, just follow these steps:
- Sign-in to Skype.
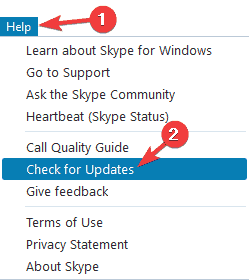
- Now go to Help menu and choose Check for Updates.
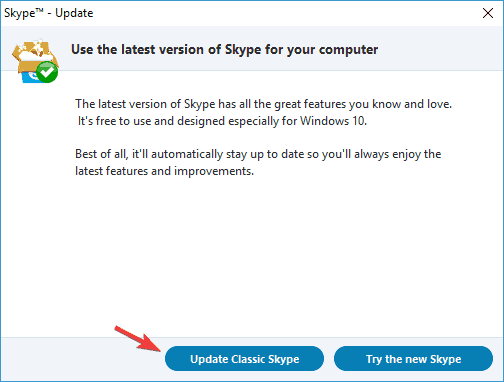
- Now click Update Classic Skype.
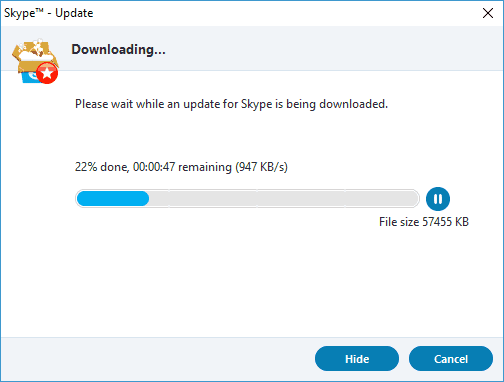
- The update process will now start, so don’t interrupt it.
If you already have the latest version installed, you might want to switch back to the older version of Skype and check if that fixes the issue for you.
In addition to updating, users also suggest that you reinstall Skype and delete all Skype-related registry entries. To do that, you can uninstall Skype and manually remove all Skype entries from your registry.
Manually deleting entries from the registry isn’t the best or the most practical solution, so you might want to use Iobit Uninstaller Pro (free) or a similar tool to completely remove Skype from your PC.
After you remove Skype, try reinstalling it and check if that fixes the problem. If Skype won’t reinstall, we got your back with this guide to fix the issue.
Solution 7 – Select the proper audio device
According to users, if Skype audio isn’t working, the problem might be your audio device. If correct audio device isn’t selected, you might encounter certain issues on your PC, most commonly the lack of sound.
This isn’t a major problem, and it can be easily resolved by doing the following:
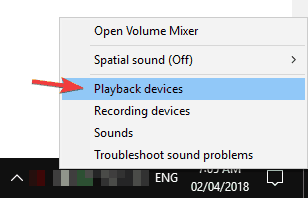
- Right-click the audio button in the bottom right corner and choose Playback devices from the menu.
- Now you should see several devices available. Make sure that you have the correct playback device set as default. To set a device as a default audio device, simply right-click it and choose Set as default.
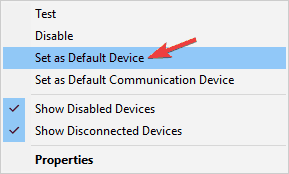
- After changing your default playback device, click Apply and OK to save changes.
Once you change your default audio device, check if the problem is resolved.
To fix this problem, in most cases you just have to set your speakers or headphones as the default playback device, and the issue should be resolved.
Solution 8 – Check if your speakers and microphone are properly connected
If you’re having any audio issues during Skype calls, that might be due to your microphone or speakers.
Several users reported that the other side can’t hear them during the Skype call, and that is most likely caused by your microphone.
Just like your headphones speakers, your microphone uses 3.5mm jack, so it’s possible that you connected your microphone to a wrong port by accident.
This is just a minor problem, and to fix it, simply disconnect it from the wrong port and connect it to a right one.
As you can see, this is a quick and easy solution, so be sure to try it out.
Solution 9 – Try changing your DNS server
According to users, sometimes your DNS settings can cause problems with Skype audio.
This isn’t a serious problem, and you can easily fix it simply by switching to Google’s DNS. To do that, just follow these simple steps:
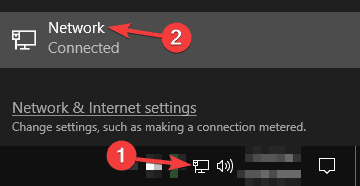
- Click the network icon in the bottom right corner and select your network from the list.
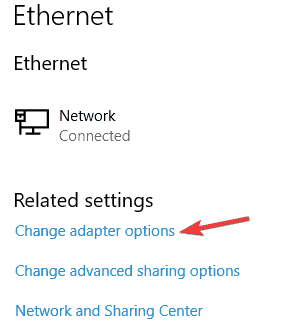
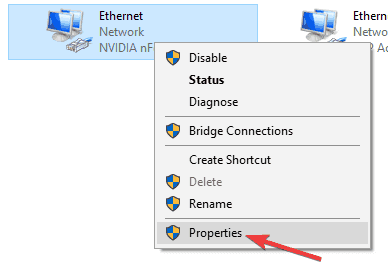
- Now click the Change adapter options.
- Locate your current network, right click it and choose Properties from the menu.
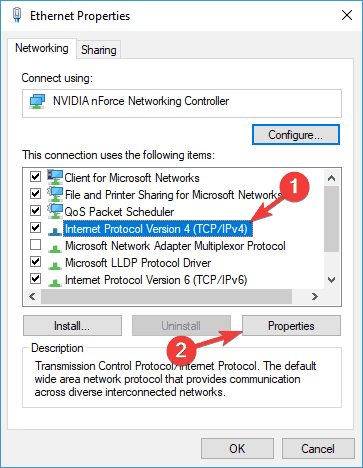
- Select Internet Protocol Version 4 (TCP/IPv4) and click the Properties button.
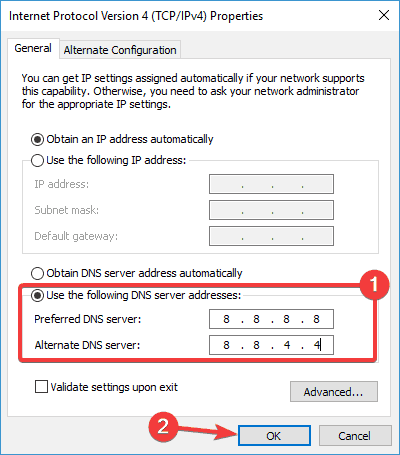
- Now select Use the following DNS server addresses and enter the following:
- Now click OK to save changes.
In addition to Google’s DNS, you can also try using OpenDNS. After you change your DNS, check if the problem with Skype is resolved.
Solution 10 – Check your network connection
If you’re having Skype audio problems, the issue might be your network connection.
If you have any problems with your Internet connection, Skype will automatically change the quality of your audio in order to keep your call active.
However, you might get better results simply by using a wired connection. Wi-Fi connection can suffer from interference, therefore it’s always better to use a wired connection.
If you can, switch to a wired connection and check if that solves your problem.
Solution 11 – Close other applications
Sometimes other applications can interfere with Skype and cause problems with audio. To minimize the interference, be sure to disable all streaming applications and downloads.
After doing that, Skype will be able to use your bandwidth without any issues or interference from other applications.
Speaking of bandwidth, here are the best monitor tools that you can choose to keep track of your internet activity.
If Skype audio isn’t working that can be a big problem because you won’t be able to perform Skype calls with your friends, but we hope that one of our solution helped you fix this issue.
No comments:
Post a Comment