Top 10 Most Important Group Policy Settings for Preventing Security Breaches

There are some simple Group Policy Settings, which if appropriately configured, can help to prevent data breaches. You can make your organizational network safer by configuring the security and operational behavior of computers through Group Policy (a group of settings in the computer registry). Through Group Policy, you can prevent users from accessing specific resources, run scripts, and perform simple tasks such as forcing a particular home page to open for every user in the network. In this article, you will learn about some important Group Policy settings that simply cannot be ignored.
Common Steps to Modify Group Policies
You must always remember to modify custom GPOs only, (create a new GPO and link it to the domain) available under “Domain Controllers” in the Group Policy Management Console. After applying the suggested changes, make your GPO applicable to “Everyone” in the domain and update the Group Policy Objects.
1. Moderating Access to Control Panel
Setting limits on a computers’ Control Panel creates a safer business environment. Through Control Panel, you can control all aspects of your computer. So, by moderating who has access to the computer, you can keep data and other resources safe. Perform the following steps:
- In Group Policy Management Editor (opened for a user-created GPO), navigate to “User Configuration” “Administrative Templates” “Control Panel”.
- In the right pane, double-click “Prohibit access to Control Panel and PC settings” policy in to open its properties.
- Select “Enabled” from the three options.
- Click “Apply” and “OK”.
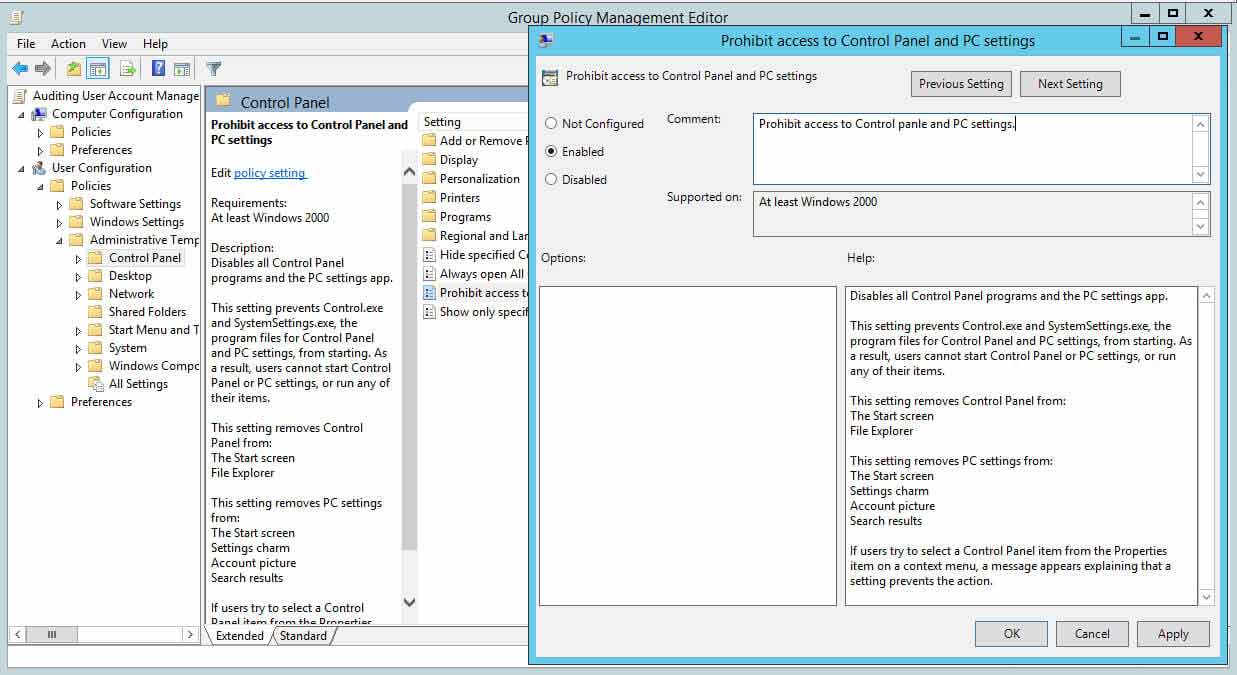 Figure 1: Configuring Control panel settings through GPO
2. Prevent Windows from Storing LAN Manager Hash
Windows generates and stores user account passwords in “hashes.” Windows generates both a LAN Manager hash (LM hash) and a Windows NT hash (NT hash) of passwords. It stores them in the local Security Accounts Manager (SAM) database or Active Directory.
The LM hash is weak and prone to hacking. Therefore, you should prevent Windows from storing an LM hash of your passwords. Perform the following steps to do so:
- In Group Policy Management Editor window (opened for a custom GPO), go to “Computer Configuration” “Windows Settings” “Security Settings” “Local Policies” “Security Options”.
- In the right pane, double-click “Network security: Do not store LAN Manager hash value on next password change” policy.
- Select “Define this policy setting” checkbox and click “Enabled.
- Click “Apply” and “OK”.
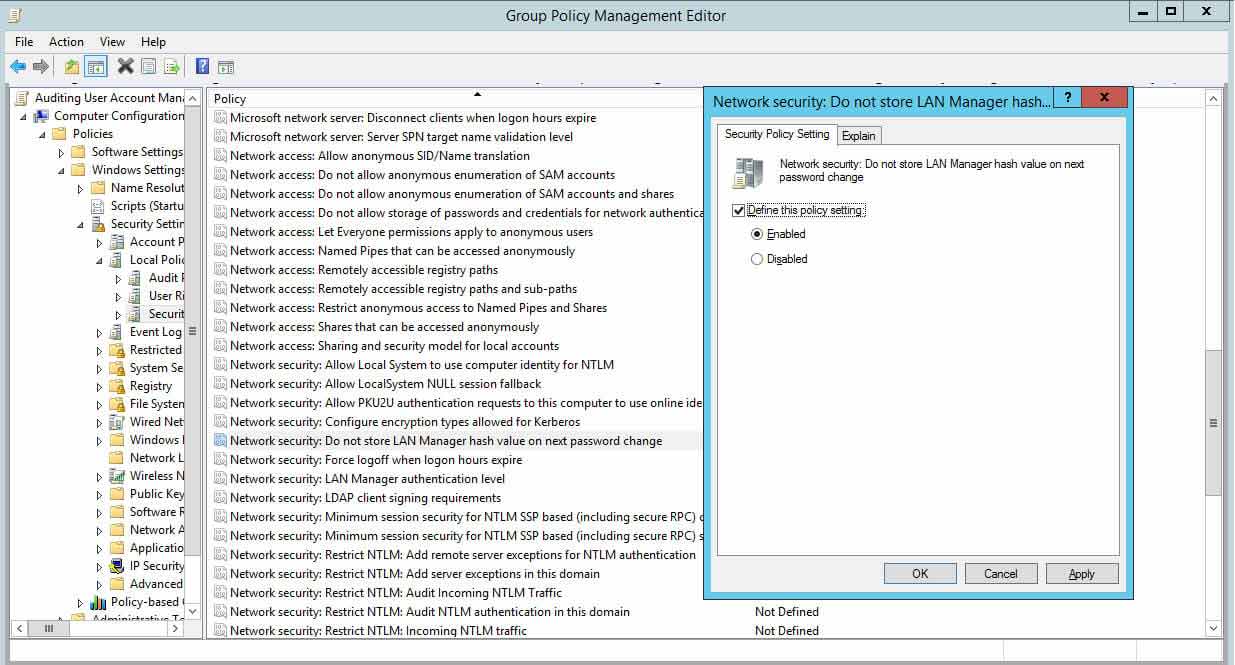 Figure 2: Configuring policy to not store LAN Manager hash value policy
3. Control Access to Command Prompt
Command Prompts can be used to run commands that give high-level access to users and evade other restrictions on the system. So, to ensure system resources’ security, it’s wise to disable Command Prompt.
After you have disabled Command Prompt and someone tries to open a command window, the system will display a message stating that some settings are preventing this action. Perform the following steps:
- In the window of Group Policy Management Editor (opened for a custom GPO), go to “User Configuration” “Windows Settings” “Policies” “Administrative Templates” “System”.
- In the right pane, double-click “Prevent access to the command prompt” policy.
- Click “Enabled” to apply the policy.
- Click “Apply” and “OK”.
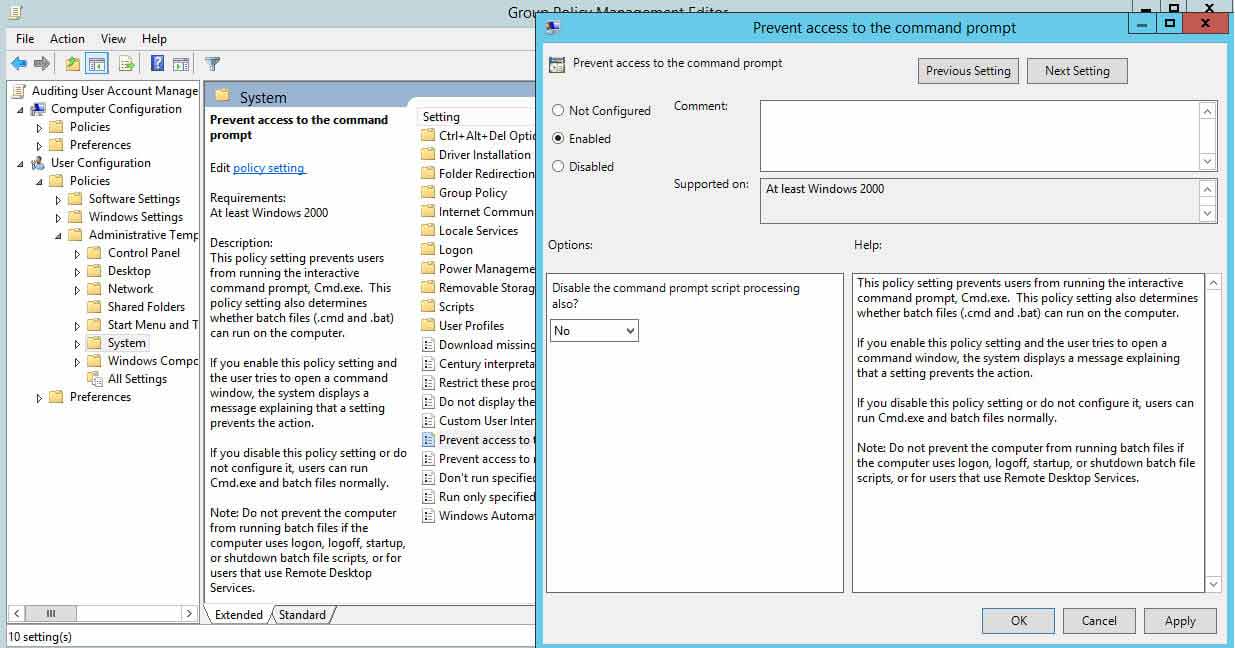 Figure 3: Prevent access to the command prompt window
4. Disable Forced System Restarts
Forced system restarts are common. For example, you may face a situation where you were working on your computer and Windows displays a message stating that your system needs to restart because of a security update.
In many cases, if you fail to notice the message or take some time to respond, the computer restarts automatically, and you lose important, unsaved work. To disable forced restart through GPO, perform the following steps:
- In “Group Policy Management Editor” window (opened for a custom GPO), go to “Computer Configuration” “Administrative Templates” “Windows Component” “Windows Update”.
- In the right pane, double-click “No auto-restart with logged on users for scheduled automatic updates installations” policy.
- Click “Enabled” to enable the policy.
- Click “Apply” and “OK”.
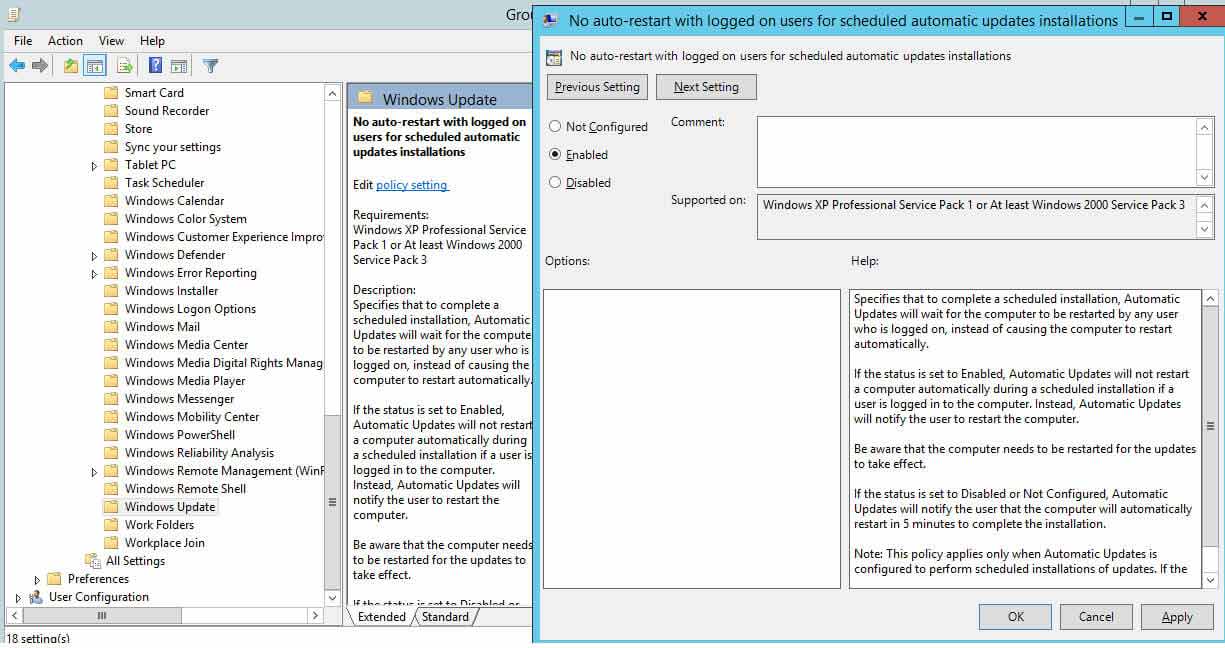 Figure 4: No system auto-restart with logged on users
5. Disallow Removable Media Drives, DVDs, CDs, and Floppy Drives
Removable media drives are very prone to infection, and they may also contain a virus or malware. If a user plugs an infected drive to a network computer, it can affect the entire network. Similarly, DVDs, CDs and Floppy Drives are prone to infection.
It is therefore best to disable all these drives entirely. Perform the following steps to do so:
- In Group Policy Management Editor window (opened for a custom GPO), go to “User Configuration” “Policies” “Administrative Templates” “System” “Removable Storage Access”.
- In the right pane, double-click “All removable storage classes: Deny all accesses” policy
- Click “Enabled” to enable the policy.
- Click “Apply” and “OK”.
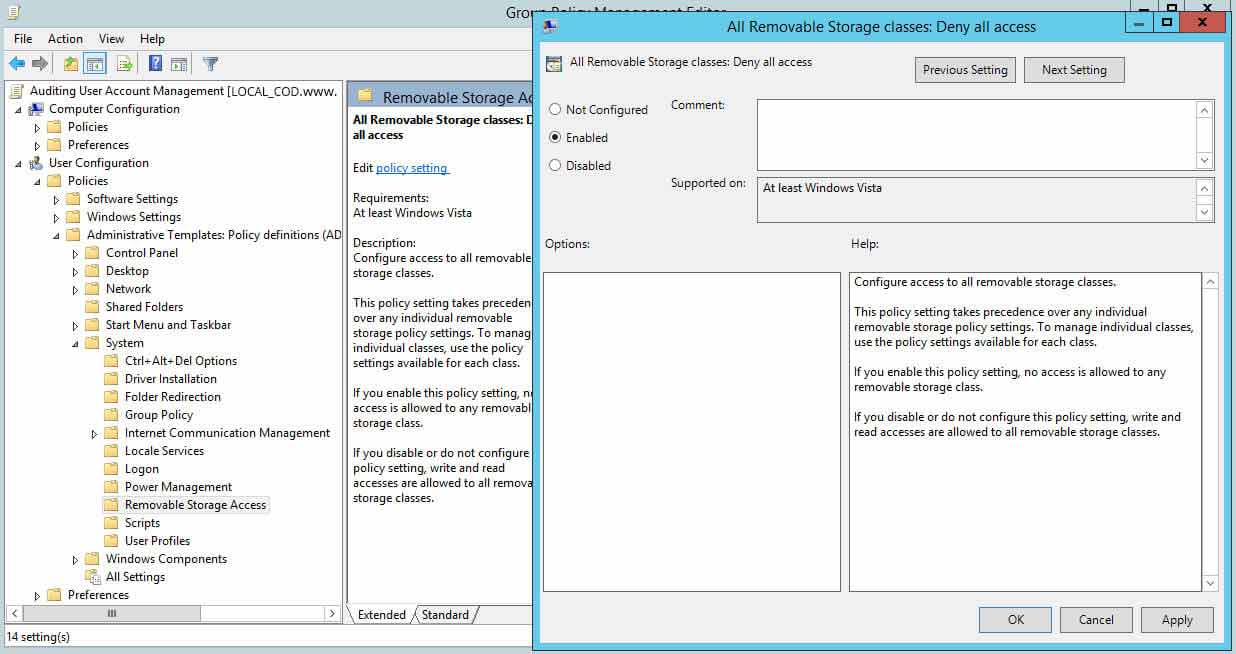 Figure 5: Deny access to all removable storage classes
6. Restrict Software Installations
When you give users the freedom to install software, they may install unwanted apps that compromise your system. System admins will usually have to routinely do maintenance and cleaning of such systems. To be on the safe side, it’s advisable to prevent software installations through Group Policy:
- In Group Policy Management Editor (opened for a custom GPO), go to “Computer Configuration” “Administrative Templates” “Windows Component” “Windows Installer”.
- In the right pane, double-click “Prohibit User Install” policy.
- Click “Enabled” to enable the policy
- Click “Apply” and “OK”.
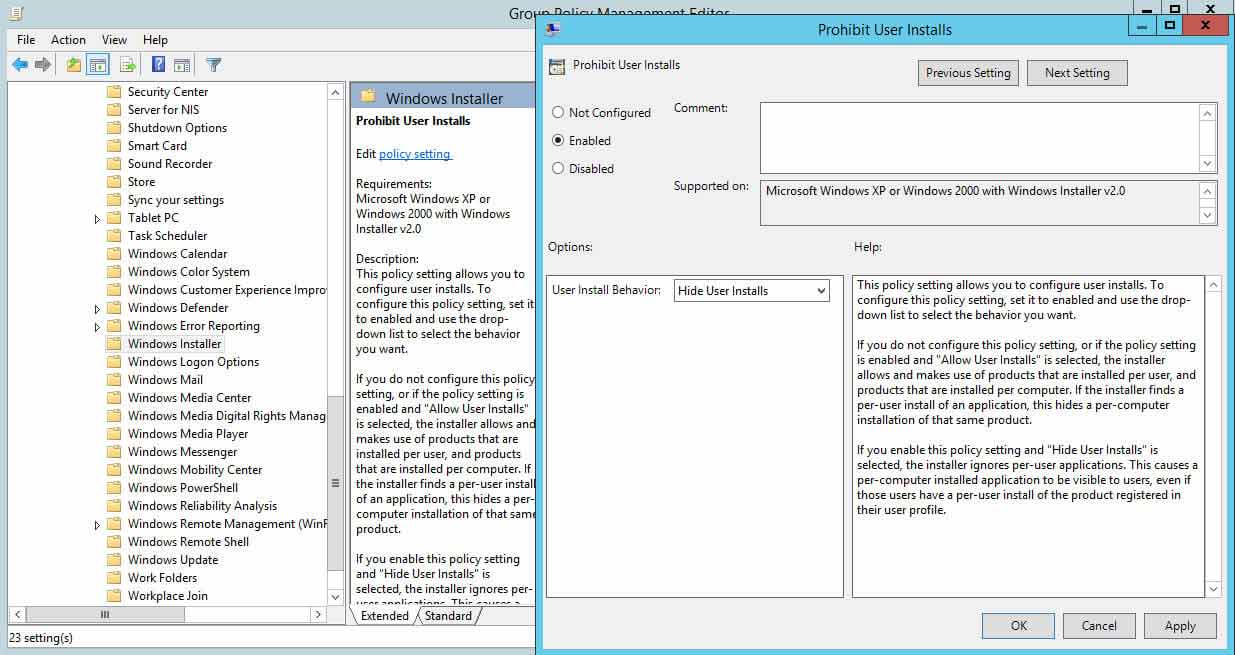 Figure 6: Restricting software installations
7. Disable Guest Account
Through a Guest Account, users can get access to sensitive data. Such accounts grant access to a Windows computer and do not require a password. Enabling this account means anyone can misuse and abuse access to your systems.
Thankfully, these accounts are disabled by default. It’s best to check that this is the case in your IT environment as, if this account is enabled in your domain, disabling it will prevent people from abusing access:
- In Group Policy Management Editor (opened for a custom GPO), go to “Computer Configuration” “Windows Settings” “Security Settings” “Local Policies” “Security Options”.
- In the right pane, double-click “Accounts: Guest Account Status” policy.
- Select “Define this policy setting” checkbox and click “Disabled”.
- Click “Apply” and “OK”.
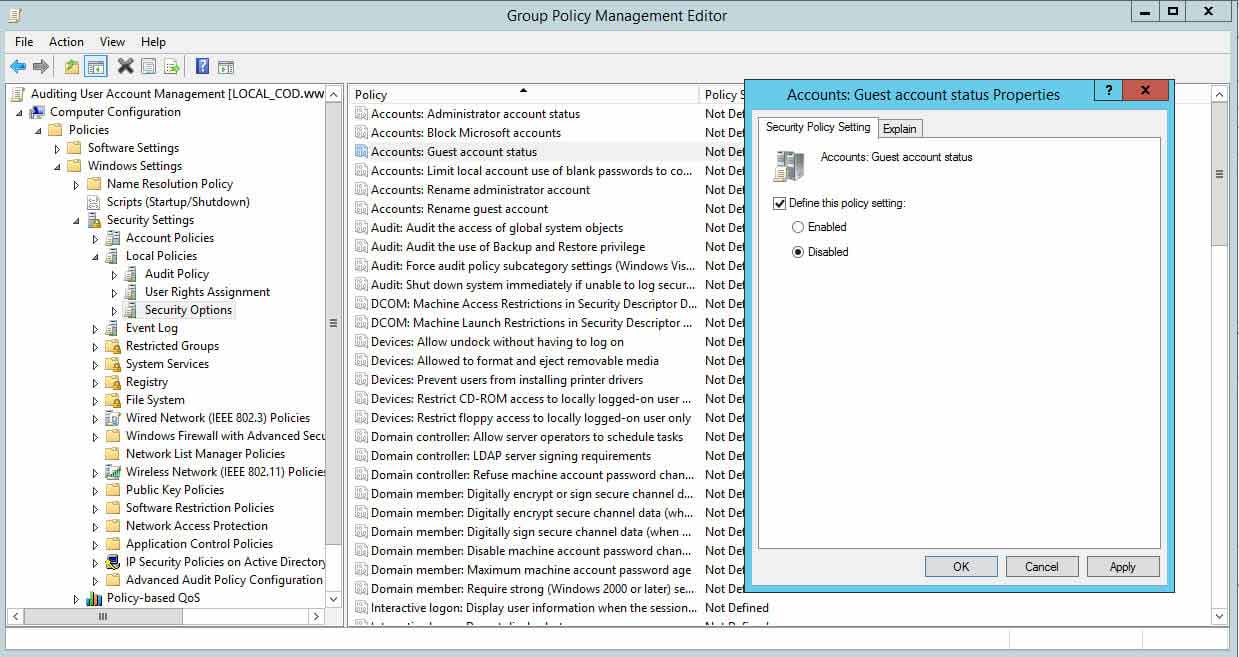 Figure 7: Disabling guest account
8. Set Minimum Password Length to Higher Limits
Set the minimum password length to higher limits. For example, for elevated accounts, passwords should be set to at least 15 characters, and for regular accounts at least 12 characters. Setting a lower value for minimum password length creates unnecessary risk. The default setting is “zero” characters, so you will have to specify a number:
- In Group Policy Management Editor window (opened for a custom GPO), go to “Computer Configuration” “Windows Settings” “Security Settings” “Account Policies” “Password Policy”.
- In the right pane, double-click “Minimum password length” policy, select “Define this policy setting” checkbox.
- Specify a value for the password length.
- Click “Apply” and “OK”.
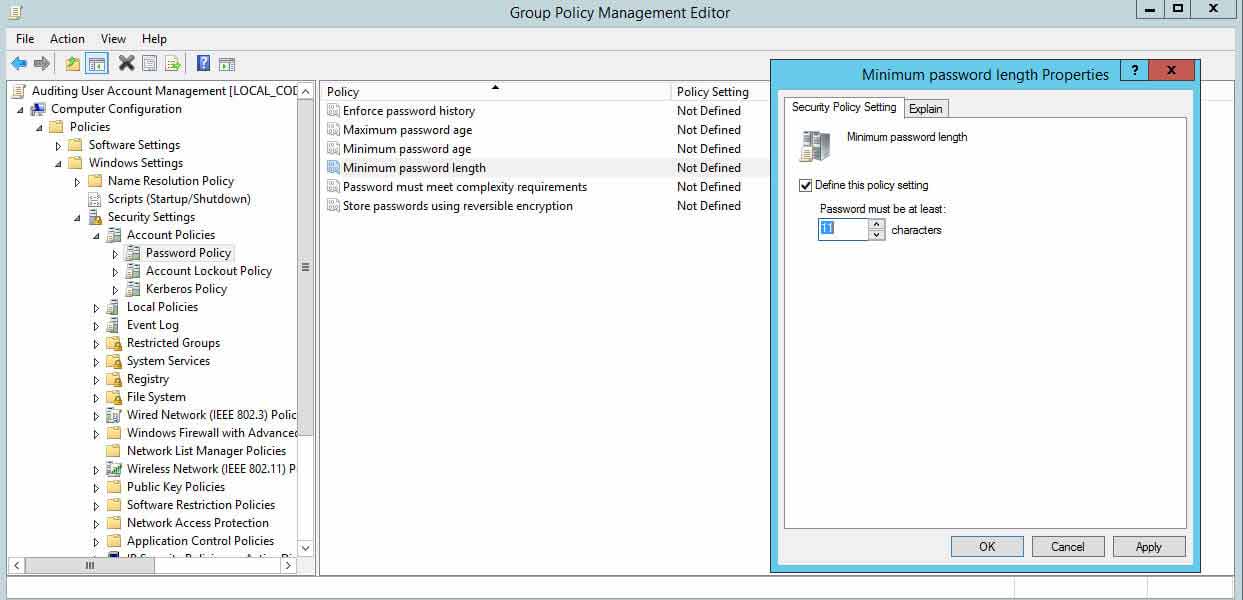 Figure 8: Configuring minimum password age policy setting
9. Set Maximum Password Age to Lower Limits
If you set the password expiration age to a lengthy period of time, users will not have to change it very frequently, which means it’s more likely a password could get stolen. Shorter password expiration periods are always preferred.
Windows’ default maximum password age is set to 42 days. The following screenshot shows the policy setting used for configuring “Maximum Password Age”. Perform the following steps:
- In Group Policy Management Editor window (opened for a custom GPO), go to “Computer Configuration” “Windows Settings” “Security Settings” “Account Policies” “Password Policy”.
- In the right pane, double-click “Maximum password age” policy.
- Select “Define this policy setting” checkbox and specify a value.
- Click “Apply” and “OK”.
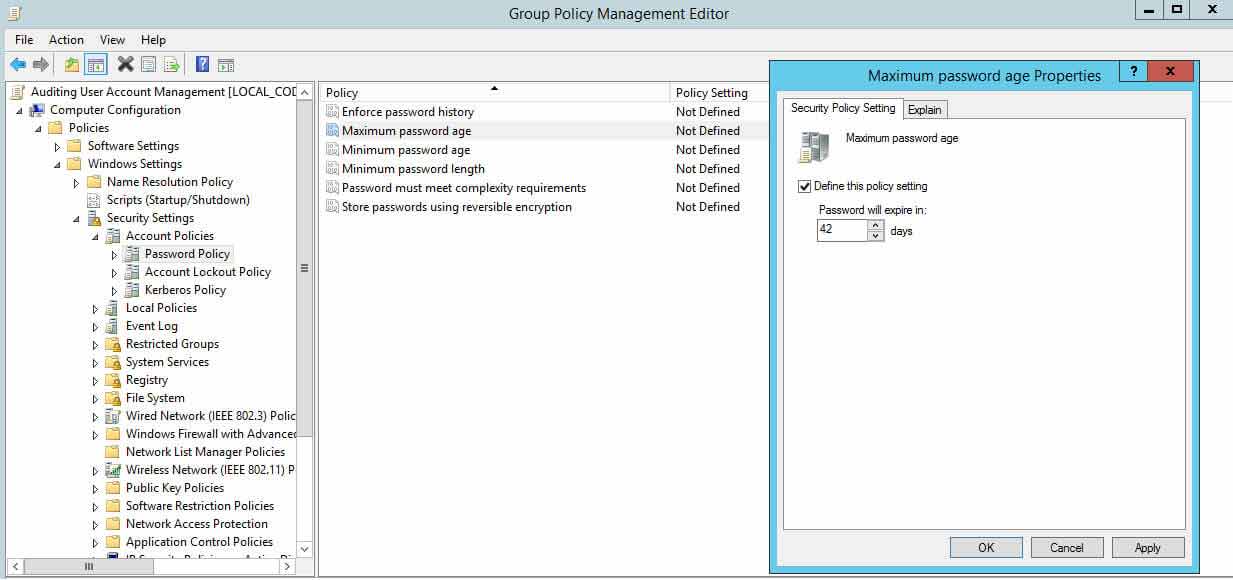 Figure 9: Configuring maximum password age policy setting
10. Disable Anonymous SID Enumeration
Active Directory assigns a unique number to all security objects in Active Directory; including Users, Groups and others, called Security Identifiers (SID) numbers. In older Windows versions, users could query the SIDs to identify important users and groups. This provision can be exploited by hackers to get unauthorized access to data. By default, this setting is disabled, ensure that it remains that way. Perform the following steps:
- In Group Policy Management Editor window, go to “Computer Configuration” “Policies” “Windows Settings” “Security Settings” “Local Policies” “Security Options”.
- In the right pane, double-click “Network Access: Do not allow anonymous enumeration of SAM accounts and shares” policy setting.
- Choose ‘Enabled’ and then click ‘Apply’ and ‘OK’ to save your settings.
If you get these Group Policy settings correct, your organization’s security will automatically be in a better state. Please make sure to apply the modified Group Policy Object to everyone and update the Group Policies to reflect them on all domain controllers in your environment.
Keep GPO Changes in Control
If you want to remain in full control of your IT Infrastructure, you have to make sure no unwanted changes in these policies and other Group Policies are made. You can do this by performing continuous Group Policy Object auditing.
However, doing through native auditing can be tricky, due to the amount of noise generated and the unavailability of predefined reports. To keep a continuous track of changes made in Group Policy Objects, try Lepide Change Reporter for Group Policy Freeware. Our freeware solution allows you to audit every change made to Group Policies.


 in the slicer.
 , and then dragging the cell to another location.
 , and then dragging the cell or range of cells to another location.
 to copy data or to fill adjacent cells with a series of data.