Tuesday, December 13, 2022

How to Make a USB Security Key for Your Winows PC

 How to Make a USB Security Key for Your Windows PC


Add extra security to your computer with a USB access token


How to Create a USB Security Key For Windows

If you want to secure a Windows 10 computer, you have a lot of options. We'll show you how to use USB Raptor, because it's free, but there are also a number of paid apps that do the same thing if you prefer having access to extensive user support in case something ever goes wrong. Some paid apps, like Rohos Logon Key, work on both Windows and Mac.

Here's how to create a USB security key using USB Raptor:


1. Navigate to the USB Raptor Security Key and click Download.


2. Unzip the USB Raptor archive to the location of your choosing, and run the USB Raptor application.


3. Read the terms of service, indicate that you have read it, and click I agree to proceed.


4. Type a password into the encryption field.


5. Select the USB drive you will use for your key, and click Create k3y file


6. Click the check box next to Enable USB Raptor.


7. Click the Advanced configuration check box in the upper right corner of the app.


Warning: At this point, your computer will lock if you remove the USB key. However, it will not be protected the next time you start your computer unless you complete the next step.


8. Under the general settings tab, click the check boxes next to the following:

  • Run USB Raptor at Windows startup
  • Start in system tray
  • USB Raptor always starts armed


Tips: There are a lot of useful settings in USB Raptor, but these are the only ones required to make it work automatically.


9. Click Minimize to tray.

10. The next time you turn your computer on and log in, USB Raptor will launch. If the USB key isn't in place at that time, the computer will lock until you insert the key.


Why Use a USB Security Key?

Strong passwords go a long way toward securing our computers and online accounts, but they can't stand up against keyloggers and other attacks. When you set your computer up to use a USB security key, you ensure that nobody will be able to access it without the key.

The downside of using a USB security key is that you'll also be locked out of your computer if you lose it. Some USB security key apps allow you to leave the option of inputting a password in place to bypass the key, in which case they key is more of a convenience and less of a security measure.

How Do USB Security Keys Work?

To set up a USB security key, you need a USB drive and a USB security key app. You install the app on your computer, set it up, and then use it to create your USB security key. Whenever your computer is on, the app constantly scans your USB ports for a device that contains a specific encrypted file. If that file is not located, the computer is locked down until you insert the USB security key that contains the file.

There is a brief moment of vulnerability with some USB security key apps when you first turn your computer on and log in. If someone has your password, but not your USB security key, they will be able to log in and have a few moments to view and access your files before the USB security key software launches and secures your computer.

Additionally, anyone with access to your computer can set the USB security key software to not launch when your computer starts up. With that in mind, it's important to maintain password secrecy and lock your computer by removing the USB security key whenever you step away from it.


Thanks for Reading...

Masud Rana

Monday, August 1, 2022

How to enable Telnet in windows 11

 How to enable Telnet in windows 11 and Some troubleshooting


What is Telnet?

Telnet, as already mentioned, uses a client/server protocol to access remote servers. You can use Telnet to check connectivity to a remote server.

Moreover, you can make use of Telnet to run commands on a remote server. The output of this will be returned to the Telnet client.

It uses the Transmission Control Protocol/Internet Protocol (TCP/IP) networking protocol to create remote sessions. When connected to a remote system, users can log in to the remote computer by entering their username and password.

Since Telnet doesn’t offer a secure medium of communication with remote servers, you can use it if strong authentication and encryption over the network aren’t critical.

Telnet can be used for a variety of tasks. This includes carrying out activities on a server, including editing files, running various programs on a remote computer, or even checking mail, if you wish.

How can I install and enable the Telnet client on Windows 11?

1. Use Control Panel

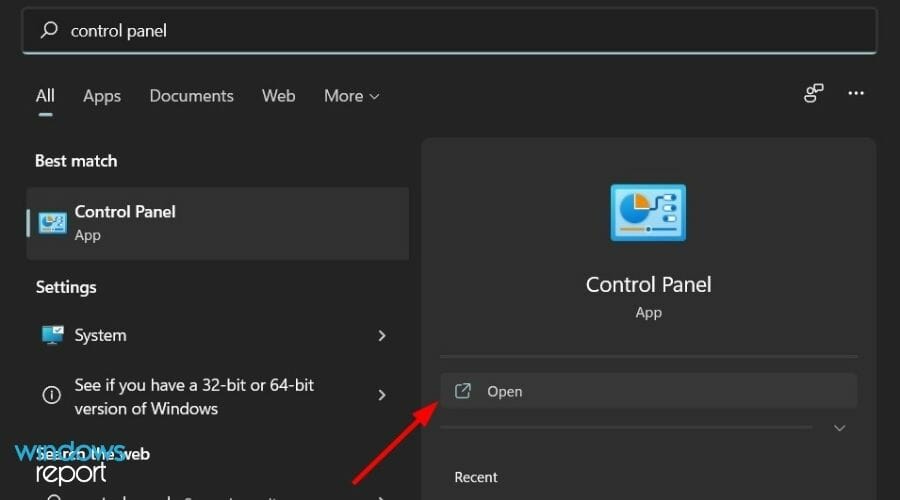
  1. Press the Start menu and search for Control Panel.Control Panel Windows 11 Telnet
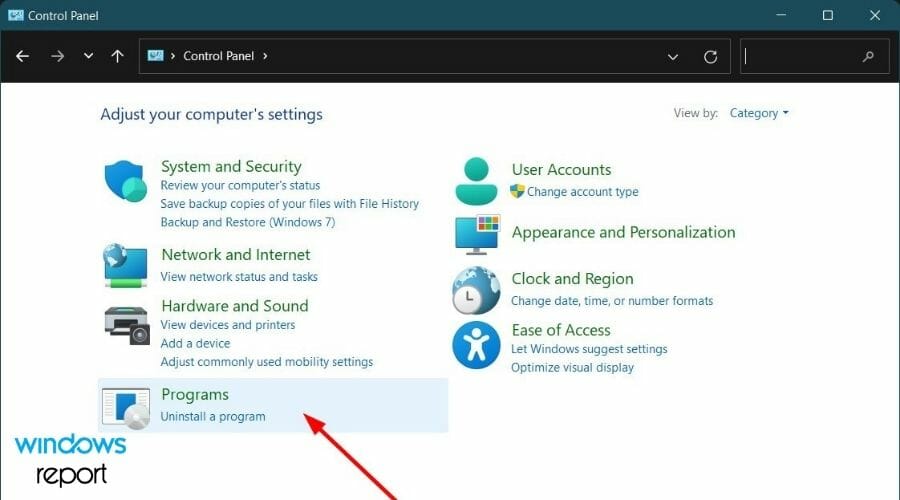
  2. Click on Programs (If you weren’t able to find Programs option, then change the View by option to Category).Programs telnet windows 11
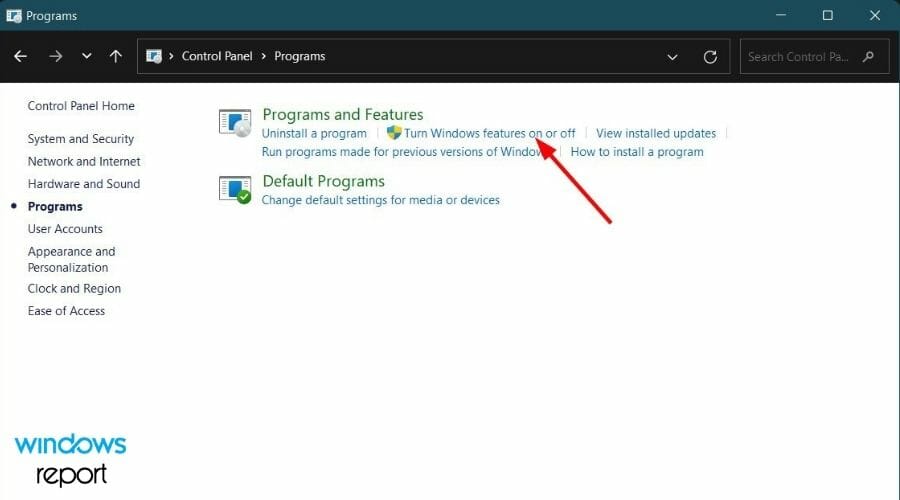
  3. Under Programs and features section, click on Turn Windows features on or off.Windows features telnet windows 11
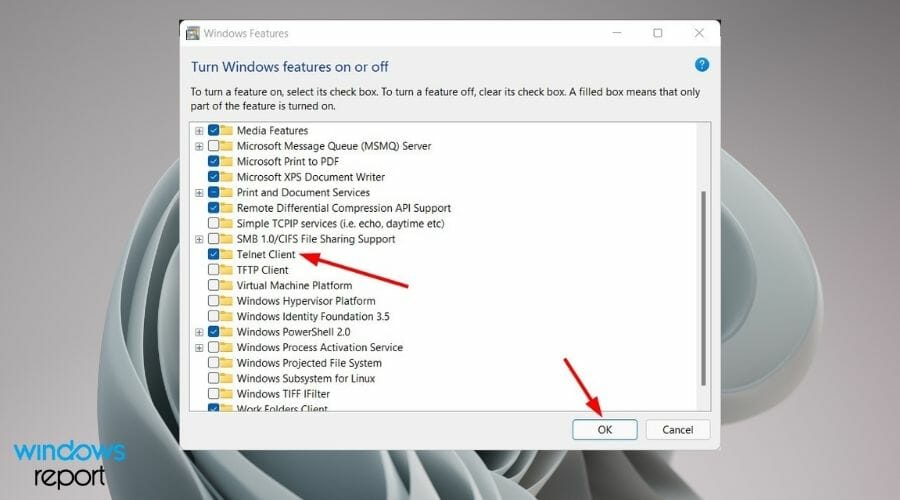
  4. Check the box beside the Telnet client, and hit OK to begin installation.Telnet client

Your system will look for resources and install the Telnet client on your Windows 11 PC. To access Telnet, follow the simple steps below.

  1. Search for command prompt in the Start menu and open it as an administrator.Command prompt
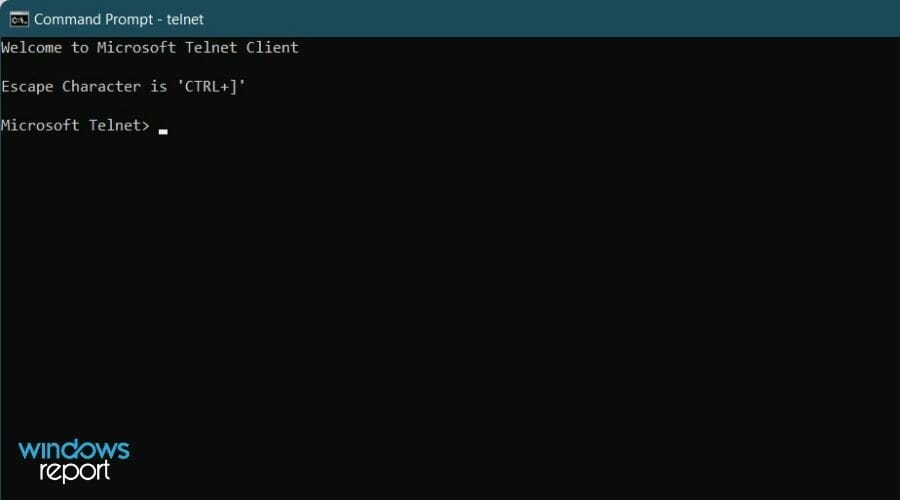
  2. Type in the following command and press Enter:telnetcmd telnet windows 11

2. Use Command Prompt

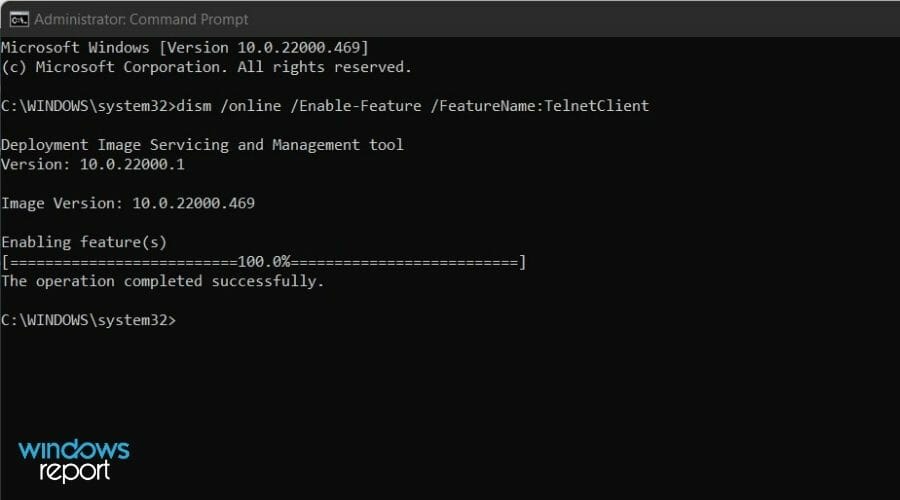
  1. Open the Start menu and search for Command Prompt. Run it as an administrator.Command prompt
  2. In the newly opened command prompt window, type in the below command and press Enter:
    dism /online /Enable-Feature /FeatureName:TelnetClienttelnet install cmd

3. Use Windows PowerShell

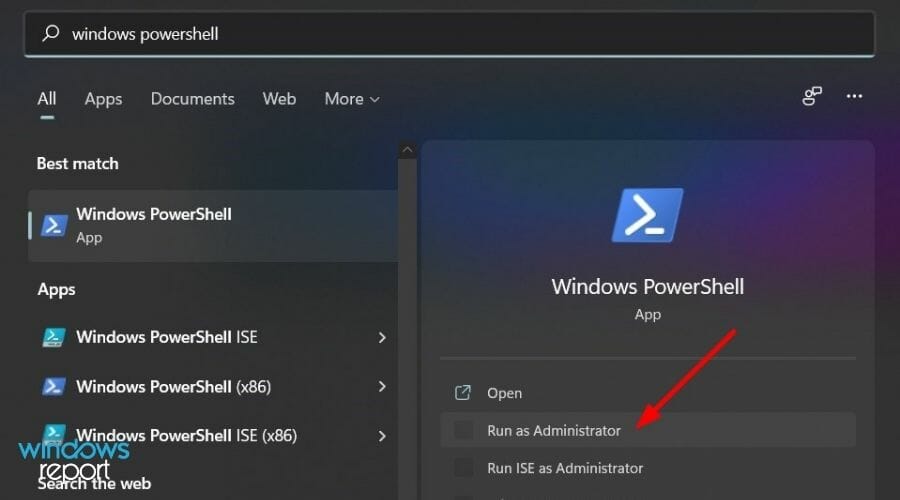
  1. Open the Start menu and search for Windows PowerShell. Open it as an administrator.Windows 11 powershell
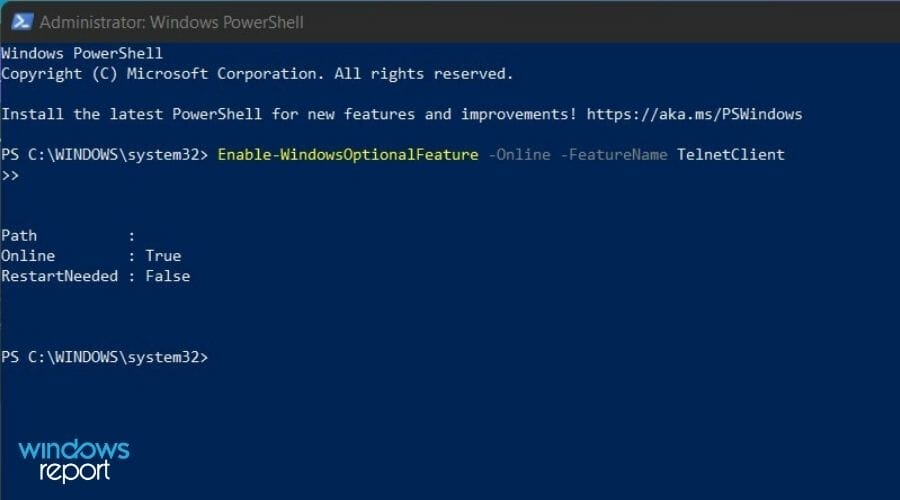
  2. In the newly opened Powershell window, type in the below command and hit the Enter button:
    Enable-WindowsOptionalFeature -Online -FeatureName TelnetClientWindows Powershell Telnet

Your PC will scan for required changes and will remove the Telnet client from your Windows 11 PC. To be on the safe side, you can reboot your PC for the changes to take effect.


,,,

Tuesday, July 5, 2022

How to Remove the News and Weather Widget on Windows 11

How to Remove the News and Weather Widget on Windows 11


How to Enable or Disable Widgets in Windows 11

There are a few methods you can use to enable or disable Widgets in Windows 11. By disable, we mean hide, as there isn’t a way to completely disable the Widgets functionality on Windows 11. You can hide Widgets from view, however.

If you want to quickly hide Widgets, right-click the Widget icon on the taskbar, then select Unpin from Taskbar.


You can also right-click an empty area on the taskbar and select Taskbar Settings.


In the Taskbar settings menu, press the Widgets slider to switch it to the Off position. That will hide the Widgets icon from the taskbar and give you more room for other apps you need.

If you want to restore Widgets to the taskbar, press the slider again to switch it back to the On position.


Hiding Widgets on Windows 11 (and Other Changes)

As we’ve mentioned, the steps above won’t completely disable Widgets functionality in Windows 11. If you hit the keyboard shortcut Windows Key + W, the Widgets menu will launch, but at least it will keep the button out of your way on the taskbar.

Who knows—you may get used to Widgets and find them useful in Windows 11. For many others, however, they’re just another unnecessary change to the core functionality that Windows provides. If that’s the case, you can use the steps above to hide it from view.

Unfortunately, Widgets isn’t the only potentially annoying change in Windows 11. For example, you may need to move the Start menu back to the left if you’re unhappy with it in the center. If you don’t like the new Windows 11 context menu, don’t panic, as you can switch that back, too.


How to Remove the Weather Widget on Windows 11 via Group Policy

You can disable the weather widget if you’re running Windows 11 Pro or above by using Group Policy.

To remove the weather widget via Group Policy:

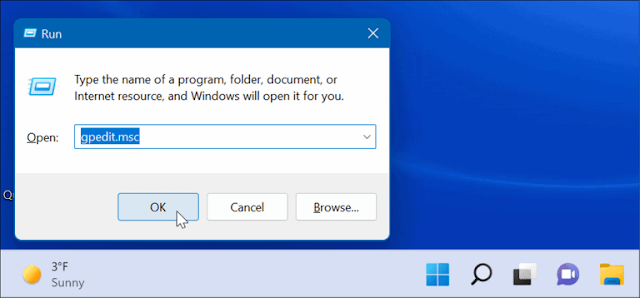
  1. Use the keyboard shortcut Windows key + R to launch the Run dialog.
  2. In Run, type gpedit.msc and click OK.

3. When the Group Policy Editor opens, navigate to the following path:

Computer Configuration -> Administrative Templates -> Windows Components -> Widgets


4. Double-click Allow widgets in the right pane.


5. Select the Disabled option at the top and click Apply and OK at the bottom of the screen.


6. After following the steps above, the weather widget will no longer display. However, if you go to Taskbar options in Settings, you’ll notice the Widgets toggle switch is grayed out. To enable it again, you’ll need to go through Group Policy again and set it to Not Configured.


How to Modify the Registry to Disable the Windows 11 Weather Widget

Windows 11 Home doesn’t include Group Policy, but if you don’t want to use Settings to disable the weather widget, you can edit the Registry instead.

Note: Using this method is for advanced users only. If you tweak an incorrect value in the Registry, it can result in an unstable system. Before making changes to the Registry, make sure to back it up, create a system restore point, or do a full system backup so you can restore your PC if something goes awry.

To disable the Windows 11 weather widget using the Registry, use these steps:

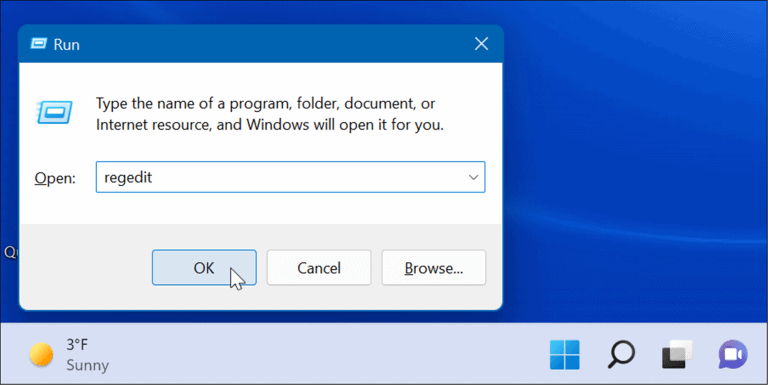
  1. Press Windows key + R to launch Run.
  2. Type regedit and click OK.

  • When the Registry Editor opens, navigate to the following path:
    HKEY_LOCAL_MACHINE\SOFTWARE\Policies\Microsoft\
  • Right-click the Microsoft key and select New > Key.
  • Name the new key Dsh.
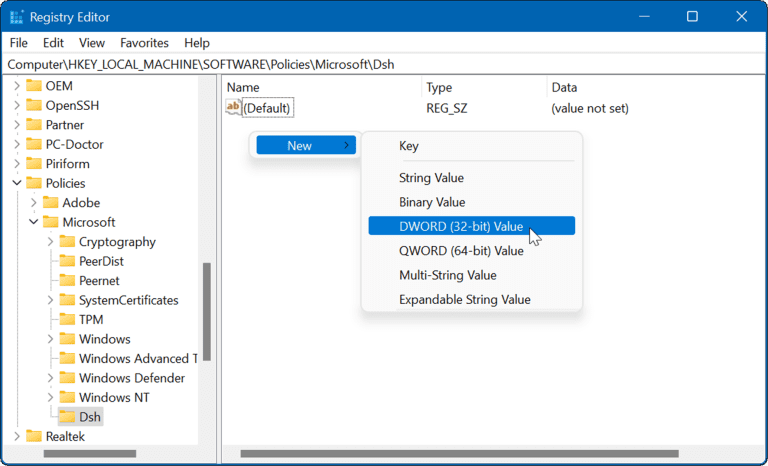
  • In the Dsh key you created, right-click an empty area in the right pane and choose New > DWORD (32-bit) Value.

  • Name the key as AllowNewsAndInterests and give it a value of 0.


    1. Exit the Registry Editor and restart Windows 11. The weather widget will no longer appear on the taskbar when your PC reboots.

    Modifying the Windows 11 Taskbar

    Microsoft has a habit of adding items to the taskbar that some users may not appreciate—like the weather widget. Luckily, you can use one of the methods above to remove it.

    You might also be interested in showing all taskbar corner overflow icons or making more space on the taskbar. The taskbar on Windows 11 is a new experience and if you’re new to Windows 11, check out some easy ways you can customize the taskbar.

    Also, if you have limited screen real estate, you can autohide the taskbar.


    Thanks for Reading...

    Masud Rana
    Tuesday, June 7, 2022

    How Do We Find Wi-Fi Passwords in Windows 11 (4 Methods)

    How Do We Find Wi-Fi Passwords in Windows 11 (4 Methods)

     Earlier, there were reports that Wi-Fi was not showing up in Windows 11, and the Wi-Fi even kept disconnecting for some users, even after troubleshooting. In case you are still facing connectivity issues on your Windows 11 PC, you can forget the Wi-Fi network and reconnect to the same wireless network. That said, make sure you know the Wi-Fi password as you need it while reconnecting. If you don’t remember it, follow our guide and learn how to see Wi-Fi passwords in Windows 11. You can find saved Wi-Fi passwords in Windows 11 using five easy methods, so let’s check them out.


    Find Wi-Fi Passwords in Windows 11 (2022)

    In this tutorial, we have included five ways to find Wi-Fi passwords in Windows 11, including the Settings app, Command Prompt, Control Panel, PowerShell, and a third-party app. On that note, let’s dive in. Expand the table below and move to your desired section.

    View Wi-Fi Password in Windows 11 Using Control Panel

    You can find Wi-Fi passwords in Windows 11 via Control Panel’s Network and Sharing Center. Follow our instructions below, and you will be able to view the passwords of all saved Wi-Fi networks on your Windows 11 PC. Here is how it goes:

    {}

    1. First, use the Windows 11 keyboard shortcut “Windows + R” to open the Run prompt. Here, type ncpa.cpl and hit Enter. This will open the Network and Sharing Center directly within the Control Panel in Windows 11.


    2. Next, right-click on the Wi-Fi network you are currently connected to. Then, click on “Status” in the context menu.


    3. In the “Wi-Fi Status” pop-up window that appears, click on “Wireless Properties“.


    4. Another window will now open up. Here, move to the “Security” tab and click on the checkbox next to “Show characters”. It will reveal the password of your current Wi-Fi network. This is the easiest way to see the Wi-Fi password in Windows 11.


    Find Wi-Fi Password in Windows 11 Using Settings App

    1. You can also find the Wi-Fi password in Windows 11 using the Settings app. Press “Windows + I” to open the Settings app and move to the “Network & Internet” section from the left sidebar.


    2. Then, click on “Advanced network settings” at the bottom in the right pane.


    2. Next, scroll down and click on “More network adapter options“. It will open the “Network and Sharing Center” in Control Panel.


    3. Now, right-click on your “Wi-Fi” adapter and choose “Status” in the context menu.


    4. Then, open “Wireless Properties” from the pop-up window that appears on your screen.


    5. After that, in the next window, switch to the “Security” tab and enable the “Show characters” checkbox to reveal the Wi-Fi password of your current network. This is how you can view the Wi-Fi password using the Windows 11 Settings app.


    Find Wi-Fi Password in Windows 11 Using CMD or PowerShell

    If you want to find the Wi-Fi password in Windows 11 using Command Prompt or PowerShell, you can do so by following the steps below. We have demonstrated the steps in Command Prompt, but the same commands work in PowerShell as well.

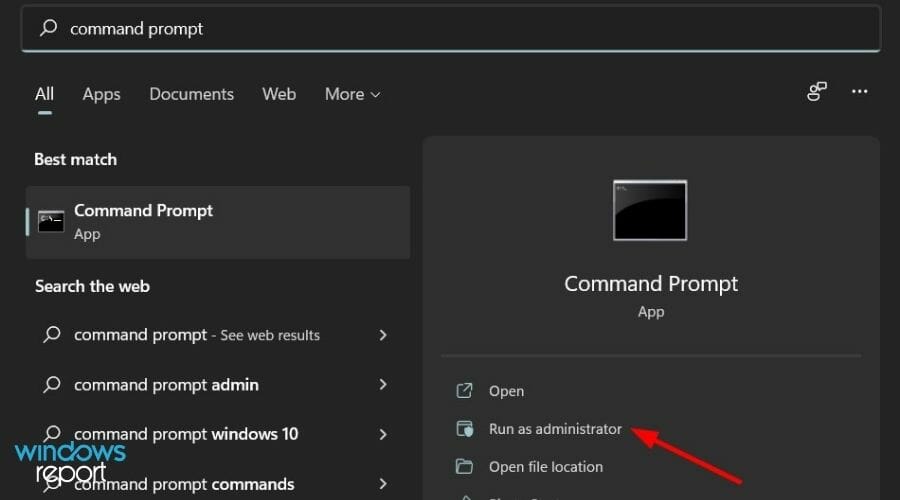
    1. Press the Windows key and type “cmd” in the Start Menu search bar. Now, click “Run as administrator” on the right pane. Moreover, if you always want to open apps as an administrator in Windows 11, follow our linked guide.


    2. In the CMD window, run the below command to display a list of all saved Wi-Fi networks on your Windows 11 PC. Here, note down the profile name (it’s case-sensitive) for which you want to know the password.

    netsh wlan show profiles


    3. Next, run the below command with the following syntax. Just replace WiFi profile name with the profile name you noted in the step above.

    netsh wlan show profile name="WiFi profile name" key=clear


    4. Now, execute the command, and Command Prompt will display all the details for that particular Wi-Fi network. Then, scroll down and look for “Key Content” under “Security settings”. That’s the password of your Wi-Fi network.


    See Wi-Fi Password of All Saved Networks Using a PowerShell Script

    If you want to check out the passwords of all the saved Wi-Fi networks on your Windows 11 PC, you can do it with a PowerShell script. A GitHub user has created a handy script that lists all the Wi-Fi names and their passwords in a neat table. Here is how to use it.

    1. First, open Notepad on your PC and paste the below code.

    $listProfiles = netsh wlan show profiles | Select-String -Pattern "All User Profile" | %{ ($_ -split ":")[-1].Trim() };
    $listProfiles | foreach {
    	$profileInfo = netsh wlan show profiles name=$_ key="clear";
    	$SSID = $profileInfo | Select-String -Pattern "SSID Name" | %{ ($_ -split ":")[-1].Trim() };
    	$Key = $profileInfo | Select-String -Pattern "Key Content" | %{ ($_ -split ":")[-1].Trim() };
    	[PSCustomObject]@{
    		WifiProfileName = $SSID;
    		Password = $Key
    	}
    }


    2. Now, click on “File” in the top menu and select “Save as“.


    3. After that, click on the drop-down menu next to “Save as type” and choose “All files”. Now, give a name to your script file. But make sure to add .ps1 (extension) at the end. Finally, save the PS1 file. Make sure to save the file on your Desktop. It will make things easier while running the script.


    4. Next, press the Windows key and type “powershell”. Now, click on “Run as Administrator” in the right pane.


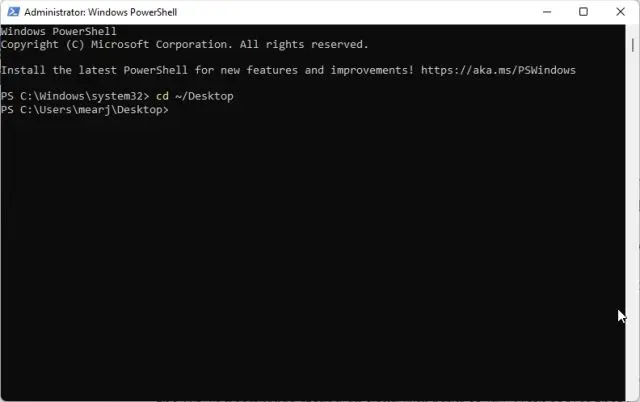
    5. In the PowerShell window, run the below command to move to the Desktop.

    Note: Download Sample .ps1 file Download-Link

    cd ~/Desktop


    6. After that, run the below command. Make sure to replace filename with the script name. And that’s it. PowerShell will now display all the Wi-Fi passwords stored on your Windows 11 PC. How cool is that?

    powershell -ExecutionPolicy ByPass -File Known_WiFi_Password.ps1


    Quickly See Saved Wi-Fi Passwords in Windows 11

    So these are the four ways to find Wi-Fi passwords in Windows 11. From individual Wi-Fi networks to all the saved ones, we have compiled the best methods to see the password of each network on your PC. Now, if you want to find the IP address in Windows 11 PCs, head over to our linked guide. And to find the Windows 11 Startup folder, follow our quick tutorial. Finally, if you have any questions, do let us know in the comment section below.

    Thanks for reading...

    Masud Rana
    Thursday, May 26, 2022

    How to find a Dell serial number and warranty information

     How to find a Dell serial number and warranty information


    HOW TO FIND A DELL MODEL, SERIAL NUMBER, AND WARRANTY INFORMATION
     
    If your Dell computer is not working, look for a label that has the serial number.
     
    On Dell computers, the Dell Service Tag is the serial number. On a desktop, the label is probably located on the back of the computer case, but can also be located on the top or side of the system. On laptops, it is usually on the bottom, but look at the rest of the outside of the computer if you cannot find it.  It can also be under a flip tab. It will contain information like this:


    If your Dell computer will not turn on you can go to the link below on another computer and fill in your service tag to find out about your warranty.

    IF YOUR DELL COMPUTER IS WORKING, FOLLOW THESE STEPS.

    If your Dell computer is working, follow these steps.
     
    Go to https://www.dell.com/support. You may have to install Dell Support Assist in other for this to work (a link should be provided from this page). Once you have it, the model of your computer and Service Tag will show here.


    Now you will see this.  You may click on View Details if you want more information.

    To complete a Cherwell laptop support form, you may select as follows on this laptop:

    Make: Dell Latitude
    Model: 5480/5488
    Serial Number: the entry beside Service Tag

    Using the Command Prompt to locate your Dell computer service tag. 

    From Laptops and Desktops

    1. Type cmd in the Windows search bar at the bottom-left of the screen, then select Command Prompt from the list of results.
    2. In the Command Prompt window, type wmic bios get serialnumber and press Enter.
    3. The Service Tag (Serial Number) appears as shown in the image below.


    Thanks for reading...

    Masud Rana
    No network driver found windows 11 installation

      N o network driver found windows 11 installation To fix "no network driver found" during Windows 11 installation, bypass the net...