Thursday, February 17, 2022

Create Multiple Virtual Desktops in Windows 11

 Create Multiple Virtual Desktops in Windows 11


Task View and virtual desktops

In Windows 11, Microsoft redesigned its Task View feature for creating multiple virtual desktops, and it’s now more useful than ever.

To activate Task View, click its icon (two overlapping squares) in the taskbar just to the right of the Search button, or press the Windows key + Tab. When you do, Task View springs into action.

This post describes to students and new users what Task View is and how to use it in Windows 11 to group and organize apps and tasks by virtual desktops.

Similarly to other operating systems and previous versions of Windows, Task View is used to create virtual desktops or workspaces which users can group apps and tasks conveniently to stay organized. You can create multiple workspaces, which act like virtual desktops.

You can also use Task View to organize your work which reduces clutter and make your desktop easier to navigate. If you keep a lot of apps opened at once and you want to separate them by tasks, using virtual desktops or workspaces may be useful.

For example, you could have all your communication apps, such as e-mail and your chat programs on one virtual desktop, and the work you are doing on a different desktop. It helps you to quickly locate and hide all windows and show the desktop, and to manage windows across multiple displays or virtual desktops.

To get started with using Task View in Windows 11, follow the steps below:

How to create virtual desktops via keyboard shortcuts

Task View is automatically added to the Taskbar in Windows 11. However, there’s a keyboard shortcut that one can use to quickly create new virtual desktop.

To do that, press the CTRL + WIN + D on your keyboard to create a new virtual desktop.


You can create as many virtual desktops using your keyboard.

How to create virtual desktop from the Taskbar

As mentioned above, Task View is automatically added to the Taskbar in Windows 11. To access Task View, simply click on the Task View icon on the Taskbar.


To add a virtual desktop, click the blank white screen to the right with the Plus sign ( + ). You can then select each virtual desktop and open apps and tasks on it. Do this to other workspace to organize your work.

To remove a virtual desktop, simple close its windows and all apps on that desktop will automatically move over to the next workspace. There is always at least one workspace available.

You can also move apps from one desktop to another simply by clicking on the Task View on the Taskbar, then right-clicking on the apps and selecting to move to another desktop or have it show in all desktops.


This workspace now contains the app you moved.


This is how one uses virtual desktops or workspaces to keep applications and files organized on Windows 11.  Hope this helps you get your desktop organized.

Conclusion:

This post described to you what Task View is and how to use it in Windows 11. If you find any error above, please use the comment form below to report.

Thanks for reading...

Masud Rana

Sunday, January 30, 2022

How to Fix Network Icon Red X and Flyout Missing Windows 10

 How to Fix Network Icon Red X and Flyout Missing Windows 10

Steps to fix Network Icon Red X and Flyout Missing Windows 10. – Clicking on Network icon residing above taskbar prompts a pop up showing entire available wireless networks in the range. Unfortunately, few users experience the pop-up absent. Hitting the Network symbol opens a small flyout instead. Consequently,  they can’t see available WiFi networks in the surroundings whereas they exist. Noteworthy is the Network icon shapes a red X. A Hover on it throws dialog – Not connected. No connections are available.

Troubleshooting Network produces no changes and updating several drivers fails to overcome the issue. Resetting Router goes meaningless and third party tools refuse to improve the status.


The latest Microsoft operating system arrived encountering numerous WiFi glitches. Daily new problems regarding Internet accessing upset users. Traceless WiFi, rigid Airplane mode, yellow network icon, continuously disturbing connections alike annoying issues tortured users. Network Icon Red X with Flyout Missing on Windows 10 persists as a badly affecting headache facing Windows 10 users. But fortunately, few ways are available to fix the issues pretty effectively.

Network Icon Red X and Flyout Missing Windows 10 Fix

Mainly Network and Display Drivers become responsible for creating the issue. So you need to workout on these to solve Network Icon Red X and Flyout Missing Windows 10 problem.

Ensure Correct Network Driver Exists

First of all, Ensure that the correct driver for Network adapter exists on the system. If you don’t hold, visit the web page of the concerned manufacturer to grab the driver.

Update WiFi Network Driver

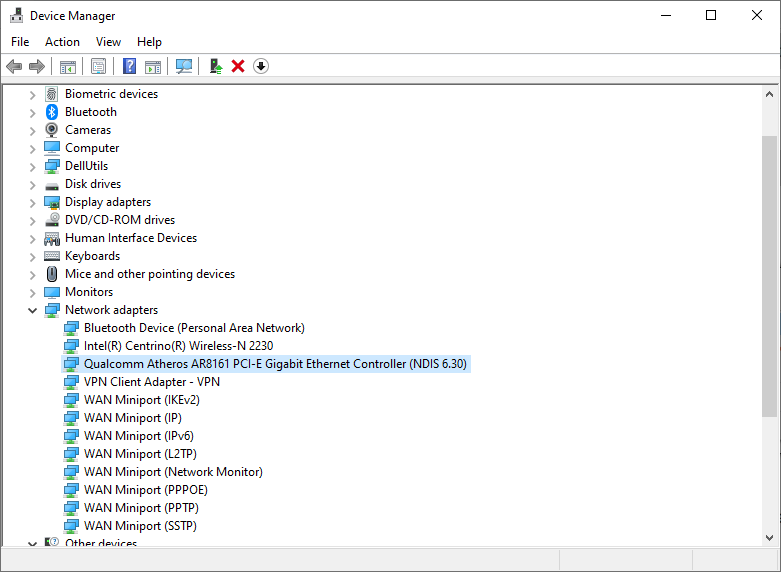
Step 1 – If the accurate network driver already remains, then update it. Open Device manager with any of your favorite methods, however, the easiest one is hitting the pair of Win+X and Selecting Device manager.


Step 2 – Hit on the menu View and once drop down becomes visible, click Show hidden devices.


Step 3 – Perform a double click on Network adapters to spread it out. Now carry out a right click on your WiFi Network adapter and hit on “Update Driver Software….”.


Step 4 – On the subsequent wizard, Click on the lower alternative written as “Browse my computer for driver software”.


Step 5 – On the next wizard, move ahead toward the bottom and hit on “Let me pick from a list of device drivers on my computer”.


Step 6 – This coming wizard displays a list of compatible drivers for your network adapter. Hence, update the drivers available here one by one and click on the Next button at the bottom respectively. After a while, you notice that the driver gets updated.


Step 7 – Reboot system to verify whether the missing flyout gets restored or not.

Update Display Driver

Commonly, your System occupies Intel Graphics by default. Furthermore,  it can possess NVIDIA, AMD, or other graphics depending on your choice. So, you need to update the driver of each graphic card one by one. The same steps will apply to update the Display drivers. Only you need to choose Display adapters instead Network adapters.

If you don’t own the appropriate Display driver navigate to the manufacturer web page to download.

In case, any driver is corrupted Driver Verifier pretty effectively assists in this situation. Hence, decipher this article and follow carefully – How to Identify if a Driver is Causing Issues in Windows 10 with Verifier.

Conclusion

These two drivers are the main culprits for Fix Network Icon Red X and Flyout Missing Windows 10. Therefore, once you eradicate the respective issues the network starts working like a charm.


Thanks for Reading...

Masud Rana

How to Fix Limited Network Yellow Mark in Windows 10

How to Fix Limited Network Yellow Mark in Windows 10

 A yellow colored caution sign is displayed on the network icon in Windows 10 which represents Limited access of the internet. The sign also exhibits an exclamation symbol, referring to an inappropriate or inaccessible gateway. Hence, keeping this issue into account, this article will guide you to Fix Limited Network Yellow Mark in Windows 10.

It is believed that while setting up the IP address, you must have skipped the gateway and thus it results in the limited access of internet. So, with the assistance of a certain command, retrieve the gateway address first and then apply the same in the subnet. Apart from this, other easy and primary workouts should be carried and see if any of them works like troubleshooting, updating the network driver, and things like that.

Along with guiding you with the steps to Fix Limited Network Yellow Mark in Windows 10, we will also pen down the steps to remove the mark. We are mentioning to settle the matter in 6 steps here. One by one give an attempt to them and undergo which one fixes the “limited access”, depending on the interest of the system.


How to Fix Limited Network Yellow Mark in Windows 10

Step 1: Stop or Uninstall Additional Antivirus

Turn off third-party antivirus app like Bit defender or others. These sorts of apps contain somewhat settings that could block the network share on your machine. Restart the system and examine if your problem gets eradicated.

Step 2: Restart Network List Service

  • In the search field of the Cortana, write the term, services.msc. She will soon spread out her bar with the appropriate result. Make a tap on it.


  • A totally individual window of Services will emerge where look for the Network List Service.
  • When you find it, conduct a right-click and affix a click on Restart option. In this way, the network to which the machine is associated with will get restarted.


  • Now, try-out a small test and calibrate if the mentioned web page is accessible or not: http://www.msftncsi.com/ncsi.txt


  • If the connectivity exists, the page will exhibit only a clause written as Microsoft NCSI with no other printing characters. This indicates that you have got success to Fix Limited Network Yellow Mark in Windows 10.
  • If you don’t find like above follow further.

Step 3: Troubleshoot

  • Conduct a right-click on the network icon and pick up Troubleshoot problems.


  • Soon the diagnostic will scan up for the issues and you will be listed the problems and their fixes with the lp of which you can fix Limited Network Yellow Mark in Windows 10.

Step 4: Turn off Firewall

  • For a certain time, like for temporarily, turn off the firewall.
  • To do so, fire up the Control Panel and shift it showcase the symbols in small view and move off with Windows Firewall.
  • Upon the emergence of the same, perform a click on Turn Windows Firewall on or off link which is showcased at the left fringe.
  • This will bring the Customize settings into the light where choose the round cells to Turn off the firewall.
  • To implement the changes, ensure to conduct a tap on Ok button.
  • Restart and examine the issue.

Step 5: Update NIC Driver

  • Execute a right-click at the Start icon and fire up the Device Manager.


  • When the device manager spread up on the screen, trace out the Network adapters and deliver a double click on it.
  • Conduct a right-click on the network that is used by your machine and appoint a click on Update Driver Software.


  • If any related updates are obtainable, they will be processed to be installed.
  • Restart the machine to see whether you are able to Fix Limited Network Yellow Mark in Windows 10.

Step 6: Add Gateway

  • In the circumstance where you have not set up IP address automatically with the aid of DHCP, there are chances to miss out the Gateway. Most of the “limited access” defines the faulty or unreachable gateway.
  • So, being not sure of the gateway, obtain it from the Command Prompt. So, make it visible on your screen using any of your methods.
  • Enter the term ipconfig after then hit Enter.
  • Now find out your gateway address.


  • And provide the same in the Network Properties.
  • Administer a right-click on the network icon to choose Open Network and Sharing Center.


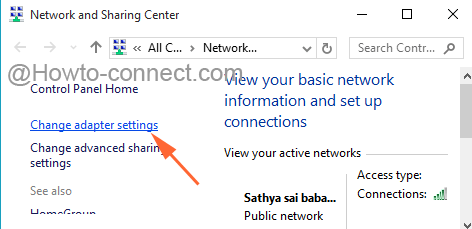
  • Discover Change adapter settings link depicted at the left fringe, click on it.


  • Look for the internet connection active on the machine and choose Properties through a right-click.


  • Upon the emergence of the Network properties box, administer a double click on the particular component Internet Protocol Version 4.


  • Now, examine all the numbers carefully and put in the IP addresses of Gateway that was obtained from Command Prompt as shown in the above step.
  • Tap Ok to Fix Limited Network Yellow Mark in Windows 10.

How to Remove Yellow Mark from Network Icon in Windows 10

The constant show of Limited Network Yellow Mark in Windows 10 makes you irritated. If you want to eradicate the mark, the Registry Editor will help you in doing so. Let us find out how it can be done –

  • With Windows and R keys, extract the Run box and in the field enter the term regedit and tap the Ok button.
  • Give affirmation to the UAC to open Registry Editor.
  • Travel through this path:

HKEY_LOCAL_MACHINE\SOFTWARE\Policies\Microsoft\Windows\Network Connections

  • Being into the Network Connections key, take attention to the other side and administer a right-click on an empty space and choose New => DWORD Value.


  • Name it as NC_DoNotShowLocalOnlyIcon.
  • Now, make a twice hit on the same to bring its Edit window and underneath the Value data, assign number 1.


  • Click Ok.
  • Close the Registry Editor and restart the machine to fix Limited Network Yellow Mark in Windows 10.


,,,

How to determine and to recover from Winsock corruption in Windows

How to determine and recover from Winsock corruption in Windows

Symptoms

When you try to release and renew the IP address by using the Ipconfig program (Ipconfig.exe), you may receive one of the following error messages.
Message 1

An error occurred while renewing interface 'Internet': An operation was attempted on something that is not a socket.

Message 2

An error occurred while renewing interface Local Area Connection: the requested service provider could not be loaded or initialized.

When you start Internet Explorer, you may receive the following error message:

The page cannot be displayed

When you use your computer, you may receive the following error message:

Initialization function INITHELPERDLL in IPMONTR.DLL failed to start with error code 10107

Additionally, you may have no IP address or no Automatic Private IP Addressing (APIPA) address, and you may be receiving IP packets but not sending them.

When you use the ipconfig /renew command, you may receive the following error messages.

Message 1

An error occurred while renewing interface local area connection: an operation was attempted on something that is not a socket. Unable to contact driver Error code 2.

Message 2

The operation failed since no adapter is in the state permissible for this operation.

Message 3

The attempted operation is not supported for the type of object referenced.

In Device Manager, when you click Show Hidden Devices, the TCP/IP Protocol Driver is listed as disabled under Non-Plug and Play drivers, and you receive error code 24.

When you create a dial-up connection, you may receive the following error message:

Error 720: No PPP Control Protocols Configured

Methods and Steps to Fix Winsock Corrupt issue in Windows 10 – Windows Sockets (Winsock full form) corruption often causes Internet data transmission’s interruption on a Windows computer. It determines the network software’s ways to access network services, particularly TCP/IP. So, to fix the poor or cut-off Internet connection issue on Windows 10, Winsock reset or repair is a good option.

During Winsock Corrupt issue in Windows, you find Unidentified Network and some more types of error messages. These problems also mess up registry entry and Ipconfig. In addition, its misconfiguration also results in network connectivity troubles. When you reset, it creates a new registry key and traces IPconfig.

Winsock Corrupt issue in Windows 10

Reset of Winsock and IP are the solutions to these network related problems. See how you will proceed for both –

Winsock Reset

Step 1 – click the hotkey combination Win+X.

Step 2 – Choose Command prompt (admin) on the list of options.


Step 3 – As soon as you select the option, a UAC dialog box appears requiring your permission, click Yes.

Step 4 – Copy the below piece of command, paste into the elevated command prompt, and click Enter.

netsh winsock reset


Step 5 – After the command will be executed it will recommend for the restart of the PC, so follow.

This command will not only reset the but also set up a new registry key and IPconfig. The method will repair the messed up catalog or create a new one which one is required.

IPreset

In the meantime, in most cases, IP settings also become corrupt during these kinds of network issues. So,

Step 1 – Copy the under mentioned command, again paste into the elevated command prompt and press Enter.

netsh int ip reset


Step 2 – Reboot the PC again for the execution of the command perfectly.

So, this command will reset IP and finally result in the fix of the network-related issues.

Conclusion

These are the definite fixes for network interruption on a frequent basis. Winsock reset is effective in fixing in both of the networks connected via Ethernet and WiFi. It’s probably the best and quickest fix for all network problems.


Thanks for Reading...

Masud Rana

Fix Cellular missing from Network & Internet in Windows 10

Fix Cellular missing from Network & Internet in Windows 10

When you use a cellular connection to access internet, you see its option listed on the right side of Network and Internet tab of Settings on Windows 10. Sometimes it is missing. This article will show you How to Fix Cellular missing from Network & Internet in Windows 10.

When you insert modem or adapter of cell phone in the port of the laptop or desktop the Network and Internet Settings window starts showing Cellular option in the right pane on your Windows 10 PC. If Cellular option is absent even after putting the device in port you would not be able to connect the adapter to your PC to access internet. The cause of the absence of this option is regarding the adapter of the particular adapter gets disabled somehow in Network Connection Settings. If you want the Cellular option showing all you have to do is to enable it.


The below steps tells you where to find the adapter for the Cellular connection and how to enable it.

The same type of issue comes with the WiFi option. I have written another article to Fix Cellular missing from Network & Internet in Windows 10.

How to Fix Cellular missing from Network & Internet in Windows 10

  • Open Control Panel and make it view in small icons.
  • Click Network and Sharing Center. This is the location where you will see your Cellular connection.


  • Click Change adapter settings link on the left pane.


  • Now, see the below screenshot. I am using the Mobile Broadband 3 Cellular connection which has been disabled. You will choose the adapter which you are using to access network.
  • Right-click on it and click Enable.


  • Open your Settings app and go to the Network & Internet
  • On the left column, you can now see your Cellular section again.


  • Thanks for Reading...

    Masud Rana

    No network driver found windows 11 installation

      N o network driver found windows 11 installation To fix "no network driver found" during Windows 11 installation, bypass the net...