Sunday, September 12, 2021

How to Fix a Driver Power State Failure BSOD in Windows 10

How to Fix a Driver Power State Failure BSOD in Win 10


When a Blue Screen of Death (BSOD) occurs on your Windows PC, you might be inclined to think the worst. In many cases, however, a BSOD is a sign of a problem that can easily be fixed with some common system maintenance steps, such a system update or repair.

One BSOD that some users will occasionally see is a “driver power state failure” error. Often caused by a faulty device driver, troubleshooting this issue is fairly straightforward and rarely impossible to fix. If you’re seeing a driver power state failure BSOD error in Windows 10, here’s what you’ll need to do to fix it.

What Causes a Driver Power State Failure BSOD Error?

A stop code “driver power state failure” blue screen of death error is usually caused by a power control issue with a device connected to your PC. If the device switches to sleep mode when you’re using it, or fails to come out of sleep mode when you try to use it, Windows assumes this is a critical error and displays a BSOD message.

There are several reasons why this might occur. If a device driver is out-of-date or faulty, Windows’ ability to control power settings for connected devices might be affected. Updating your drivers (or downgrading to the last working driver) might resolve the issue.


However, this isn’t the only possible cause. If system files are corrupted, you can attempt to repair the issue using the System File Checker tool. Changing your device’s power settings (including disabling sleep or hibernation mode) can also stop certain devices from entering a low-power or sleep mode.

If all else fails, however, you may need to look at removing any devices that are causing this issue. Typically, external peripherals (such as USB or Bluetooth devices) or certain high-powered internal components (such as your graphics card) are behind this issue.

Updating Your System Drivers

A driver power state failure BSOD is most often caused by a problem with the installed device drivers. Unless your device is configured to install new driver updates automatically, you may need to install new drivers manually.

You can usually do this through Windows Update, which will search for (and install) any suitable drivers for your PC.

  1. To check forn ew driver updates using Windows Update, right-click the Start menu and select the Settings option.


  1. In the Settings menu, select Update & Security > Download or Download and Install if drivers are available. If Windows doesn’t search for drivers automatically, select Check for Updates first.


  1. Allow Windows time to download and install new updates (if available). Once installed, restart your PC to complete the process.

While Windows Update does have most device drivers available, you may also need to consider downloading drivers from the manufacturer website and installing them manually. For instance, much newer NVIDIA graphics drivers are available from the NVIDIA website compared to the drivers available through Windows Update.

Likewise, certain chipset drivers for internal motherboard components (such as built-in WiFi) may require you to download the drivers from the manufacturer, especially if you’ve built your own PC.

Running the System File Checker Integrity Tool

In some cases, a power issue (such as a driver power state failure BSOD) is caused by corrupted or missing system files. To resolve this problem, you can use the System File Checker (SFC) tool. This checks the integrity of your Windows system files and, if any files are missing or corrupted, the tool will fix them automatically.

  1. To run the SFC tool, right-click the Start menu and select Windows PowerShell (Admin).

  1. In the new PowerShell window, type sfc /scannow and select the Enter key.

Allow some time for the SFC tool to complete a scan of your PC. If it detects any missing files, this should automatically repair them.

Removing Recently Installed Drivers

While updating a device driver is usually the best way to install new bug fixes, the newer driver may have bugs that can cause this issue. If this is the case, you’ll need to roll back the driver to the latest working version.

You may need to restart Windows in Safe Mode first to roll your drivers back successfully.

  1. To begin, right-click the Start menu and select Device Manager.

  1. In the Device Manager window, find and select the driver that you believe is causing the BSOD error from the list. This is most likely a recently installed or updated device. If you’re unsure, check your BSOD dump logs for more information. Once you’ve located the device, right-click it and select Properties.

  1. Select the Driver tab in the Properties window, then select the Roll Back Driver option.

  1. Windows will ask you to confirm why you’re rolling back the device. Select one of the appropriate options, then select Yes to confirm.


  1. Windows will remove the affected driver and return to using the last installed driver. Before you restart your PC, however, you can help to prevent this BSOD error occurring in future by disabling power saving mode for your device. If the option is available, select the Power Management tab and disable the Allow the computer to turn off this device to save power checkbox.

  1. Select OK to save your settings. With the device driver rolled back, restart your PC to complete the change by right-clicking the Start menu and selecting Shut down or sign out > Restart.

Disabling Sleep or Hibernation Mode

Because a driver power state failure BSOD is usually caused by a power issue, changing your PC’s power settings can stop it from happening. If you can’t disable your device’s power management settings directly, you’ll need to stop your PC from entering sleep or hibernation mode as a last resort.

  1. The quickest method for disabling hibernation is to use the Windows PowerShell. Right-click the Start menu and select Windows PowerShell (Admin).

  1. In the new PowerShell window, type powercfg.exe /hibernate off and select the Enter key.

  1. To disable sleep mode, you’ll need to open the Windows Settings menu. Right-click the Start menu and select Settings.

  1. In the Settings menu, select System > Power & sleep. In the Sleep section, make sure to select Never from the drop-down menus.

Keeping Windows Updated

In most cases, keeping your system updated with new device drivers will resolve a driver power state failure BSOD error. If your drivers are buggy, however, you may need to downgrade to the last working driver or consider upgrading the affected device to a newer model (or removing it entirely).

If you’re still having issues with BSOD errors, you may need to take more drastic measures. You may need to wipe and reinstall Windows to remove conflicted files, especially if the SFC tool doesn’t resolve the issue. Once you’ve reinstalled Windows, don’t forget to install some essential software to get up and running again.


Thanks for Reading...
Masud Rana

Saturday, September 11, 2021

Windows 10 Blue Screen of Death (BSOD) Error Code List

Windows 10 Blue Screen of Death (BSOD) Error Code List


What causes Blue Screen of Deach (BSOD) errors?

What causes Blue Screen of Death (BSOD) errors?


 ➡ Hardware malfunction

This issue can occur no matter if you’ve just installed a new SSD on your PC, or if a previously installed piece of hardware is experiencing issues.

Hardware malfunction could be caused by components not being connected properly to the motherboard, a sudden disconnection because of loss of power, or a broken element.

Unfortunately, this is one of the most common reasons for encountering BSOD errors, which will temporarily disable access to your files.

Hardware can get broken by being exposed to the limits of its capabilities, both in terms of temperature and power voltage.

To ensure that this is not a possible problem, it is recommended that you use a good computer monitoring tool that allows you to check these factors whenever you need to.

➡ Corrupted DLLs or system files

DLL files are the instruction manual of your system, so when and if one or more get corrupted, this can affect the way your PC works.


Example of corrupted DLL error

Damage to DLLs can appear because of mistakenly deleting one, malware attacks, and faulty application installations.

The damaged DLL will need to be replaced with a fresh new one for the system to be able to function without issues.

➡ Device drives improperly written

Sometimes, whenever you create a new partition, or during the installation process of a new OS, some drives might encounter errors while being written.

This can happen because of issues with your HDD or the partition software that you’re using. In turn, a BSOD can appear which will stop you from accessing your files entirely.

➡ Power supply issues

If your power supply has issues, then this will cause the voltage required for running the hardware on your motherboard to fluctuate. This in turn causes the components to malfunction, and thus, a BSOD error can appear on your screen as a result.

➡ Full PC memory

Having your PC memory full will hinder the OSs ability to process information promptly, and thus cause issues with the software, which in turn could cause issues with the hardware.

To avoid this problem, it may also be recommended that you use a PC Optimization tool that can easily identify any clutter and resolve it promptly.

Fortunately, you don’t have to worry anymore about finding an effective method to fix BSOD issues or to prevent the file loss triggered by it, because some third-party tools can cover all the risk factors mentioned above.


Thanks for Reading...

Masud Rana

Wednesday, August 4, 2021

How to Use WhatsApp on Desktop Computer Using Chrome Browser

 How to Use WhatsApp on Desktop Computer Using Chrome Browser

WhatsApp is the most popular chatting application and now you can use it on your desktop without using the blue stack. Yes, you just need a chrome or any other browser of your choice. Whatsapp is used by more than 700 million people and to increase the usability of WhatsApp their developers take it to next level by introducing the WhatsApp access from Laptop or desktop.

The Whatsapp desktop browser based application which we are going to show, however, it is not a standalone application. Before using the WhatsApp desktop version you need to install and activate the WhatsApp in a smartphone.


The Whatsapp desktop browser application can support any platform’s installed WhatsApp: Android, iPhone, Windows Phone, Blackberry, Blackberry 10, Nokia s60


In the real time, you can chat from your phone as well as your desktop browser while working.

 https://www.bdshop.com/automatic-soap-dispenser?aw_affiliate=eyJjYW1wYWlnbl9pZCI6IjciLCJ0cmFmZmljX3NvdXJjZSI6Imh0dHBzOlwvXC90ZWNodGFsa21hc3VkcmFuYS5ibG9nc3BvdC5jb21cLyIsImFjY291bnRfaWQiOjE3ODk4fQ


Setting Up WhatsApp on your PC

If you want to know how to use Whats App on PC without blue stacks then follow these simple steps given below.

Step 1: You can use Whats App on the Google Chrome, Mozilla, Internet explorer, Safari or on your choice browser. Right now we are using Google chrome in this tutorial. Now open your browser and click here to open the Whats App website.

Step 2: A desktop website will open and a QR code will show on your PC screen. As shown in the screenshot.


Step 3: Now open you Whats App in the smartphone and click on top right side three dots for getting menu option. From the menu select Whats App Web.


Step 4: Once you tap on Whats app web option and a QR scanner will open. Now scan the QR code shown on Desktop browser.


Step 5: Once the QR code scanned, the PC browsers Whatsapp will automatically login you on the Desktop Whats app. 


Step 6: If you want to enable the desktop notification for Whatsapp,  you will find an option called Get Notified of New Message. Click the Turn on desktop notification link to enable the notification. This option is very useful as it will give you a sound alert on your PC when you receive a new message, even if your browser is minimized.


Step 7: If you forget to log out your Whats App from the PC, just open the WhatsApp web option of Whats App from the smartphone and click on Logout from all computer. And you will automatically log out from every and each computer you have been logged in.


How to turn off the Whats App desktop Notifications

If you have accidently on the Whats App desktop Web notifications and now you want to turn it off due privacy issue then here is the way:

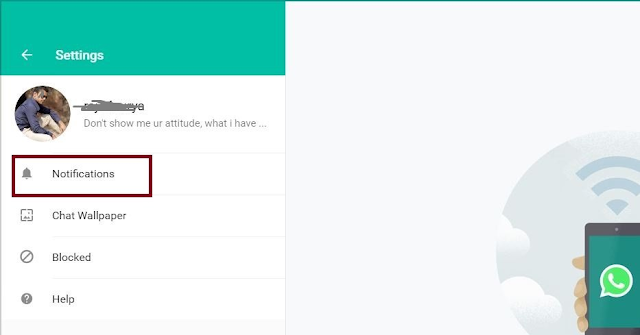
Step 1: Click on the three dots and a pop-up will open, and select the setting option.


Step 2: Select the Notification option.


Step 3: Uncheck the desktop notification option to stop the Whats App desktop notification.


Final Thoughts

So, the popular Whats App becomes more popular and convenient to use by enabling the Web option. You can use it through any browser and computer whether it is Linux, MacOS or Windows. This is the fastest way to use Whats app on Desktop without blue stack, what you need just a Chrome or any other browser.  For any other Whats App application help please free to comment and let us know your problems.


Thanks For Reading...

Masud Rana

How to connect and share files between two computers using an Ethernet cable

How to connect and share files between two computers using an Ethernet cable

 Wi-Fi routers for homes are quite mainstream nowadays. Most users use the home Wi-Fi to connect to the internet, but it can also be helpful to send and receive files locally. This feature makes it handy to transfer files between different devices connected to the same Wi-Fi. Most power users out there take the advantage of this feature. But, at times, you might need to transfer files between two computers or laptops. It is not that a big deal as long as you are at home, kudos to your Wi-Fi connection. But what about doing the same task, when there isn’t a Wi-Fi network, or there are some other issues. An Ethernet connection can be handy, if you want to transfer personal files with your colleagues or friends, without letting your organization network or the Wi-Fi network know about it.

Sending files between two computers can also be accomplished by Bluetooth, but the speed is not as good as connecting the two computer using a hard-wired Ethernet connection. I know it seems to be little bulky, but it can obviously help you at some emergency times. For this simplest method of file transfer, you will just need a crossover Ethernet cable. You can easily get that at any computer shop or can make your own with an Ethernet cable of your desired length, and two RJ45 clips. Well, how to make one? I will discuss that at the end of the article.

But how to share files using crossover cable of Ethernet? I will discuss it here.

How to connect two computers through LAN cable to share files

The steps to be followed

Just connect the two ends of your Ethernet cable to the Ethernet ports. Yes, that’s simple. But wait, you need to do some tweaks.

On Windows

  1. Open ‘Network and Sharing Center’ within Control Panel. (On Windows 10, click on Cortana. Type ‘cpl’ and hit the enter key. You will find the option there.)


2. On the left side of the opened window, click on the option saying ‘Change adapter settings’.


3. Right-click on the ‘Ethernet’ icon, and click on ‘Properties’. If you are having multiple virtual Ethernet adapters, the physical Ethernet adapter should be the one, which comes with an OEM name like Realtek or something like that. Just in case, you cannot find the appropriate adapter, contact your vendor or see the user manual.   


4. In the window that appears, click on the option, which says ‘Internet Protocol Version 4 (TCP/IPv4)’ and then ‘Properties’.  


5. Another Window will appear. Select the radio button saying ‘Use the following IP address:’ After that, the three options namely ‘IP address’, ‘Subnet mask’ and ‘Default gateway’ will be enabled. Just enter following information in all the fields.

The entries below are meant for the first computer.


IP address: 192.168.5.1 (You can enter any other values though. But this entry is the most common.)

Subnet mask: 255.255.255.0 (You should not assign any other values.)

Default gateway: 192.168.5.2 (Just like the IP address, you can enter any other values, but there is a catch.)

Now repeat the same steps on the second computer, but interchange the IP address and Default gateway values.

*So the entries for the second computer should be as follows.


IP address: 192.168.5.2

Subnet mask: 255.255.255.0

Default gateway: 192.168.5.1


You can always use other values for the IP address and default gateway, but they should be interchanged on the two different computers. The default gateway shouldn’t be changed though under any circumstances.


Once you are done with that, you should now be able to copy files between two computers. You can see your computer, as well as the connected computer, in ‘Network’.


You might see a message, asking you to turn on network discovery, on both the computers. Just click on the message, and click on the second option. Now you can send files easily between the computers.


On Linux

The trick can even be handy to connect two computers with Ethernet on the Linux platform. The entries will be similar, but I will be discussing the way to get to the option for changing the IP address and Default gateway. I am using Ubuntu in this tutorial, but the method should not vary a lot, on other Linux distributions.

  1. Go to ‘Settings’. Scroll down, and click on ‘Network’.                                      


2. Find the Ethernet adapter in the list of networks, and click on the ‘+’ icon. In the new window that appears, click on ‘IPv4’. 


3. Just choose the radio button with the name ‘Manual’. Now you can have the option add the IP address, Subnet mask, and Default gateway. The names are Address, Netmask, and Gateway for IP address, Subnet mask, and Default gateway respectively. After entering everything, tap on ‘Add’.


4.In Ubuntu, the settings are stored as profiles, which can be handy, if you have multiple networks with different IP addresses and gateways. Just choose a different profile, when you want to connect to a different network with the same Ethernet adapter.

If your question was, how to create LAN connection with a straight cable connection, I got you covered. This is the simplest way to share files between computers without the need for any PC to PC file sharing software. Most people know how to connect two computers using a router in the middle, but this tutorial is a little different.

Making crossover cables

Now you came to know how to connect PC to PC using a crossover cable. But how to make a crossover cable. The schematic diagram form making a crossover cable is given below.


Hope the tutorial was helpful for you. Did you face any issues with the tutorial? Surely let me know about it in the comment section down below.

Thanks for Reading...

Masud Rana

No network driver found windows 11 installation

  N o network driver found windows 11 installation To fix "no network driver found" during Windows 11 installation, bypass the net...