Monday, July 31, 2023

How to fix Fix Dell Touchpad Not Working

How to fix Fix Dell Touchpad Not Working


The touchpad (also called trackpad) plays the prominent role of the primary pointing device in laptops. Although, nothing is oblivious to errors and issues in windows. Touchpad errors and malfunctions are universal in nature; they are experienced at least once by every laptop user irrespective of their laptop brand and operating system versions.

However, in recent times, touchpad issues have been reported to a greater extent by Dell laptop users. While we have a separate and more comprehensive guide for how to fix a touchpad that is not working with a list of 8 different solutions, in this article, we will go over the methods to fix touchpad in Dell laptops specifically.

4 Ways to Fix Dell Touchpad Not Working

The causes for a Dell laptop’s touchpad not working can be narrowed down to two reasons. First, the touchpad may have been accidentally disabled by the user, or second, the touchpad drivers have become outdated or corrupt. Touchpad issues are primarily experienced after an incorrect Windows software update and sometimes, also out of the blue.

Luckily, fixing the touchpad, and therefore getting its functionality back is quite simple. Below are a few methods to fix your Dell Touchpad not working issue.

Table of Contents

7 Ways to Fix Dell Touchpad Not Working

Make sure to create a restore point just in case something goes wrong.

As mentioned earlier, there are just two reasons as to why your touchpad may not be responding to your benign touches. We will be fixing both of them, one after the other, and try to revive your touchpad.

We will start by ensuring that the touchpad is indeed enabled and if it isn’t, we will be switching it ON via the Control Panel or Windows Settings. If the touchpad functionality still doesn’t return, we will move forward to uninstalling the current touchpad drivers and replacing them with the most updated drivers available for your laptop.

Method 1: Use the Keyboard Combination to Enable Touchpad

Every laptop has a hotkey combination to quickly enable and disable the touchpad. The key combination comes in handy when a user connects an external mouse and doesn’t want any conflicts between the two pointing devices. It is also particularly useful to quickly turn the touchpad off while typing to prevent any accidental palm touches.

The hotkey is normally marked with a rectangle inscribed with two smaller squares on the bottom half and an oblique line passing through it. Usually, the key is Fn + F9 in Dell computers but it could be any of the f-numbered keys. So look around for the same (or perform a quick Google search for your laptop model number) and then simultaneously press the fn and touchpad on/off key to enable the touchpad.

Use the Function Keys to Check TouchPad

If the above doesn’t fix the issue then you need to double-tap on the TouchPad on/off indicator like shown in the below image to turn off the Touchpad light and enable the Touchpad.

Double-tap on the TouchPad on or off indicator | Fix Dell Touchpad Not Working

Method 2: Enable Touchpad via Control Panel

Apart from the hotkey combination, the touchpad can be turned on or off from the Control Panel too. Many Dell users who faced touchpad problems after a Windows update reported that enabling the touchpad from the control panel solved their issue. To enable touchpad from Control Panel, follow the below steps-

1. Press the Windows key + R on your keyboard to open the run command. Type control or control panel and hit enter.

(Alternatively, click on the start button, search for the control panel and click on open)

Type control or control panel and hit enter

2. In the control panel window, click on Hardware and Sound and then Mouse and Touchpad.

3. Now, click on Additional mouse options.

(You can also access Additional mouse options via Windows Settings. Open windows settings (Windows Key + I) and click on Devices. Under Mouse and Touchpad, click on Additional mouse options present at the bottom or right side of the screen.)

4. A window titled Mouse Properties will open up. Switch to the Dell touchpad tab and check whether your touchpad is enabled or not. (If the said tab is absent, click on ELAN or Device Settings tab and under devices, look for your touchpad)

Switch to the Dell touchpad tab

5. If your touchpad is disabled, simply press on the toggle switch to turn it back On.

If you do not find the toggle switch, open run command once again, type main.cpl and press enter.

Open run command once again, type main.cpl and press enter

Switch over to the Dell touchpad tab if you aren’t already there and click on Click to change Dell Touchpad settings

Click on Click to change Dell Touchpad settings

Finally, click on the Touchpad on/off toggle and switch it to ON. Click on save and exit. Check if the touchpad functionality returns.

Make sure Touchpad is enable | Fix Dell Touchpad Not Working

Method 3: Enable Touchpad from Settings

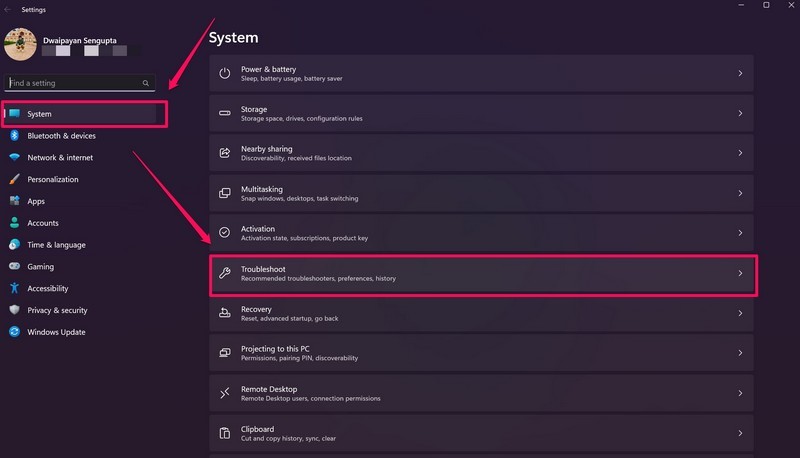
1. Press Windows Key + I then select Devices.

click on System

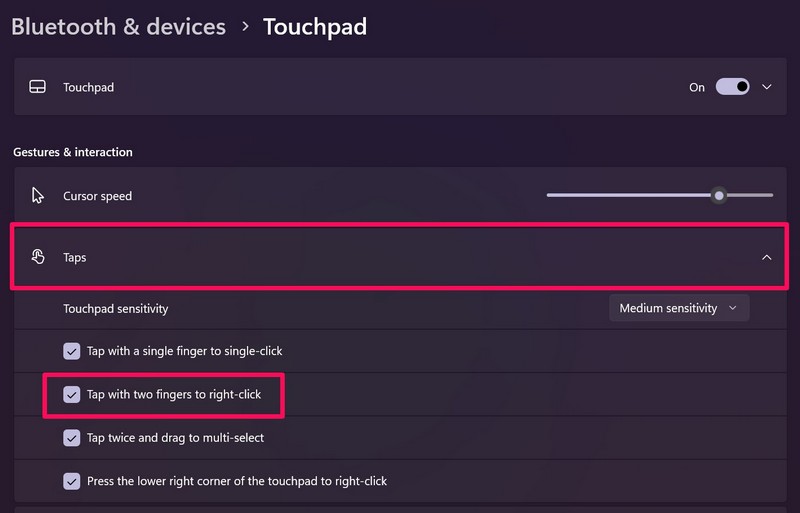
2. From the left-hand menu select Touchpad.

3. Then make sure to turn on the toggle under Touchpad.

Make sure to turn on the toggle under Touchpad | Fix Dell Touchpad Not Working

4. Reboot your PC to save changes.

This should fix Dell Touchpad Not Working issue in Windows 10 but if you’re still experiencing the touchpad issues then continue with the next method.

Also Read: Fix Mouse Lags or Freezes on Windows 10

Method 4: Enable Touchpad from BIOS Configuration

The Dell touchpad not working issue sometimes may occur because the touchpad may be disabled from BIOS. In order to fix this issue, you need to enable touchpad from BIOS. Boot your Windows and as soon as the Boot Screens comes up press F2 key or F8 or DEL to access BIOS. Once you are in BIOS menu, search for Touchpad settings and make sure touchpad is enabled in BIOS.

Enable Toucpad from BIOS settings

Method 5: Remove Other Mouse Drivers

The Dell touchpad not working may arise if you have plugged in multiple mice into your laptop. What happens here is when you plug in these mice into your laptop than their drivers also get installed on your system and these drivers are not automatically removed. So these other mouse drivers might be interfering with your touchpad, so you need to remove them one by one:

1. Press Windows Key + R then type devmgmt.msc and hit Enter to open Device Manager.

Type devmgmt.msc and click on OK

2. In the Device Manager window, expand Mice and other pointing devices.

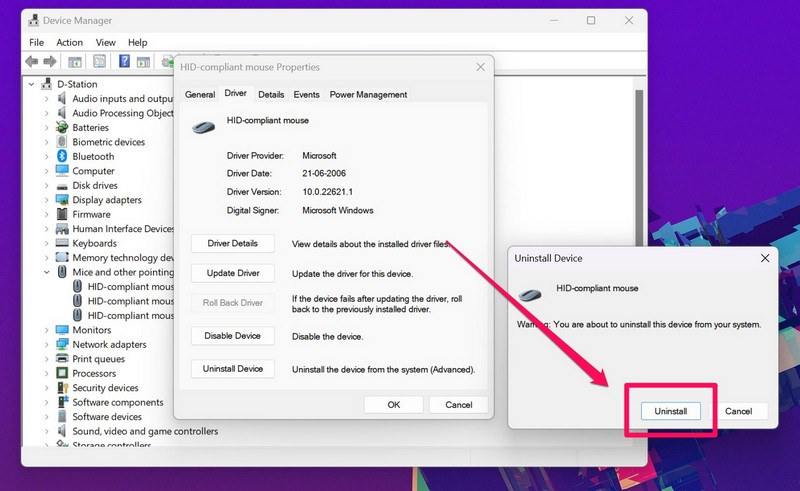
3. Right-click on your other mouse devices (other than touchpad) and select Uninstall.

Right-click on your other mouse devices (other than touchpad) and select Uninstall

4. If it asks for confirmation then select Yes.

5. Reboot your PC to save changes.

Method 6: Update Touchpad Drivers (Manually)

The second reason for touchpad breakdowns are corrupt or outdated device drivers. Drivers are computer programs/software that help a piece of hardware communicate effectively with the operating system. Hardware manufacturers roll out new and updated drivers frequently to catch up with OS updates. It is important to have your drivers up-to-date with the latest version to make the most of your connected hardware and not face any issues.

You can either choose to manually update your touchpad drivers through the device manager or take the assistance of third-party applications to update all your drivers at once. The former of the two is explained in this method.

1. We start by launching the Device Manager. There are multiple methods to do so and we have listed a few below. Follow whichever feels the most convenient.

a. Press Windows key + R to launch the run command. In the run command textbox, type devmgmt.msc and click on OK.

Type devmgmt.msc and click on OK

b. Click on the Windows start button (or press Windows key + S), type Device Manager, and press enter when search results return.

c. Open Control Panel using the steps explained in the previous method and click on Device Manager.

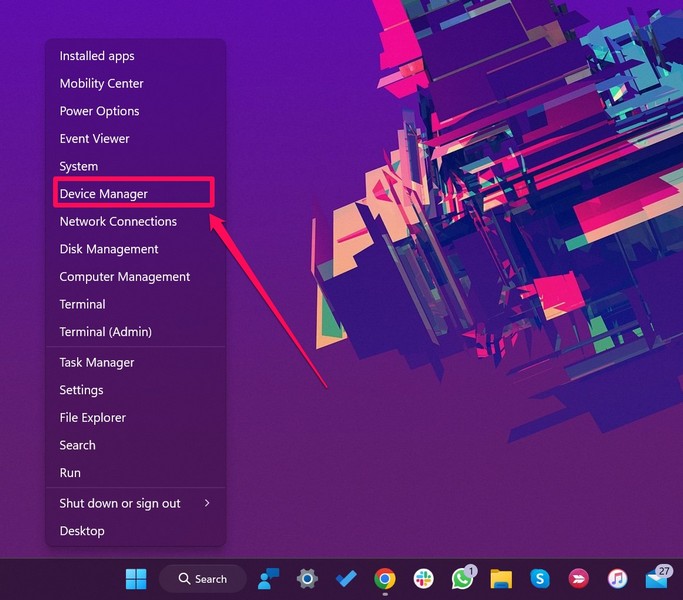
d. Press Windows key + X or right-click on the start button and select Device Manager.

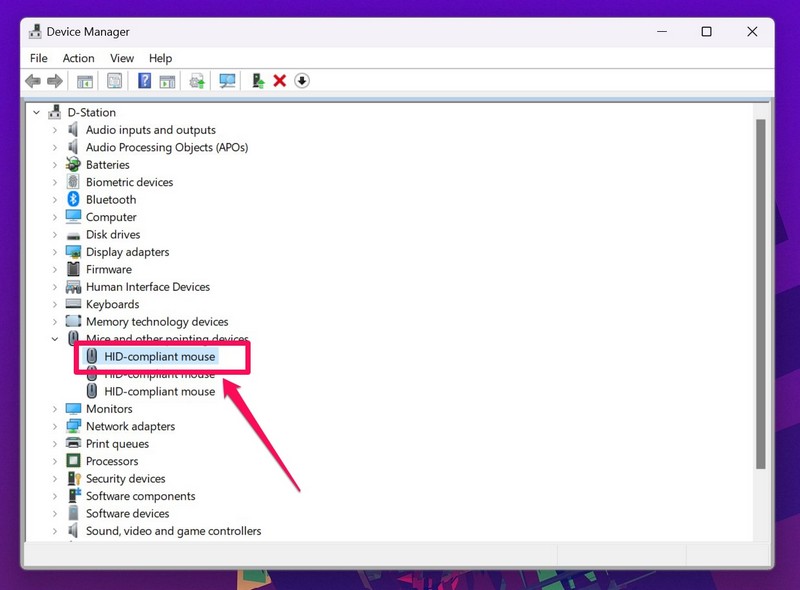
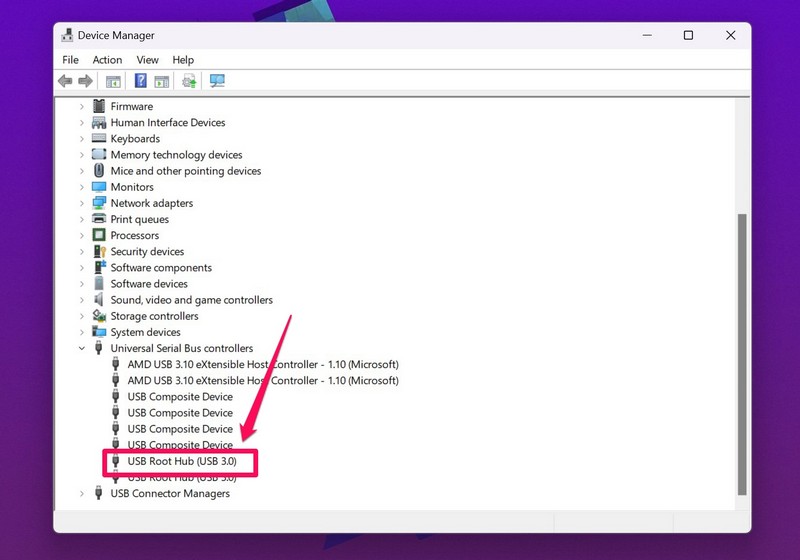
2. In the Device Manager window, expand Mice and other pointing devices by clicking on the arrow next to it or double-clicking on the label.

Expand Mice and other pointing devices by clicking on the arrow next to it

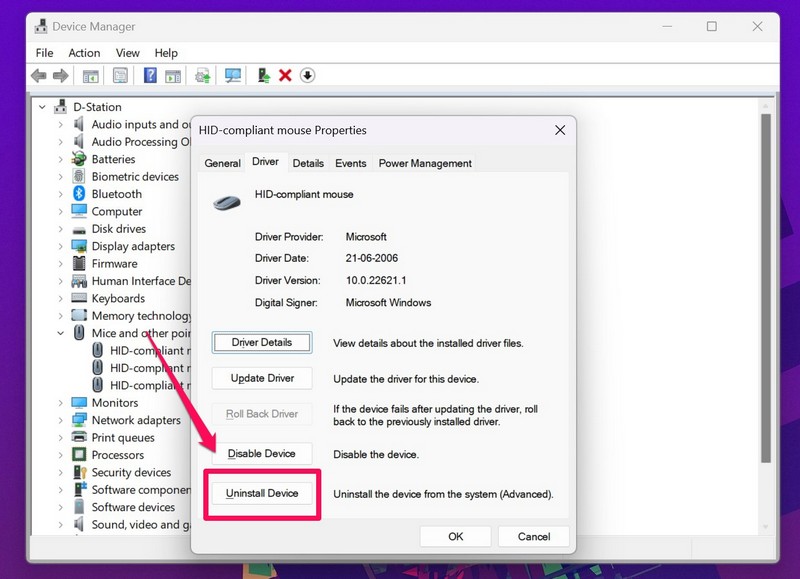
3. Right-click on Dell Touchpad and select Properties.

Right-click on Dell Touchpad and select Properties | Fix Dell Touchpad Not Working

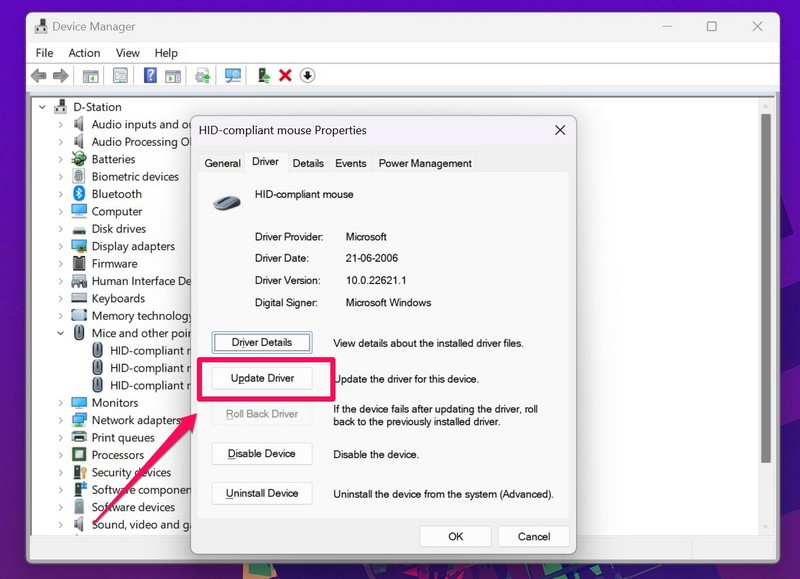
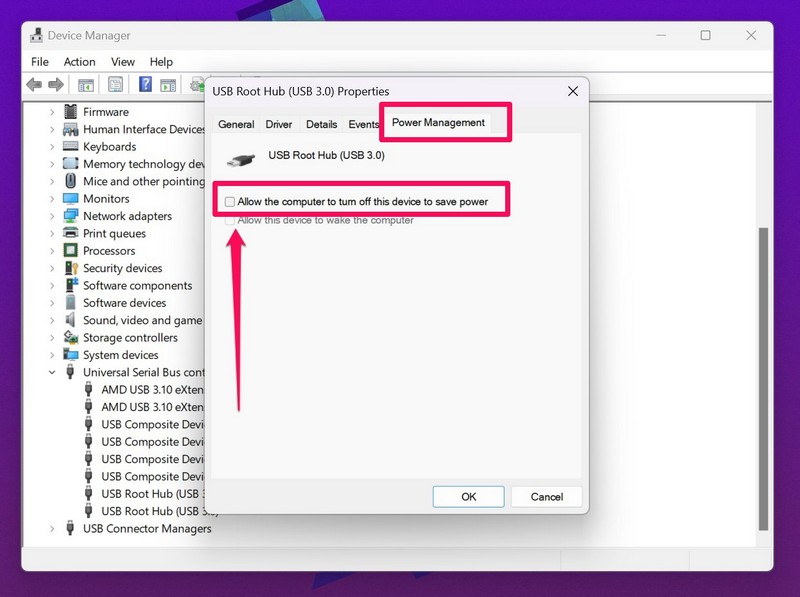
4. Switch to the Driver tab of the Dell Touchpad Properties window.

5. Click on the Uninstall driver button to uninstall any corrupt or outdated driver software you might be running.

Click on the Uninstall driver button to uninstall any corrupt

6. Now, click on the Update Driver button.

Click on the Update Driver button
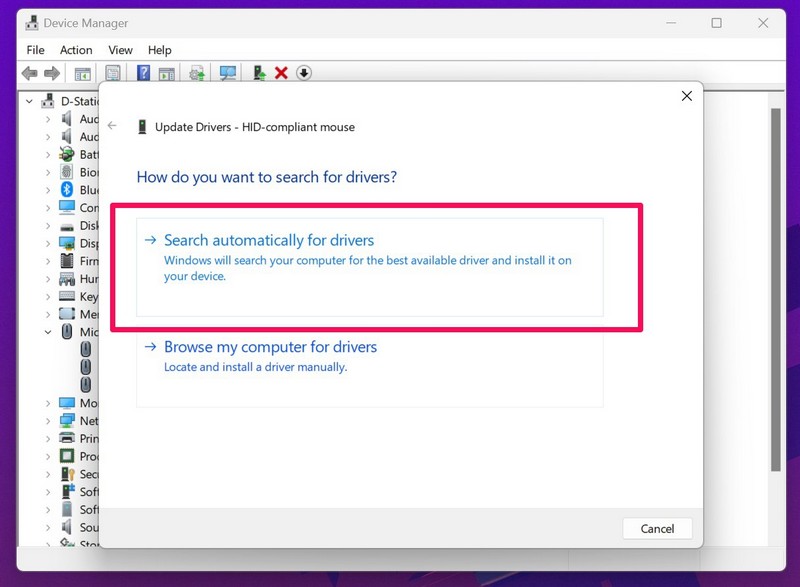
7. In the following window, choose

Search automatically for updated driver software.

Choose Search automatically for updated driver software

You can also manually download the latest and the most updated drivers for your Dell touchpad through Dell’s website. To download touchpad drivers manually:

1. Open your preferred web browser and search for your ‘Dell laptop model Driver Download’. Do not forget to replace the laptop model with the model of your laptop.

2. Click on the very first link to visit the official driver download page.

Click on the very first link to visit the official driver download page

3. Type Touchpad in the textbox under Keyword. Also, click on the drop-down menu under the Operating System label and select your OS, system architecture.

Type Touchpad in the textbox and select your OS, system architecture

4. Finally, click on Download. You can also check the version number and last updated date of the drivers by clicking on the arrow next to the Download Date. Once downloaded, extract the file using the built-in Windows extracting tool or WinRar/7-zip.

5. Follow steps 1-6 of the earlier method and this time select browse my computer for driver software.

Select browse my computer for driver software | Fix Dell Touchpad Not Working

6. Click on the Browse button and locate the downloaded folder. Hit Next and follow the on-screen instructions to install the latest touchpad drivers.

Click on the Browse button and locate the downloaded folder. Hit Next

Alternatively, you can also install the drivers by simply pressing on the .exe file and following the on-screen prompts.

Method 7: Update Touchpad Drivers (Automatically)

You can also choose to automatically update your touchpad drivers using a third party application. Sometimes it is impossible to find the correct driver version for a certain laptop model. If that’s the case for you or you simply don’t wanna go through the hassle of manually updating drivers, consider using applications like Driver Booster or Driver Easy. Both of them have a free as well as a paid version and boost a long list of features.

Thanks for Reading...

Masud Rana

Sunday, July 30, 2023

How to Boot into Safe Mode in Windows 11 or Windows 10

 How to boot into Safe Mode with Networking


Safe Mode starts Windows in a basic state, using a limited set of files and drivers. If a problem does not happen in Safe Mode, this means that the default settings and basic device drivers are not causing the issue. Observing Windows in Safe Mode enables you to narrow down the source of a problem, and can help you troubleshoot problems on your computer.

There are three different types of Safe Mode boot options that are available in the Advanced Boot Options.

  1. Safe Mode - Starts Windows with the minimum of drivers and services possible.
  2. Safe Mode with Networking - Same as Safe Mode, but adds the network drivers and services you must access the Internet and other computers on your network. You also use this mode if you use devices such as a USB flash drive.
    NOTE: Wireless (Wi-Fi) Internet connection is not supported in safe mode with networking.
  3. Safe Mode with Command Prompt - Same as Safe Mode but the Command Prompt as the user interface instead of the windows desktop Graphical User Interface (GUI).

Cause

In Safe Mode, Windows has reduced functionality. The task of isolating problems is easier since many nonessential components are disabled, such as sound, third-party drivers and services, nonessential Windows services, and more. Corrupt software, drivers, or the installation of poorly configured software prevents Windows from successfully booting into normal mode.

Resolution

Boot into Safe Mode from Windows 11 or Windows 10

  1. Press the Windows + I on the keyboard to open Settings.
    • If that does not work, click Start and then select Settings.
  2. Click Update & Security and on the left pane select Recovery.
  3. Under Advanced Startup, click Restart Now.
  4. After the computer restarts, on the Choose an Option screen, select Troubleshoot > Advanced Options > Startup Settings > Restart.
  5. After the computer restarts, a list of options appears. Select 4 or F4 to start the computer in Safe Mode. If you must use the Internet, select 5 or F5 for Safe Mode with Networking.

Boot into Safe Mode from the sign-in screen in Windows 11 or Windows 10

  1. Restart the computer.
  2. At the sign-in screen, hold the Shift key down and then click Power > Restart.
  3. After the computer restarts to the Choose an Option screen, select Troubleshoot > Advanced Options > Startup Settings > Restart.
  4. After the computer restarts, a list of options should appear. Select 4 or F4 to start the computer in Safe Mode. If you must use the Internet, select 5 or F5 for Safe Mode with Networking.

Boot into Safe Mode from outside of Windows 11 or Windows 10

Windows 11 and Windows 10 automatically boot into the Windows Recovery Environment (WinRE) if Windows fails to start three times in a row. Three consecutive failed attempts trigger this action. Booting to Safe Mode outside of Windows is achieved in the Windows Recovery Environment (WinRE).

Follow these steps to enter Safe Mode from the Windows Recovery Environment (WinRE):
  1. At the Choose an option screen, select Troubleshoot.
  2. At the Troubleshoot screen, select Advanced Options.
  3. At the Advanced Options screen, select Advanced Startup Options.
  4. Select Startup Settings.
  5. Select Restart.
  6. The computer restarts and enters the Startup Settings menu. Select 4 or F4 to start the computer in Safe Mode. If you must use the Internet, select 5 or F5 for Safe Mode with Networking.
Thanks for Reading...
Masud Rana

How to Fix Right-Click Not Working in Windows 11

 Much like how you might not realize how significant the handy copy-paste functionality in Windows is until it stops working, you might not realize the same when it comes to the right-click menu or the context menu in Windows. Microsoft released its newest firmware for PCs and laptops in the form of Windows 11. However, after upgrading to the latest platform, many users have reported that the right-click is not working on their PCs and laptops.

So, if you are one of the few users who are experiencing the right-click not working in Windows 11 issue on their PCs and laptops, you have come to the right place. In this in-depth guide, we will discuss some of the best fixes for the right-click not working issue in Windows 11. Stick around to find out more!

Fix Right-Click Not Working in Windows 11

Now, when we usually press the right mouse button on any screen in Windows 11, the OS is designed to show a pop-up context menu with shortcut actions like copy, paste, new, and others. However, for some users, the context menu is not opening with the right-click on their Windows 11 PCs and laptops.

Below you can find some of the top solutions that could fix the right-click not working issue in Windows 11 with just a few clicks. Be sure to try them all out on your device one by one to see which one works for you.

1. Restart Your Windows 11 PC or laptop

Oftentimes, system-level issues such as the right-click not working issue could arise due to conflicts with background applications or processes. In this case, a quick restart of your Windows 11 device can help you resolve the right-click not working issue as a restart force-closes all the running apps and processes in Windows, and also clears out the RAM.

windows 11 restart ss

So, head over to the Power options menu in Start and hit the Restart button to perform a quick restart of your Windows 11 PC or laptop. Following the restart, check whether the right-click not working issue is fixed or not.

2. Check Your Hardware and Connection

If restarting your PC or laptop did not fix the right-click not working issue in Windows 11, check the physical mouse that you are using and test whether or not the right mouse button is actually broken. If you are using a wired mouse, check the connection points and see if they are properly inserted.

And if you are using the touchpad on your laptop, check for touchpad damage as well. In the case of Bluetooth-enabled, wireless mice, you might want to reconnect your mouse to your Windows 11 PC or laptop to check if it fixes the right-click not working issue.

3. Check the Touchpad Settings in Windows 11

Now, if you are using a Windows 11 laptop, chances are that you single-tap with two fingers to open the context menu. So, if you see that the right-click gesture is not working via the touchpad of your Windows 11 laptop, you might want to check the Touchpad settings on your device.

In Touchpad settings in Windows 11, you have to make sure that the Tap with two fingers to right-click option is enabled. Follow the steps right below to enable that on your laptop:

1. Use Windows + I to launch the Settings app on your Windows 11 laptop.

2. Under the Bluetooth & devices tab on the left nav bar, click the Touchpad option.

touchpad settings windows 11 1

3. On the following page, click the Taps section to expand it and make sure that the checkbox for Tap with two fingers to right-click is marked.

touchpad settings windows 11 2

Now, you can use the two-finger gesture to open the right-click context menu on your Windows 11 laptop.

4. Restart Windows Explorer in Windows 11

The Windows Explorer background process is an essential operation that is responsible for handling various system functions such as JPG and PDF previews. Hence, minor issues in the Windows Explorer background process can cause the right-click not working issue on your device.

In this case, follow the steps below to restart the Windows Explorer process in Windows 11 and hopefully, fix the right-click not working issue on your device:

1. Use the Ctrl + Shift + Esc shortcut to launch the Task Manager in Windows 11.

2. Click the Processes tab on the left navigation bar.

Restart windows explorer ss 2

3. Search for Windows Explorer using the search bar.

Restart windows explorer ss 3

4. Select the said Windows Process and click the Restart task button above.

Windows Explorer restart

After that, close the Task Manager window and check whether the context menu is showing up or not when you right-click.

5. Update the Mouse Driver in Windows 11

Outdated drivers for the mouse that you are using can also cause issues like right-click not working in Windows 11. In this case, you can update the mouse driver on your PC or laptop to get rid of unwanted bugs and glitches that could be causing the said issue. Follow the steps below to update the mouse driver on your Windows 11 PC or laptop:

1. Use Windows + X to open the Quick Links menu in Windows 11.

2. Click on Device Manager to open the program.

Command Prompt not working driver update ss 1

3. In the Device Manager window, click the arrow beside the Mice and other pointing devices option to expand it.

4. Now, double-click on your primary mouse driver.

Mouse driver select windows 11

5. Go to the Driver tab and click the Update Driver button.

Update Mouse driver windows 11

6. Select the Search automatically for drivers option in the following window.

update mouse driver windows 11 ss 4

7. Wait for Windows to automatically install the latest available updates.

8. Restart your Windows 11 PC or laptop.

6. Re-Install the Mouse Driver in Windows 11

If updating the mouse driver on your Windows 11 PC or laptop did not fix the right-click not working issue, the next thing you can try is to reinstall the driver on your device. Follow the steps right below to do that:

1. Open the Device Manager in Windows 11 as explained in the previous method (Fix #5).

Command Prompt not working driver update ss 1

2. Expand the Mice and other pointing devices section and double-click on your primary driver.

Mouse driver select windows 11

3. Under the Driver tab, click the Uninstall Device button.

Uninstall Mouse driver windows 11 1

4. Confirm your action on the following prompt.

Uninstall Mouse driver windows 11 2

5. Wait for Windows to uninstall the driver.

6. Restart your Windows 11 PC or laptop.

Following the restart, Windows 11 will automatically detect the hardware change in the system and will re-install the mouse driver. So, after restarting your device and logging into Windows, check whether the right-click not working issue in Windows 11 has been fixed or not.

7. Run the Bluetooth Troubleshooter in Windows 11

Now, if tweaking the mouse driver in Windows 11 did not help fix the right-click not working issue, you might want to run the Bluetooth troubleshooter in Windows 11. This solution, however, is applicable only to those who are using a Bluetooth-enabled, wireless mouse with their PC or laptop as it resolves Bluetooth-related issues in Windows 11. So, follow the steps below to run the Bluetooth troubleshooter in Windows 11:

1. Use Windows + I to launch the Settings app in Windows 11.

2. Under the System tab on the left nav bar, go to the Troubleshoot menu.

Windows 11 troubleshoot windows store apps ss 1

3. Click the Other troubleshooters button on the following page.

Windows 11 troubleshoot windows store apps ss 2

4. Next, click the Run button beside the Bluetooth option.

Troubleshoot bluetooth windows 11 ss

5. Wait for the troubleshooting process to complete and make the suggested changes, if there are any.

6. Restart your Windows 11 PC or laptop.

Following the restart, check whether the right-click not working issue with your wireless mouse has been fixed or not.

8. Change Power Management Settings for USB Root Hub in Windows 11

Now, unlike the above fix that is only applicable to wireless mouse users, this fix is exclusive to those using wired mice. In this solution, you can change the power management settings of the root USB hub on your Windows 11 device to try and fix the right-click not working issue. Follow the steps right below to do that:

1. Launch the Device Manager in Windows 11 as explained in Fix #5.

Command Prompt not working driver update ss 1

2. Now, click the arrow beside the Universal Serial Bus Controller option to expand it.

3. On the list, find the USB Root Hub (USB 3.0) option and double-click to open its properties.

USB Root Hub power management windows 11 1

4. Go to the Power Management tab on the top nav bar and uncheck the box for Allow the computer to turn off this device to save power.

USB Root Hub power management windows 11 3

5. Click the OK button to save the changes.

USB Root Hub power management windows 11 2

6. Restart your Windows 11 PC or laptop.

9. Run SFC Scan in Windows 11

For system issues such as the right-click not working issue in Windows 11, the System File Checker scan, popularly known as the SFC scan, can be really helpful. The SFC scan is essentially a command-line tool that scans the system file directory on your PC or laptop and replaces corrupt or missing system files.

So, if the right-click not working issue is being caused by issues in system files, the SFC scan can actually fix it. Follow the steps right below to run it on your Windows 11 device:

1. Use Windows + S to open Windows search and search for cmd.

2. Click the Run as administrator button for the Command Prompt tool on the search results page.

copy paste not working sfc scan ss 1

3. Click Yes on the following User Account Control prompt.

4. In the Command Prompt window, type in the following command and press Enter:

sfc /scannow
copy paste not working sfc scan ss 2

5. Wait for the scan to complete.

6. Restart your Windows 11 PC or laptop after completion.

10. Run DISM Scans in Windows 11

If the SFC scan did not work for you, try the Deployment Image Servicing and Management scan in Windows 11 to try and fix the right-click not working issue. The DISM scans are a set of SFC scan-like command-line tools that helps resolves issues in Windows disk images. Hence, these scans can also fix the right-click not working issue. Follow the steps right below to run the DISM scans in Windows 11:

1. Open the Command Prompt tool as an administrator as explained in the previous solution (Fix #9).

copy paste not working sfc scan ss 1

2. Once the tool opens, type in the following commands and press Enter one by one:

DISM /Online /Cleanup-Image /CheckHealth
DISM /Online /Cleanup-Image /ScanHealth
DISM /Online /Cleanup-Image /RestoreHealth

Note: Do not run the above commands simultaneously in Command Prompt.

copy paste not working DISM scan ss 1

3. Wait for the scans to complete.

4. Restart your Windows 11 PC or laptop.

11. Scan for Viruses/ Malware in Windows 11

Other than issues in system files, hardware, and misconfigured settings, the right-click not working issue can also arise due to viruses and malware residing in your system. In this case, you can use the built-in Windows Security tool to scan your Windows 11 PC or laptop and remove the threat actors that might be causing the issue. Follow the steps right below to do that:

1. Use Windows + I to open Windows Settings.

2. Go to the Privacy & security tab on the left nav bar and click the Windows Security option.

Command Prompt not working windows security ss 1

3. Next, select the Virus & threat protection option.

Command Prompt not working windows security ss 2

4. Click the Quick scan button on the following page to initiate the scan.

copy paste not working windows security ss 3

5. Wait for the scan to complete.

Note: You might have to remove/ uninstall third-party applications that contain the threat actors.

6. Restart your Windows 11 PC or laptop.

12. Update Windows 11

Now, if all the above methods fail to fix the right-click not working in Windows 11 issue on your device, you are probably running an outdated Windows version. In this case, a minor bug or glitch can cause issues like right-click not working and a quick update could fix that right away. So, follow the steps right below to update your Windows 11 PC:

1. Use Windows + I to launch Settings in Windows 11.

2. Under the Windows Update tab on the left nav bar, click the Check for updates button.

copy paste not working windows updates ss 2

Note: You must be connected to an active internet network at this point.

3. Once the updates show up, click the Download and install button to install them on your device.

4. After the update process is complete, restart your Windows 11 PC or laptop.

Following the restart, the right-click not working issue in Windows 11 should be fixed on your device.

FAQs

Why is the right-click not working on my Windows 11 laptop?

The right-click not working issue is quite common amongst Windows 11 users and can be caused by a variety of factors, including damaged hardware, outdated drivers, misconfigured settings, issues in system files, and a few others.

How to enable right-click on my Windows 11 laptop?

On Windows 11 laptops, you can go to the Touchpad settings under the Bluetooth & devices tab and check the box for Tap with two fingers to right-click option. This way you can use the two-finger tap gesture on your laptop touchpad to open context menus in Windows 11.

How to open context menus without right-click in Windows 11?

If the right-click is not working on your Windows 11 PC or laptop, you can use the left click to select the file, app, or link for which you want to open the context menu. With the relevant app or file selected, press the Shift + F10 shortcut on your keyboard to open the context menu without right-clicking.

Wrapping Up

So, this was all about fixing the right-click not working issue on Windows 11 PCs and laptops. Try all the above-listed solutions on your device and let us know in the comments which one worked for you in fixing the right-click not working issue on your Windows 11 device. You can also check out similar guides to fix other Windows 11-related problems on your PC or laptop using the link right here!

Dell XPS 13 Battery Replacement

If your Dell XPS 13 (also known as Dell XPS 13 Infinity Edge Ultrabook or Dell XPS 13 Skylake) has   lost its ability to hold a charge , you...